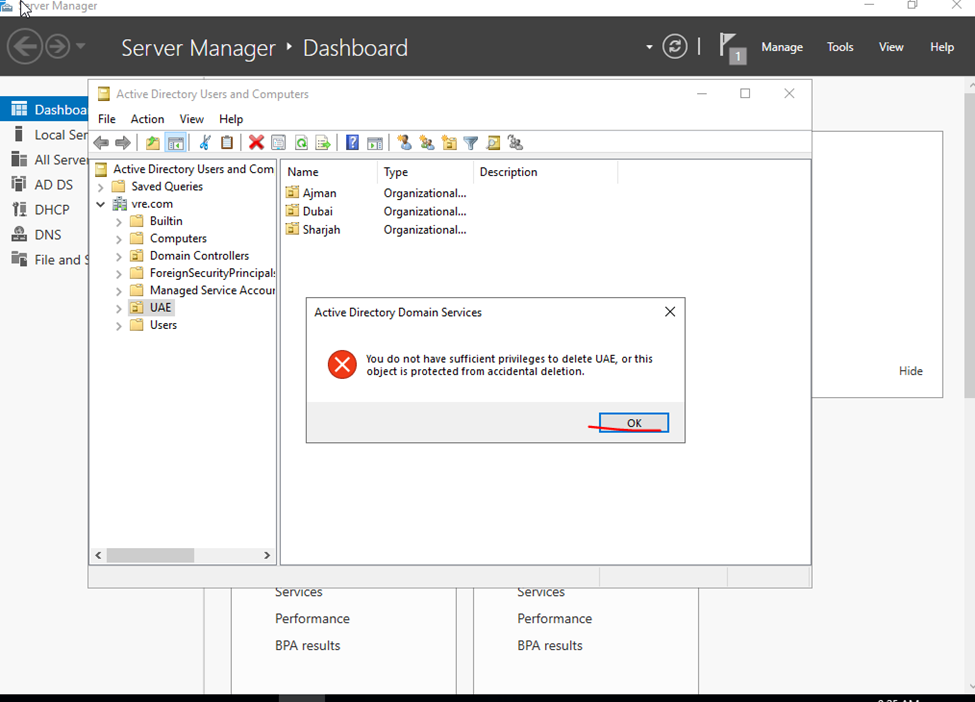
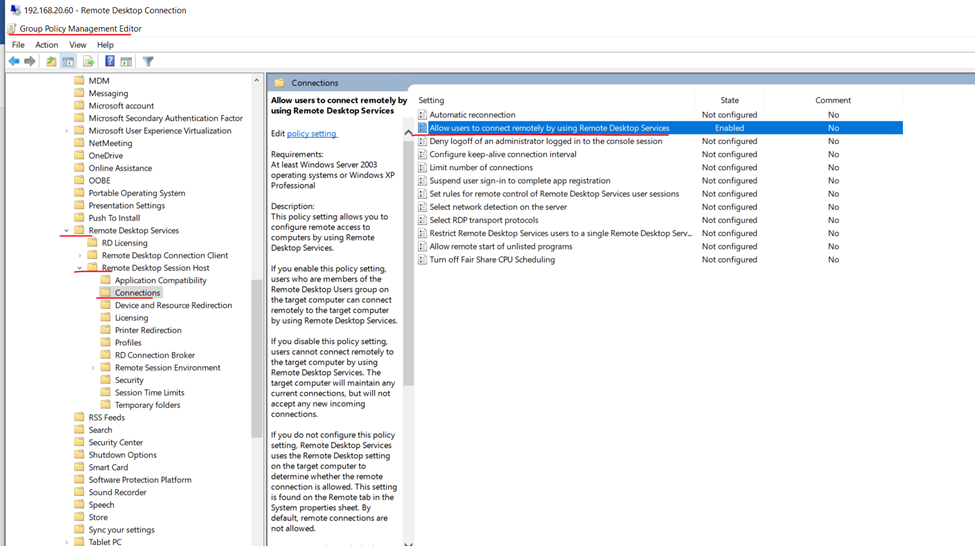
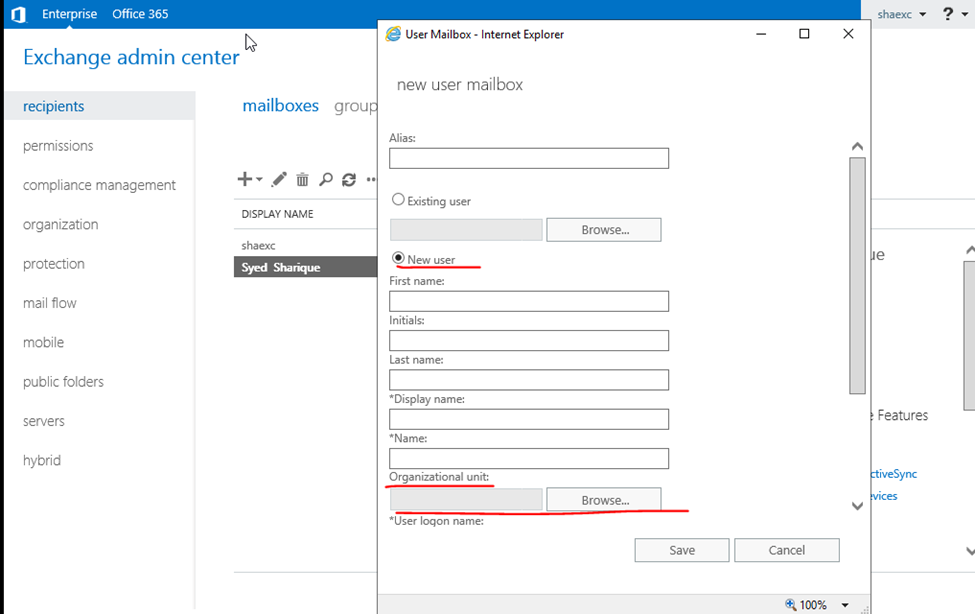
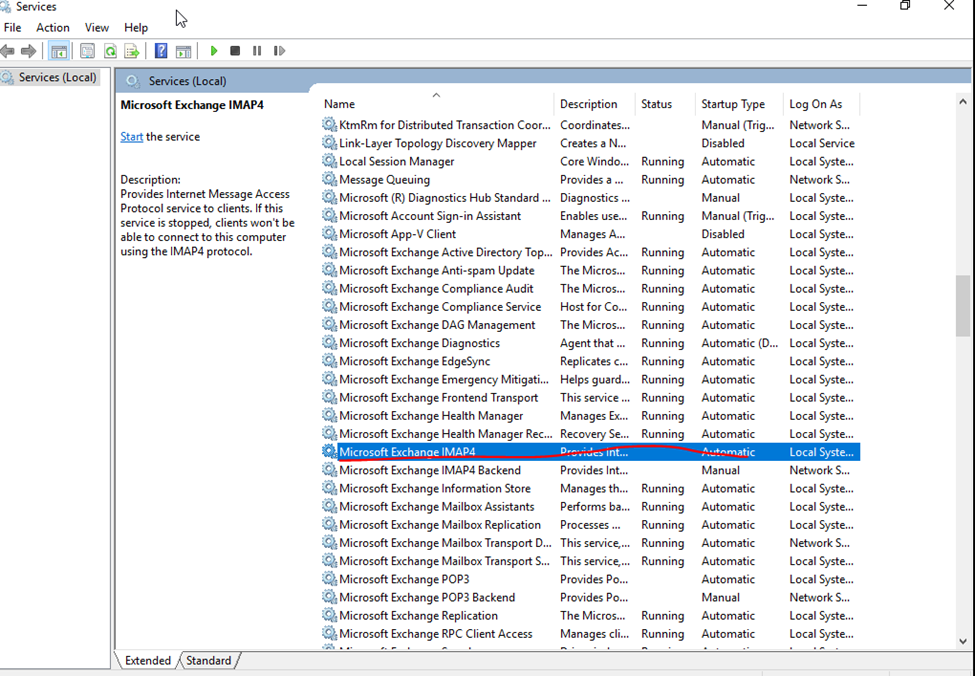
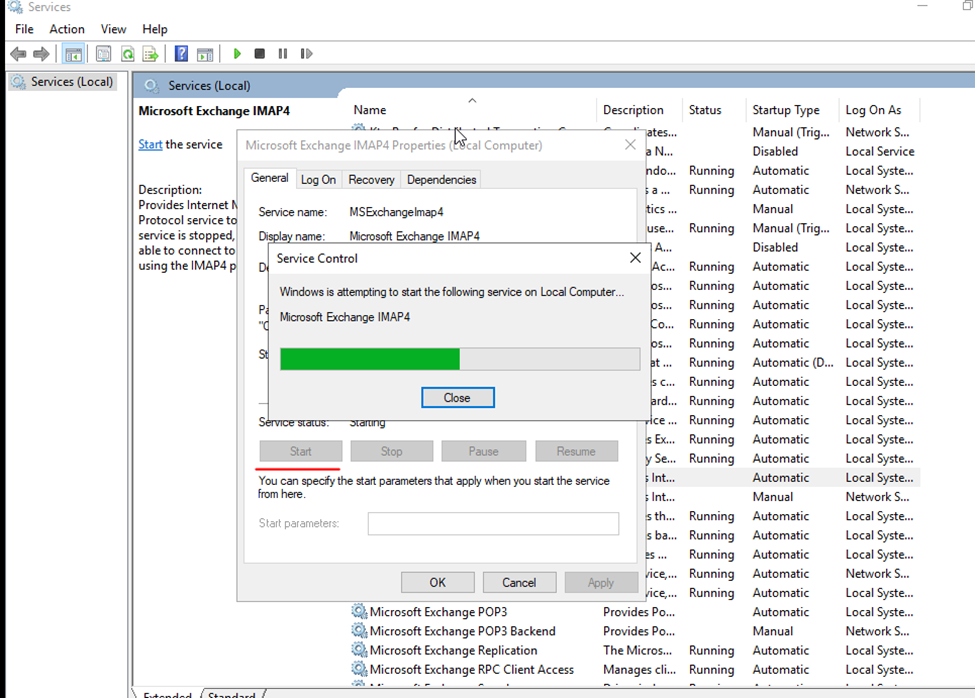
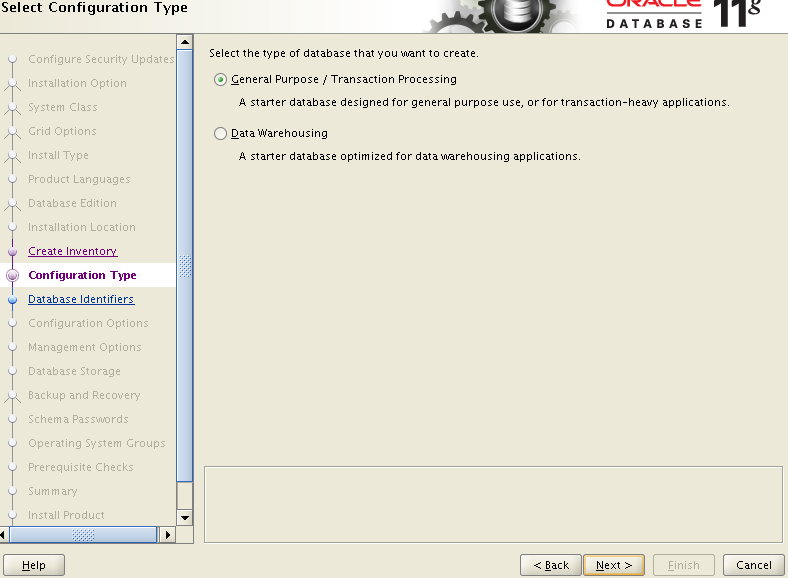
Here I am selecting customize installation process
Now need to install required components
Click to install
Installation started
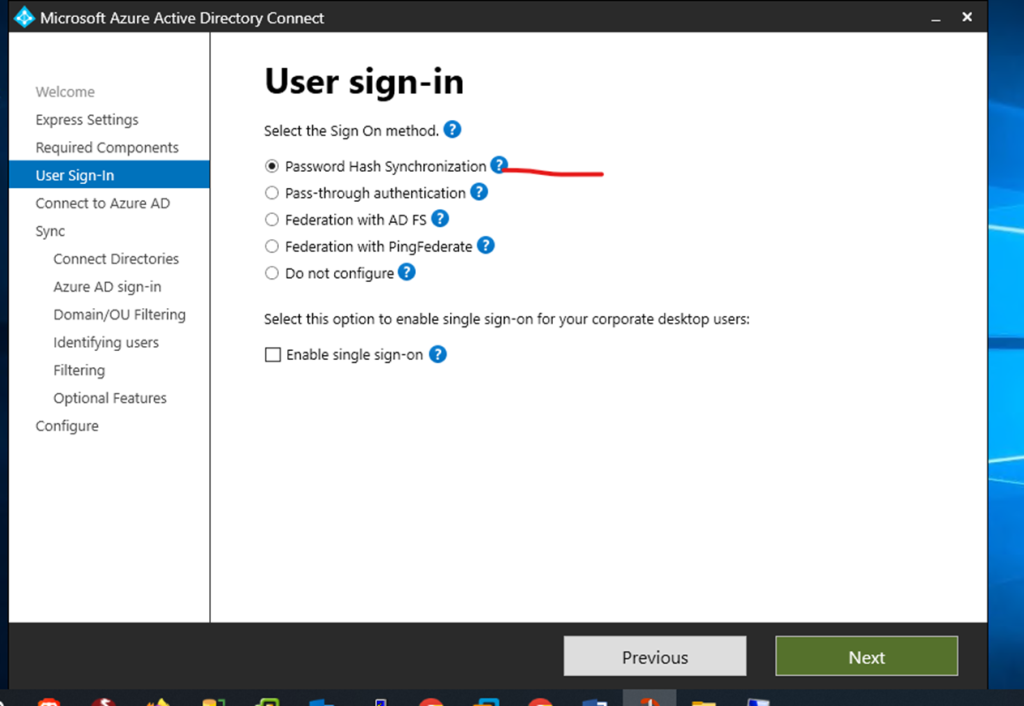
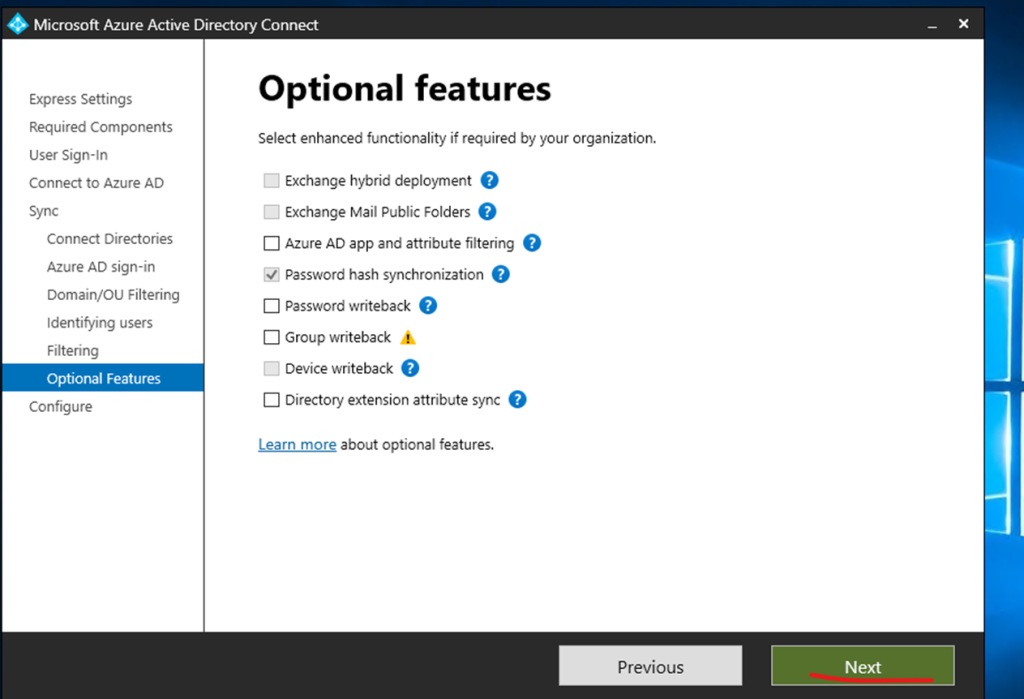
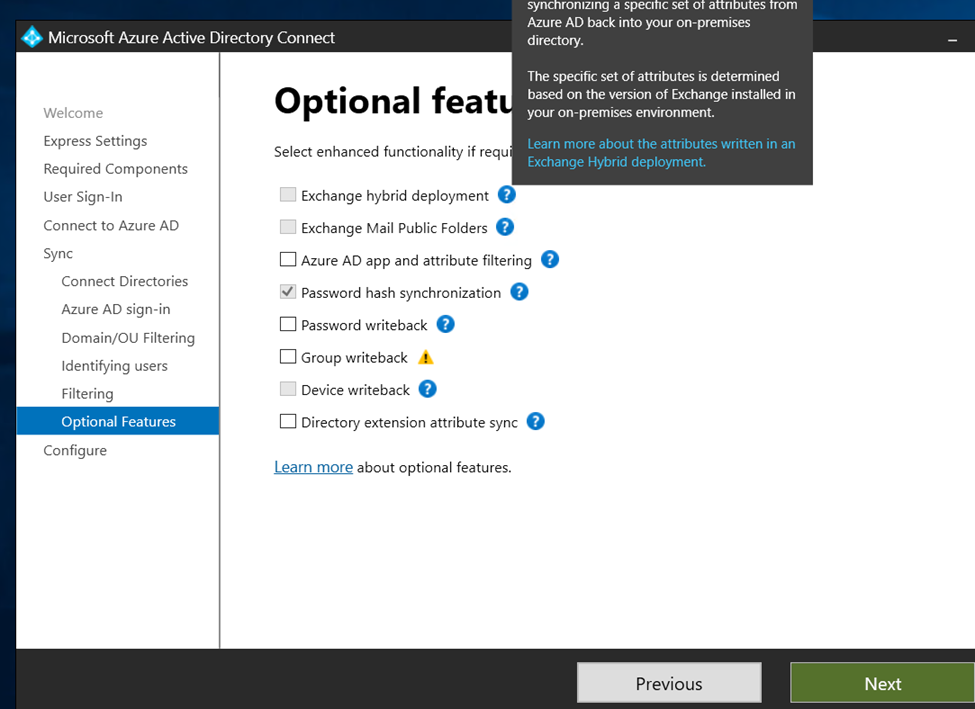
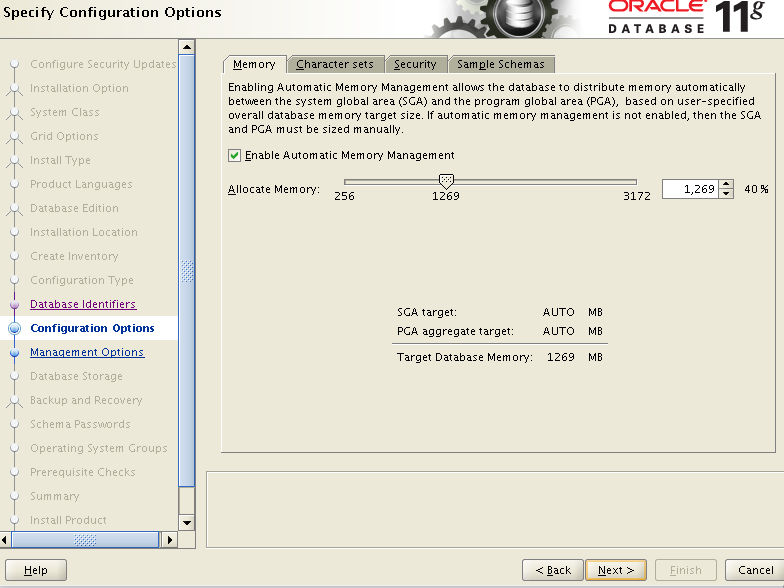
Have selected password hash
Converting passwords into unreadable strings of characters that are designed to be impossible to convert
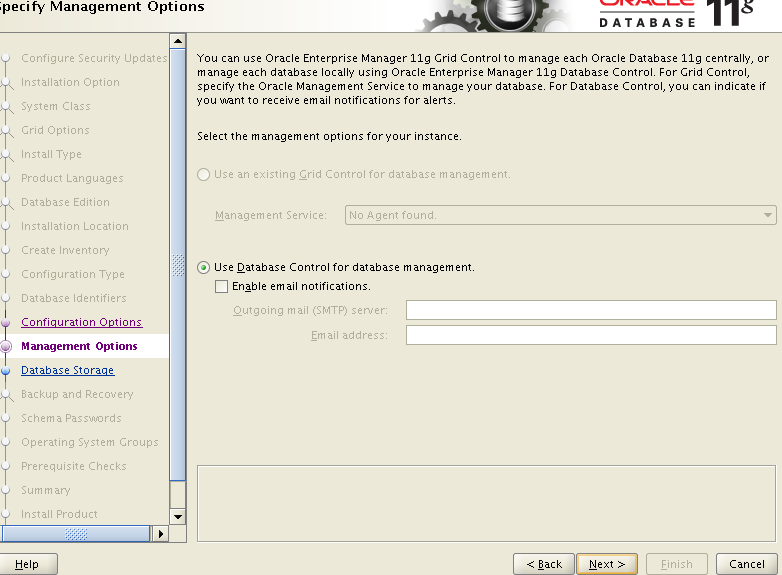
Click to next step
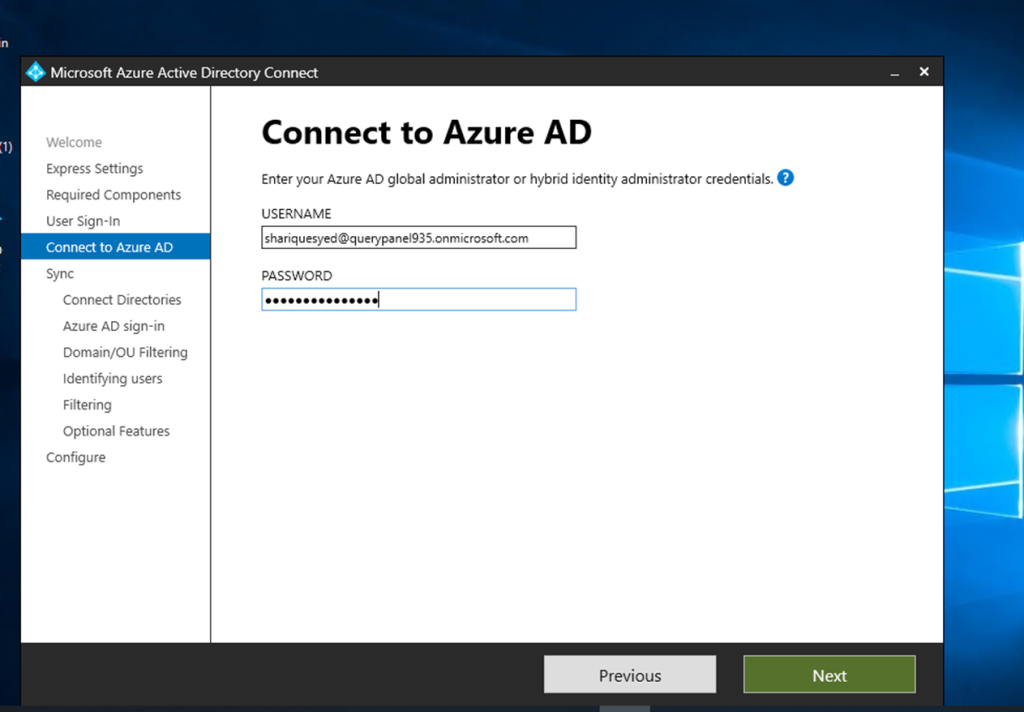
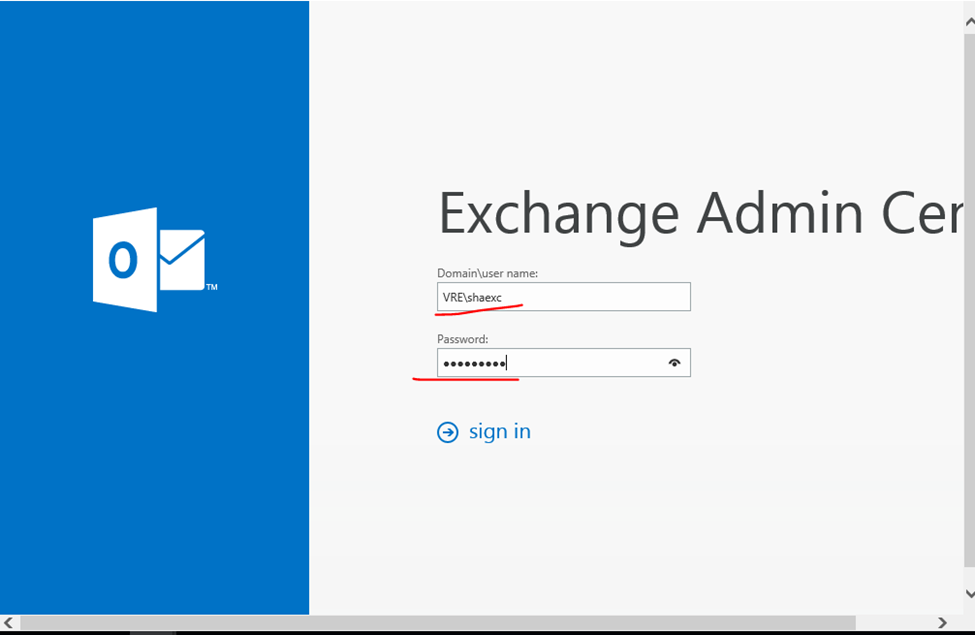
Admin user and password required and click next
Again required admin user credentials
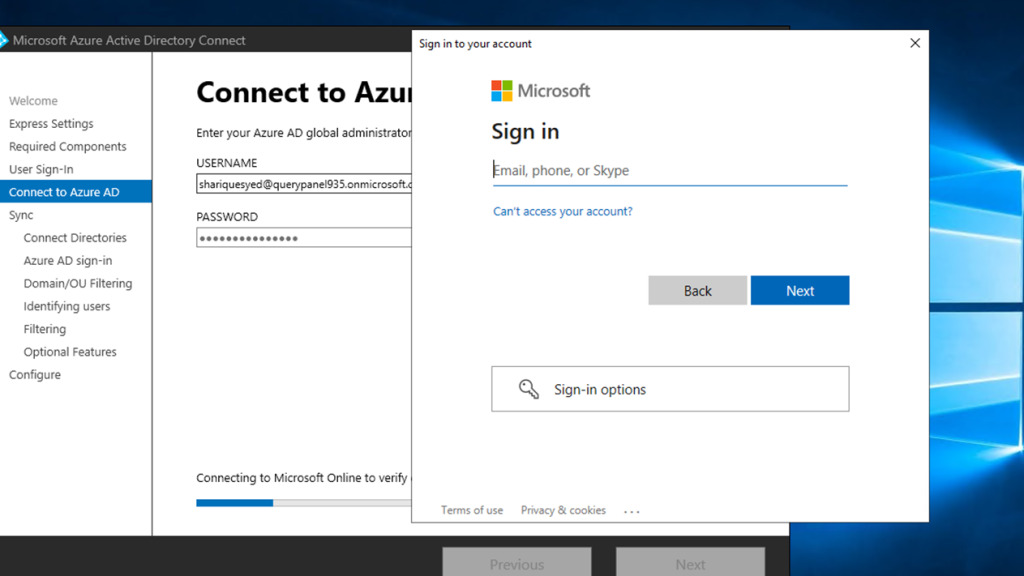
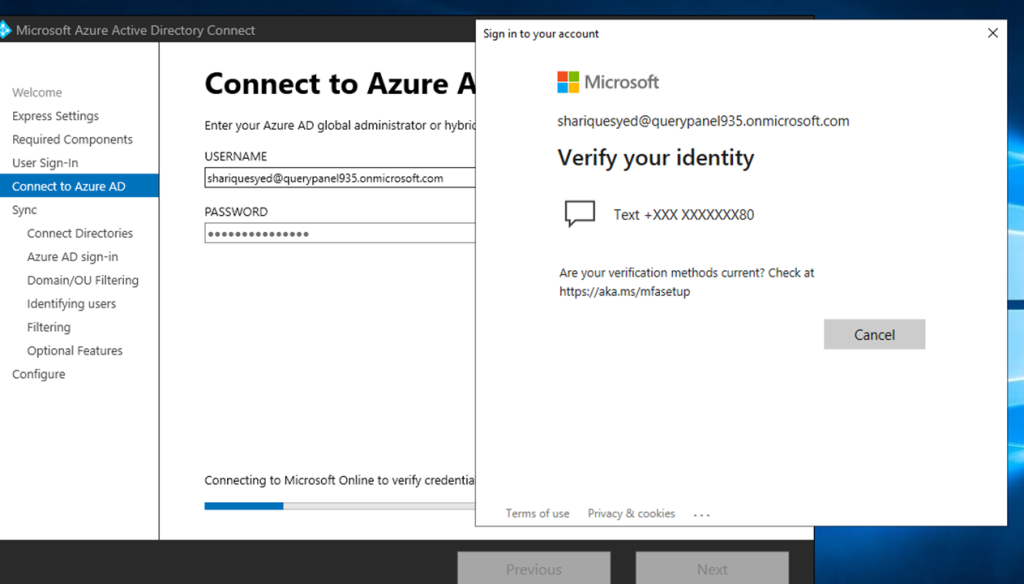
Verification
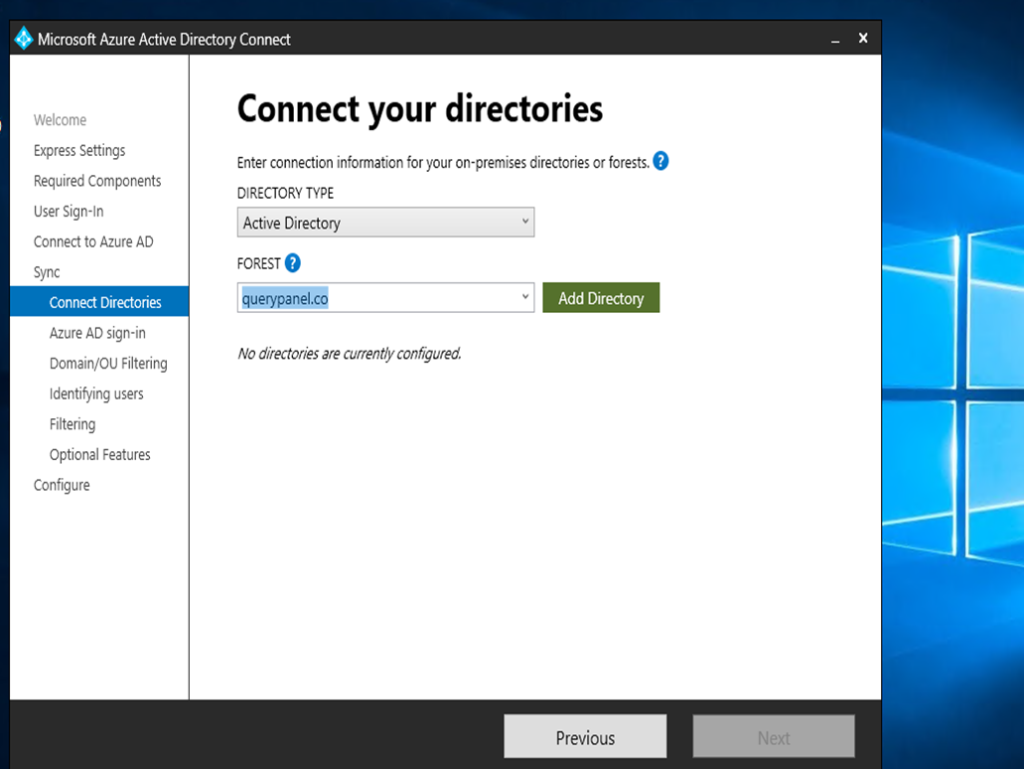
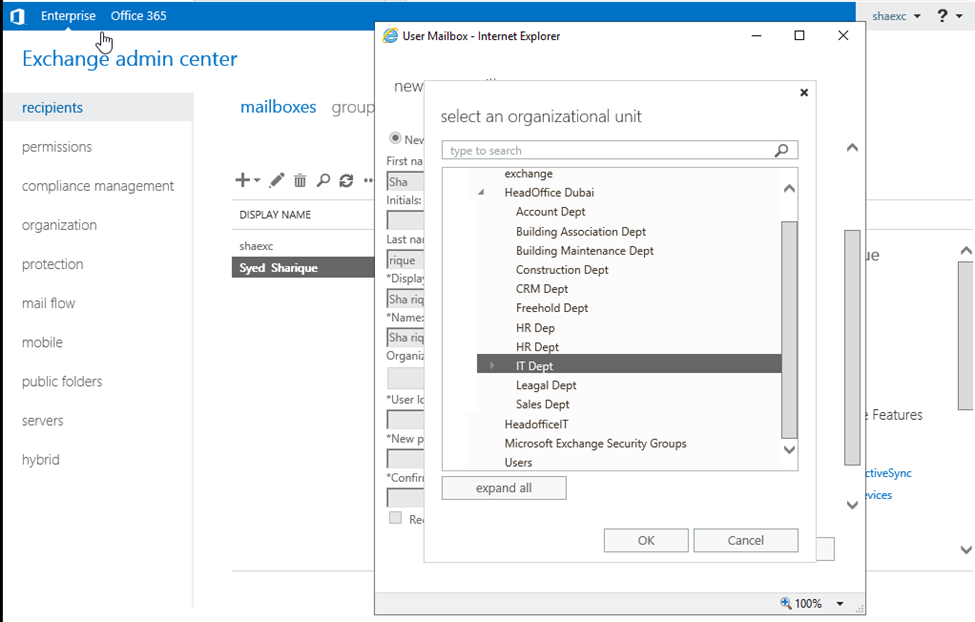
Select domain and click to add directory
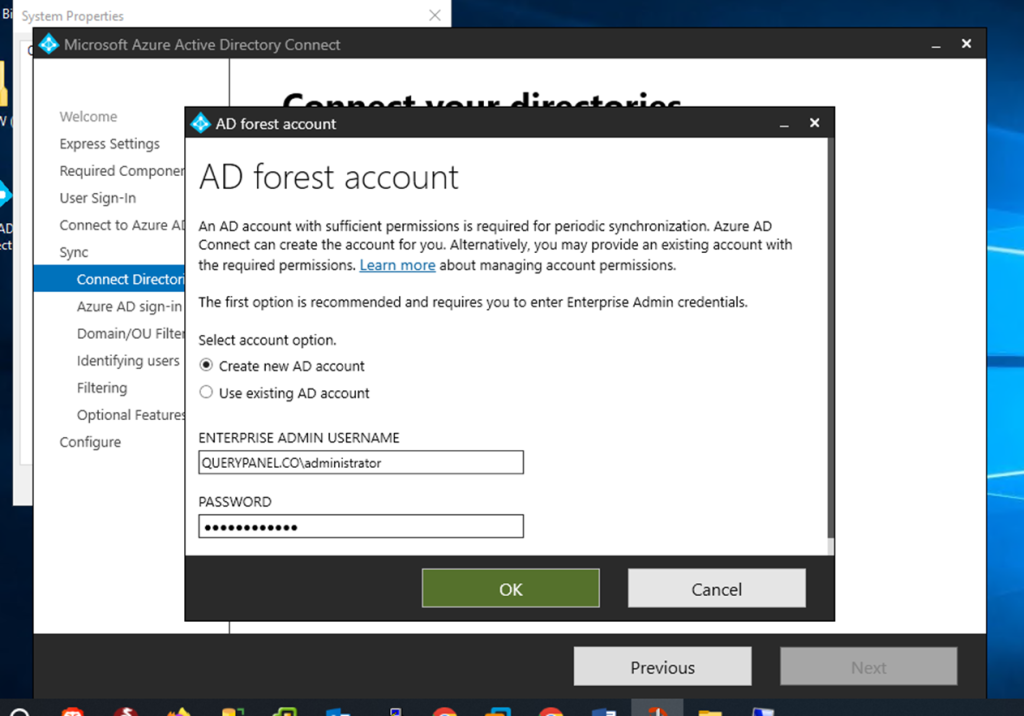
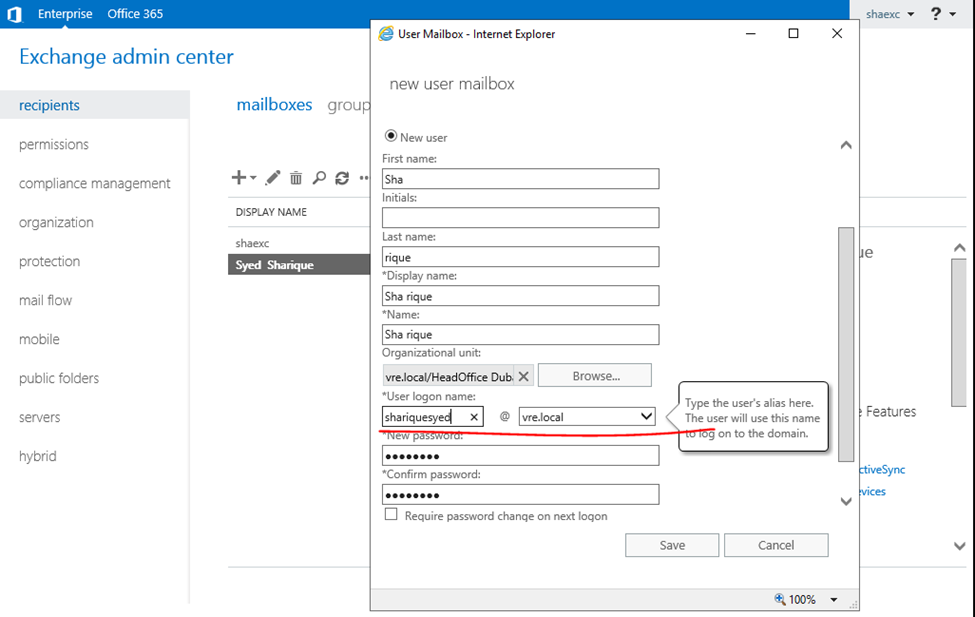
Now enter on premises admin username and password
Active directory added click to next
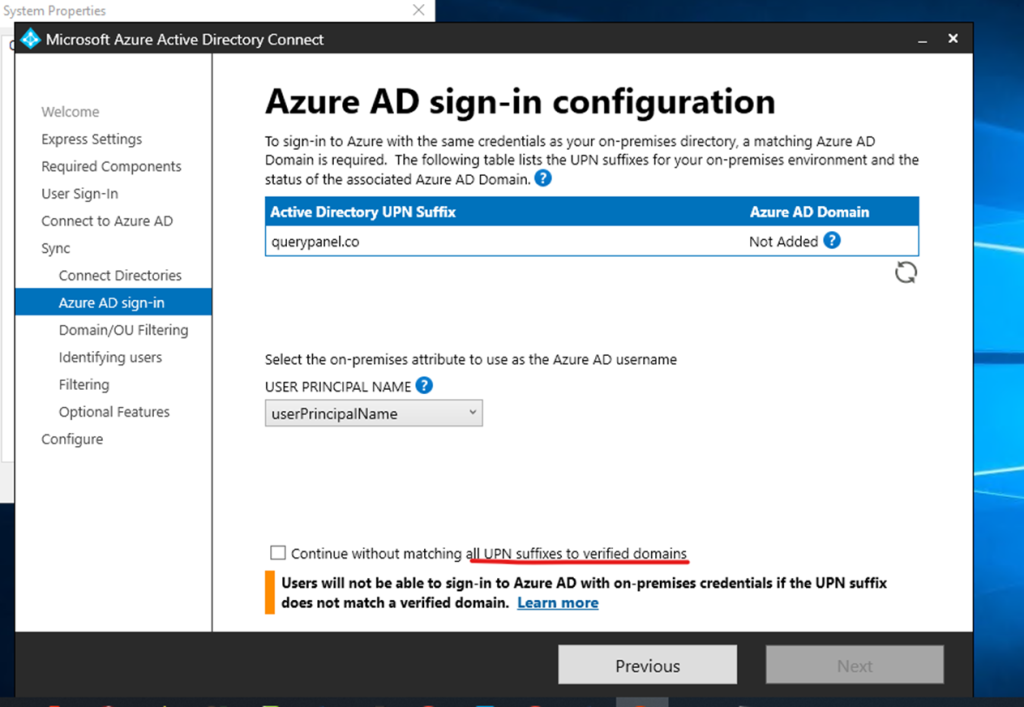
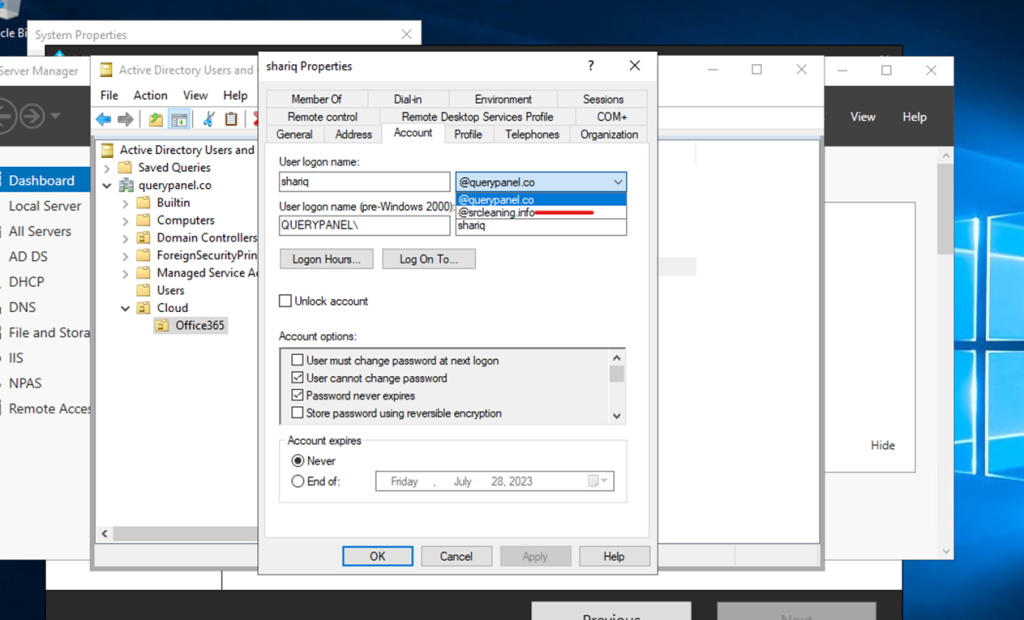
Now need to create UPN Suffixes
User Principal Name (UPN)? In Microsoft Active Directory, a User Principal Name (UPN) is a username and domain in an email address format. In a UPN, the username is followed by a separator “at sign” (@) followed by the active directory’s internet domain. An example UPN is shariq@querypanel.co.
Go server manager
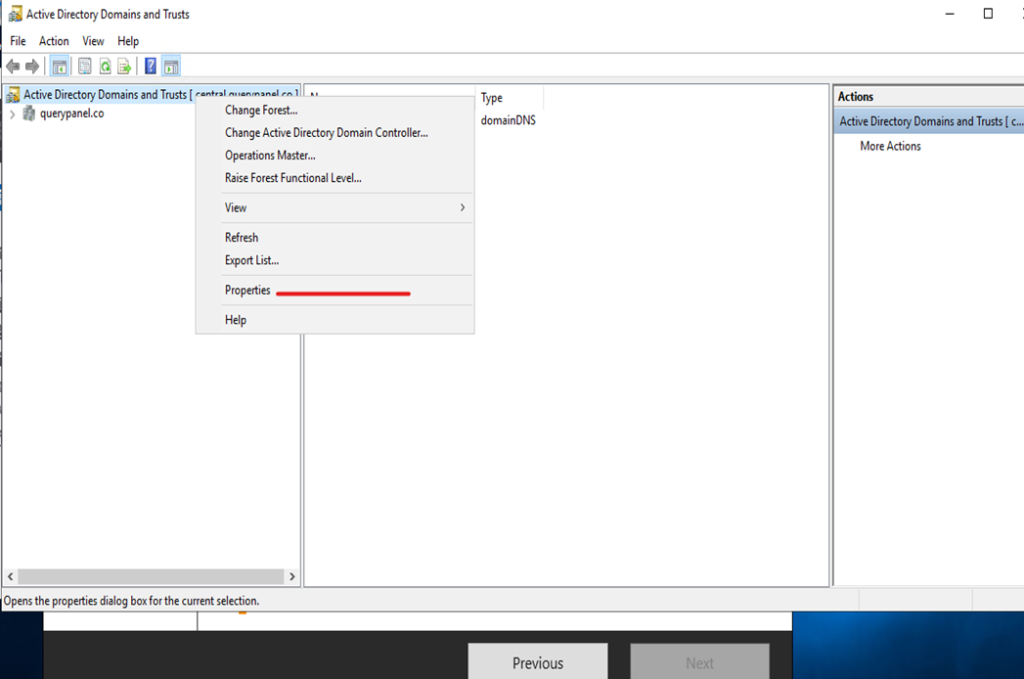
Click to active directory domain and trust
Click on domain and trust go to properties
UPN Suffixes click to add domain and apply
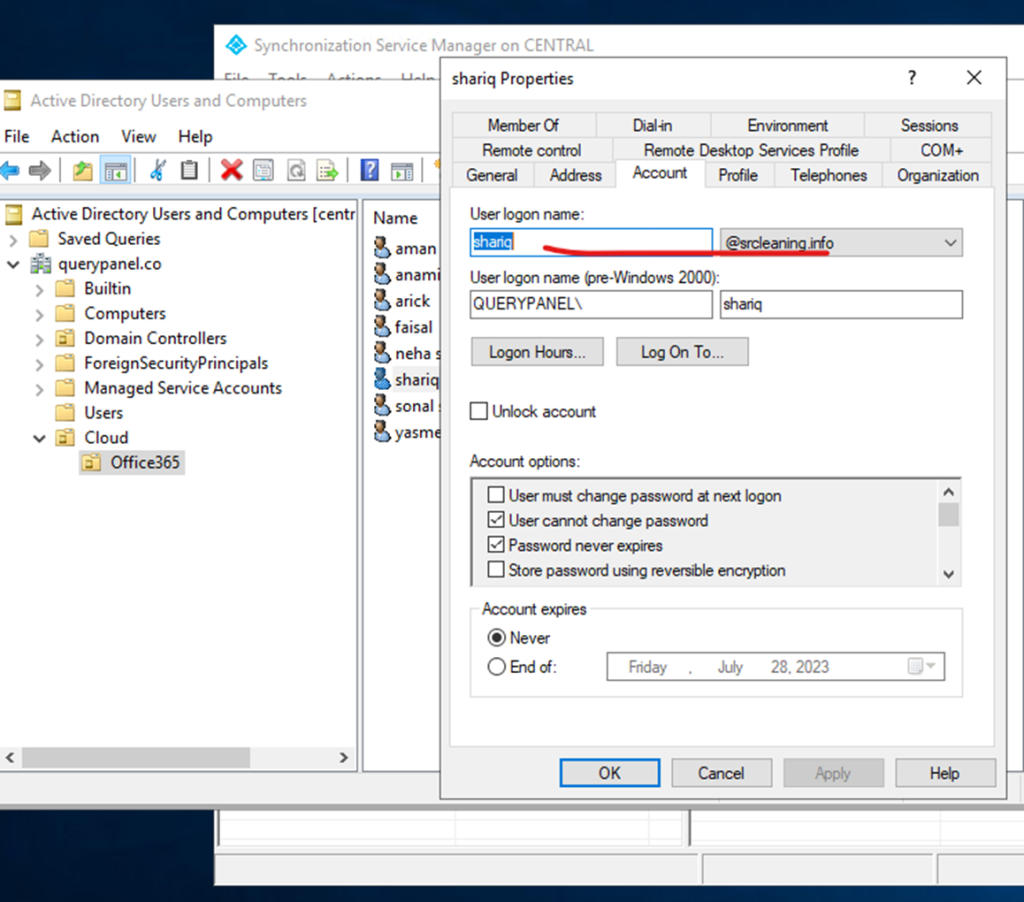
After creating upn suffixes getting multiple domains
Select domain suffixes
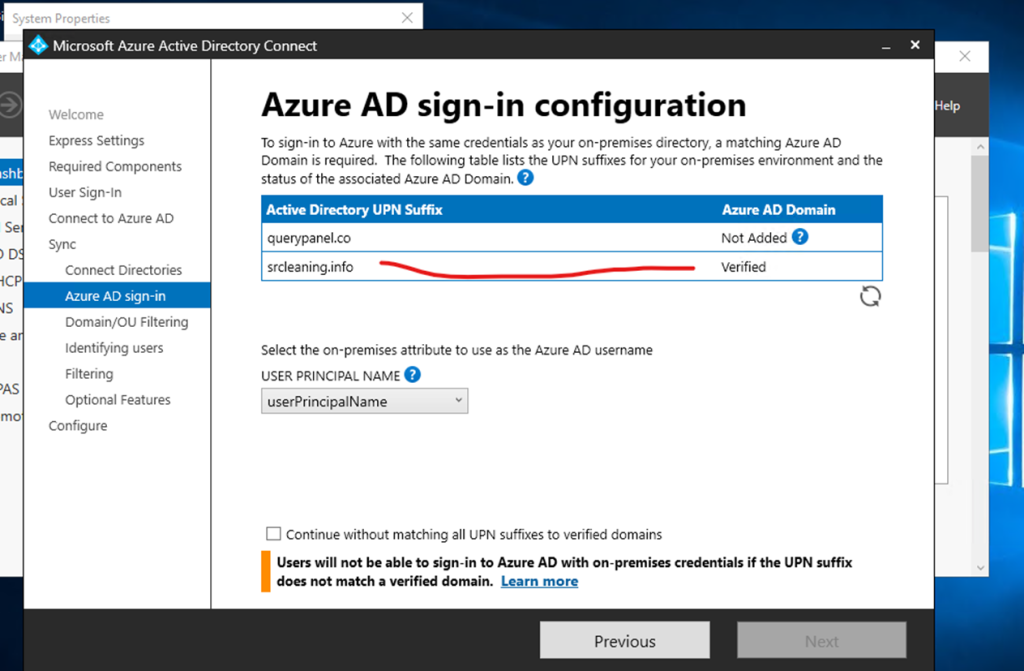
If you can check here office 365 domain is verified
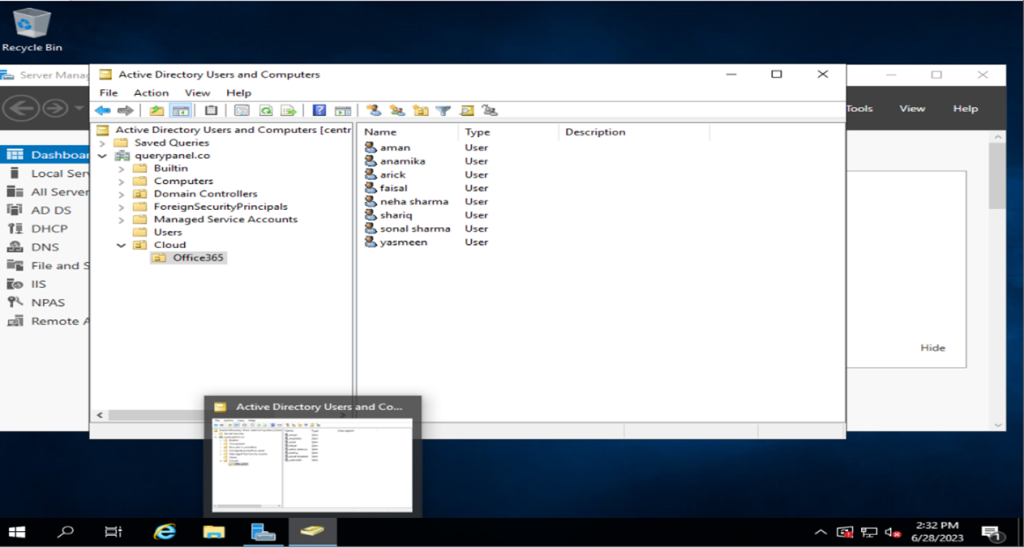
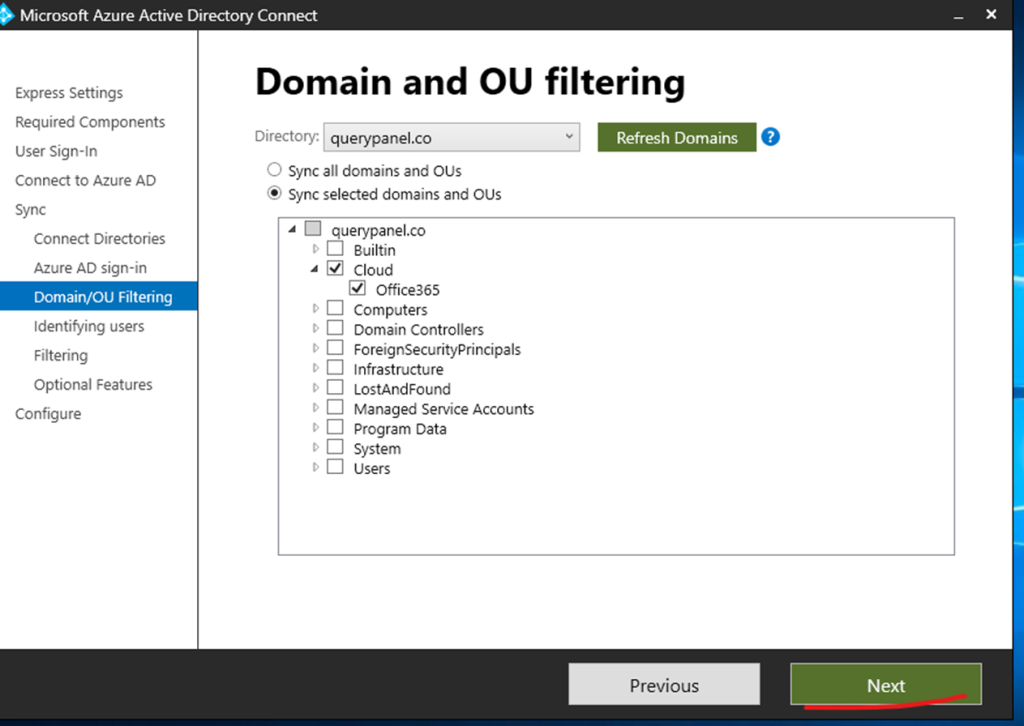
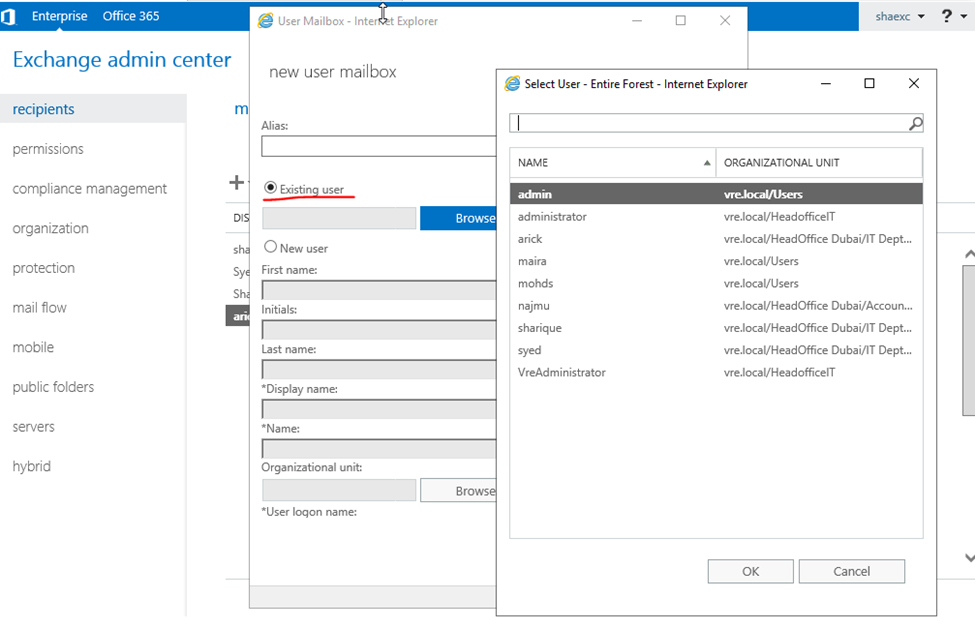
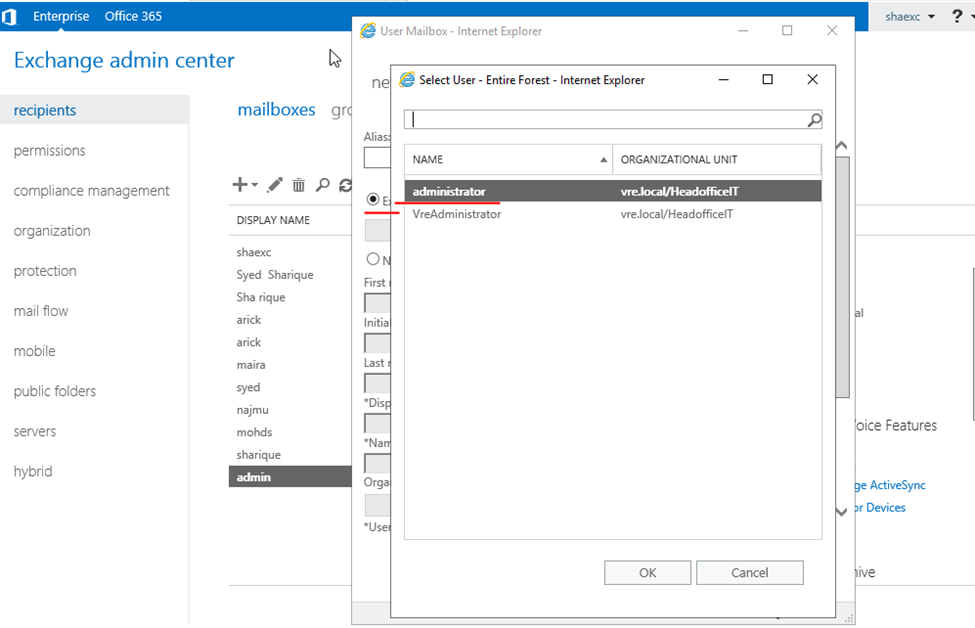
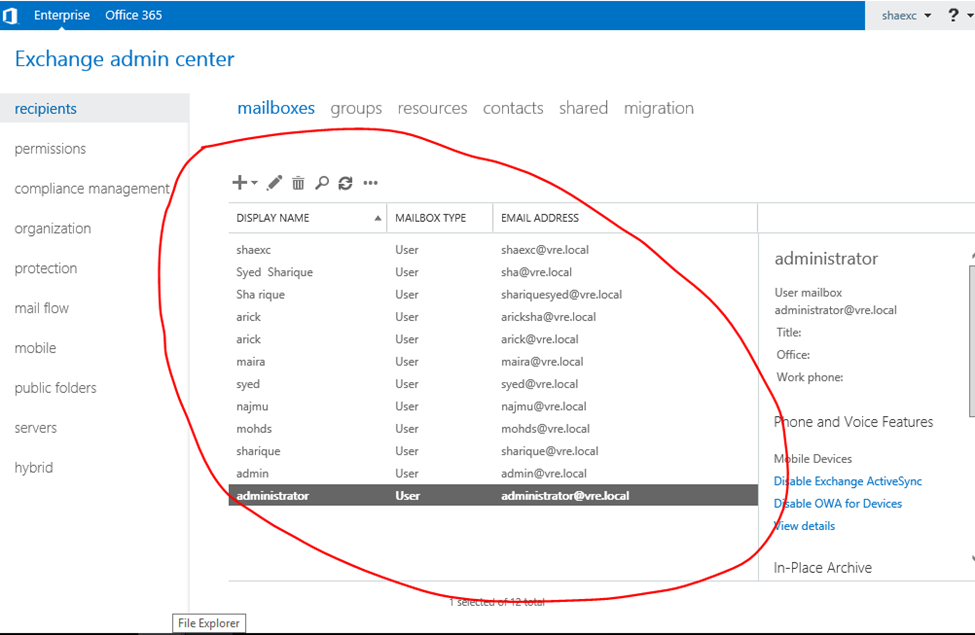
Here selecting the 365 cloud user from OU click to next
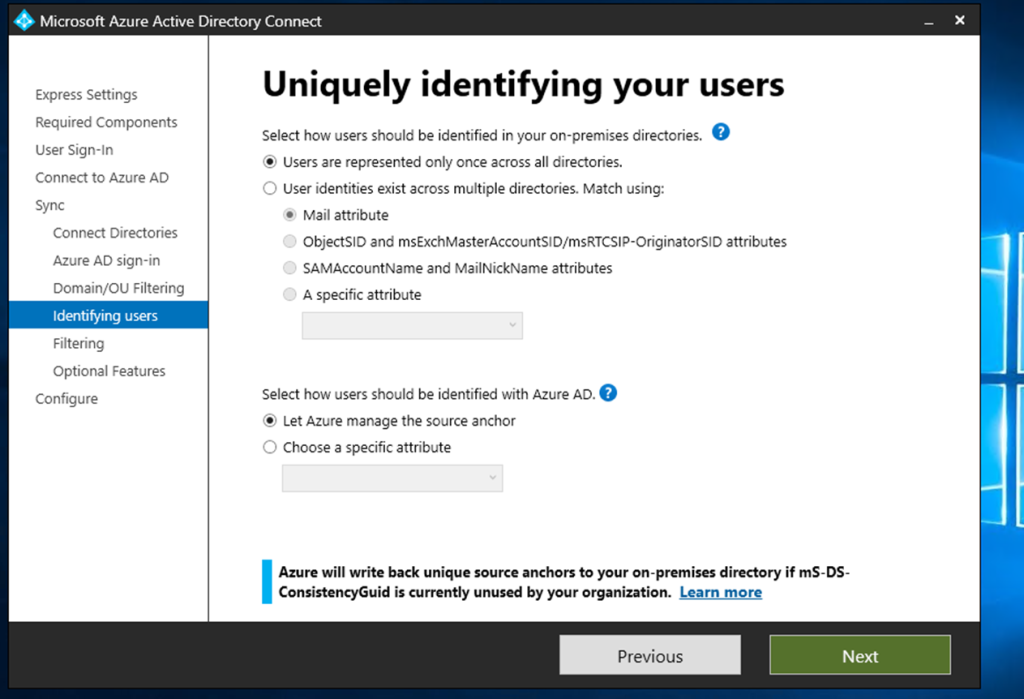
User identification click to next
Optional features click to next
Now click to install
Configuration completed
Click to exit and checking the synchronization status
Synchronization status office 365
Synchronization status page
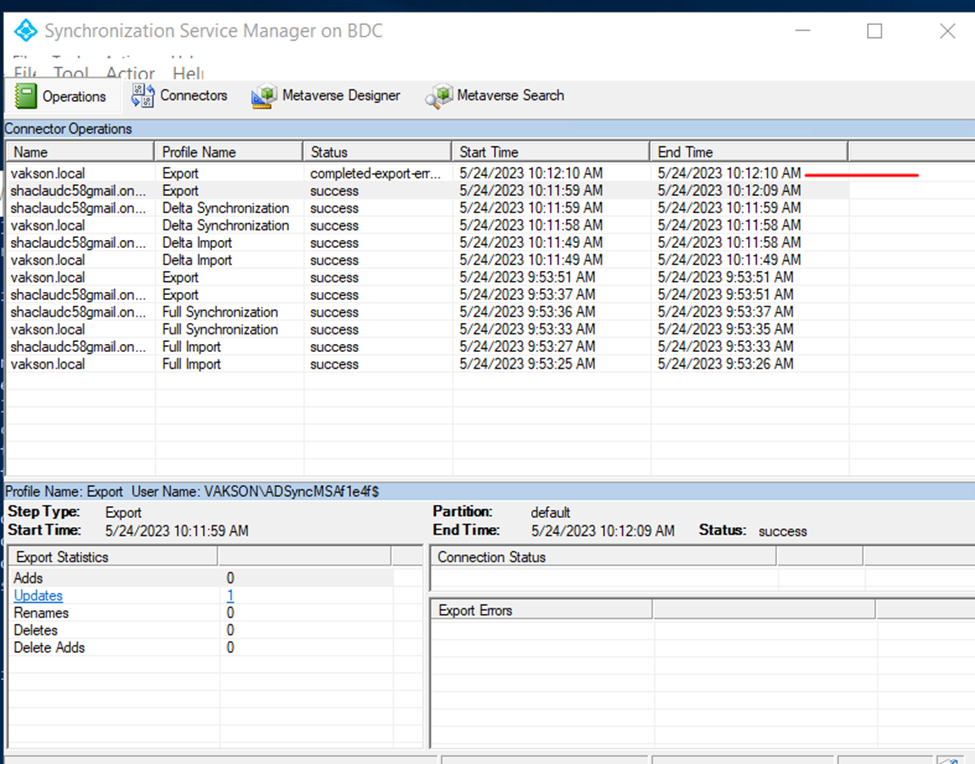
Open Synchronization service manager
Start powershell for force to sync on premises to 365 normal 30 minutes auto sync
FSMO Roles: FSMO roles is a feature in Active Directory
FSMO roles is dependent on Replication.
Flexible single master operation is a method active directory method for replication active directory tasks.
Microsoft introduced flexible single master operation (FSMO) roles in 2003.
Introduced because if Primary DC is down no changes could be made until it will up again.
Once we have install active directory it’s automatic available to Active directory.
FSMO roles give the confidence that Active directory working perfectly
FSMO having 5 Roles:
1: SCHEMA Master.
2: Domain Naming.
3: PDC Emulator.
4: RID Master.
5: Infrastructure Master.
Note: Before starting it need to understand Replication.
Replication type:
a. intrasite replication
b. intersite replication
a. intrasite replication –it’s replicate 24*7 – its also called as live replicate
b. intersite replication — replication between domain to domain call as intersite replication – replicate time between 1 tree to another tree is 180 Minutes.
intersite replication taking maxmix 180 Minutes to replicate between each other.
Fsmo role: divided into two categories:
1. forest wide fsmo roles
a) schema master – perform the Read write copy and user login operations of active directory ,Managing attributes, its try to avoids conflict between trust domain users
Example: if we create same user 2 both domain and tree it will automatic delete 1 user from domain between 180 Minutes.
b) Domain Naming – responsible to take care of not to create any same name domain and child domain, managing domain creating modification or deletion.
2. Domain wide fsmo roles
a) PDC Emulator – if password changed it will replicate to pdc – Password Authentication/Failure control by PDC Emulator.
DFS is a method or a process to increase the consistency of Shared file server.
DFS in a Windows Server Infrastructure & DFS Replication
It’s difficult to recall all file server in Infrastructure so, Microsoft implemented Distributed file server.
DFS is a technology to manage multiple shared files from single server but actually DFS picked the data from original location.
Distributed File System- (DFS) – DFS is a Windows Server feature which allows System Administrators to create a single namespace to provide a replicated sharing infrastructure across the network.
Here I am going to explain how to install DFS in your Infrastructure.
Select which wins server you wanted to become Primary File shared server.
Go to windows server
Open windows server manager.
Click to add roles and features
Installation will be on Role Based feature-based installation
—Steps
Install Distributed File System from server Manager
Start DFS from tools
Create new Namespace server
Again, create new namespace server inside created namespace server
Create new folder inside namespace
Add folder target for replication jobs
—
Select DFS Replication and Namespace
Once selected click too next
DFS is ROLES based installation.
And roles added make all default installation.
(We need to Install DFS Roles on all File Server which will be associate with Main File Server.
Like example: I am having Primary Server I need to associate all my file server will associate with Primary server with the help of DFS ACTUALLY file server will be on his original location but they act like hosted with primary server.
)
Check the features leave as default and click too next
Now click to install
Once installation done click to tools
Now close wizard after installation done
Now click to tools and select dfs
Once DFS Wizard open click to namespace primary file server and create new namespace
Enter the host namespace server so, primary server will be hosting browse primary server
Once select server name click to next
Time the Shared file name edit permission setting click to custom permission add users and apply
Now select domain based namespace
And click to create namespace
Once done close wizard
Now adding the file server to primary server inside the created namespace
Right click on created namespace and add new namespace server
Browse file server machine name and assign permission and click to ok
Click ok Wizard
Namespace server having two now
So, now need the target folder right click and click new target folder
File Server Directory
Click to folder right click and select to folder target
Browse the target folder and select that
Once selected click okay
Replication job verification click yes
Once replication wizard change the replication name or leave as default
Now click to next
Primary member
Topology
Click to next
Now click to create replication job
Created successfully
Replication one server to another server
Now here I am checking and sharing File Server using Secondary Server (Because I don’t want to share my Primary server’s name to Infrastructure users).
Here: I am having all data to my primary server but just using to replicate and hide my primary server details to users.
Start DFS in Secondary server
Assign user permission
Domain based name space
Now click to create
Namespace created close the wizard
Right click to created namespace and create new namespace to created server
Browse server
So now here NEW namespace server creating behalf of bdc server
Namespace server status
Namespace servers
Now creating the folder
Browse the shared folder and select that
Selected folder
Click okay
Created folders
Now select the folder and add the replication target
Select the folder target
Now click okay
Now replication job will be created
Once replication started here configure it
Again, click to next
Select the primary server
Select full mesh
Schedule bandwidth
create replication job
Created replication job
Directory Structure
using DFS useful for even security complete hide the Directory Structure
Domai:Domain is a Group of Resource specfic by the name. Domain is a method to organize a group with a name. Domain is a resource management process which can be assign by the name and associated with the Internet Protocal IP Adress.
Domain is the address of Website like public domain and private domain example: hotmail.com/gmail.com — it’s a domain but it’s associated with IP Address.
kinds of domain: Public Domain availability to everyone Example google.com/facebook.com and etc.
Private Domain only authorized users. querypanel.local abc.local or etc
:
Workgroup: workgroup is a method to arrange self contained computers system in any network. workgroup is not connected to any server. workgroup pc is not under centralize management system not having the any security policies.
WORKGROUP Domain collection of self contained computers A workgroup primarily uses a pee to peer networking architecture in which each computer is self-contained, with its user account permissions, memory, and importance. Furthermore, the security of these systems is questionable.
no centralized control over the devices in the workgroup.
Domain group: Domain group is a process to manage Centralize pc and server. a domain controller is used to manage all connected pc server in the domain Group.
Centralize control to all devices over the domain group.
Difference Between work group and domain group:
Workgroup: all system and pc / servers is in the peer connection but there is not any centralize management.
workgroup is also knows as a Individual management system or self control system.
example workgroup: in every pc/server need to assign policies individually. less secure workgroup infrastructure.
Domain: in Domain group a centralize server managing all connected devices like server, pc, printers, switches and etc. Domain Group can set the centralize policies and security and assign the roles as per the profile and requirement.
example: if Domain Admin allow to use the resource then it can be use otherwise they haven’t having access.
Mostly in Offices Infrastructure having Domain Group authentications because we can apply the policies according the IT Protocol.
Antivirus: Antivirus is a software to protect you from unwanted thread.
Example: you can say Antivirus protect individual level protection method it’s protect you according to your Configuration of Antivirus. Antivirus software is the process to detect the virus remove the virus or quarantine virus.
Antivirus: Antivirus is a method to protect your pc from unwanted threat. an antivirus is a individual pc protector. qulity of antivirus dependent on the categories. kinds of antivirus protection: browser surfing protection. software protection disallow unwanted threat safe browsing.
Firewall: A network Security method to keep you safe from non authorize access and packets will receive only authorize and filter access. Firewalls typically work on the network layer and transport layer, some are also capable of working as high as the application layer.
Firewall is a defense system of any network Firewall. Firewall is a security method of any network firewall. firewall always keep you safe Firewall keep prevent from hackers and non authorize access internal and external.
A firewall performs the task of inspecting network activity, looking for cyber threats by comparing data against an extensive catalog of known threats. They can also detect abnormal activity, which may signal a potential threat
Firewall is a two way protection security method or protocol, Firewall used to protect internal threat and external threat.
TYPES OF Firewall protection Hardware device and software. hardware firewall A hardware firewall acts as a gatekeeper and antivirus solution for your server. It sits directly behind the router and can be configured to analyze incoming traffic, filtering out specific threats as they come across the device.
Hardware Firewall Network protection dependent how do you configure your firewall. which security policies you have applied.
Example: I am using PfSense firewall. Linux Kernel Firewall. have configure according to Infrastructure. so, allow traffic disallow traffic. some of the customized good firewall having option to protect IT infrastructure to use Proxy Server.
Firewall is the Gatekeeper of any Network. it’s filter network traffic incoming and outgoing network traffic. Firewall is protector of entire network associated with them.
Firewall: Firewall is used to protect your internal Network from unwanted thread. Firewall is the protector of your internal Network from outside thread. firewall is a two way protection method.
Hardware Firewall protect the entire firewall. implemented on the Router Level to protect the entire network.
firewall only allow authentic traffic and block unwanted traffic.
What can firewall do? Focus on security decision. stop hackers to enter your network and pc. firewall allow which program can access internet. Authentication managed by firewall rules
every operating system having inbuilt software firewall. example: if you are surfing internet you have visited so many sites and application from that site you will not get any thread or any virus software’s.
in simple language you can say a firewall is a protector of your workplace infrastructure in every pc having default windows firewall protector.
one more example: in infrastructure in one pc having virus and thread, so in this scenario firewall will also can deal with internal thread or virus that’s why firewall is a two way protector.
types of firewall.
Hardware: in workplace or home network if you are having hardware firewall enable then hardware firewall will uniquely identify all pc connected and assign network address and cross check browsing
Software Firewall: Software firewall protect the individual computer or single computer.
Microsoft split the responsibilities of a DC into 5 separate roles that together make a full AD system.
FSMO stands for Flexible Single Master Operations. Microsoft Active Directory is by far the most widely used domain authentication service across the globe ever since it was released in 1999 (in Windows Server 2000). Over the decades Microsoft has made many advancements in its Active Directory to transform it into the secure system we are using today.
One of these updates included the introduction of a Single Master Model. In this model- only one domain controller could make the required changes in a domain, while the other DCs would only complete authentication requests.
This model created a single point of failure, which means if the master or primary domain controller goes down, there is no way to make changes to the domain until the master DC is back up.
To remediate this issue, Microsoft separated the responsibilities of a DC into multiple roles. The administrators could then assign these roles to multiple domain controllers, and if one of the DCs would go down, the other DCs could take over the missing role and business continuity would remain intact.
This concept is named the Flexible Single Master Operation or FSMO for short, and the roles are known as FSMO roles.
FSMO gives you confidence that your domain will be able to perform the primary function of authenticating users and permissions without interruption (with standard caveats, like the network staying up).
Schema Master The Schema Master role manages the read-write copy of your Active Directory schema. The AD Schema defines all the attributes – things like employee ID, phone number, email address, and login name – that you can apply to an object in your AD database.
Domain Naming Master The Domain Naming Master makes sure that you don’t create a second domain in the same forest with the same name as another. It is the master of your domain names. Creating new domains isn’t something that happens often, so of all the roles, this one is most likely to live on the same DC with another role.
RID Master The Relative ID Master assigns blocks of Security Identifiers (SID) to different DCs they can use for newly created objects. Each object in AD has an SID, and the last few digits of the SID are the Relative portion. In order to keep multiple objects from having the same SID, the RID Master grants each DC the privilege of assigning certain SIDs.
PDC Emulator The DC with the Primary Domain Controller Emulator role is the authoritative DC in the domain. The PDC Emulator responds to authentication requests, changes passwords, and manages Group Policy Objects. And the PDC Emulator tells everyone else what time it is! It’s good to be the PDC.
Infrastructure Master The Infrastructure Master role translates Globally Unique Identifiers (GUID), SIDs, and Distinguished Names (DN) between domains. If you have multiple domains in your forest, the Infrastructure Master is the Babelfish that lives between them. If the Infrastructure Master doesn’t do its job correctly you will see SIDs in place of resolved names in your Access Control Lists (ACL).
//
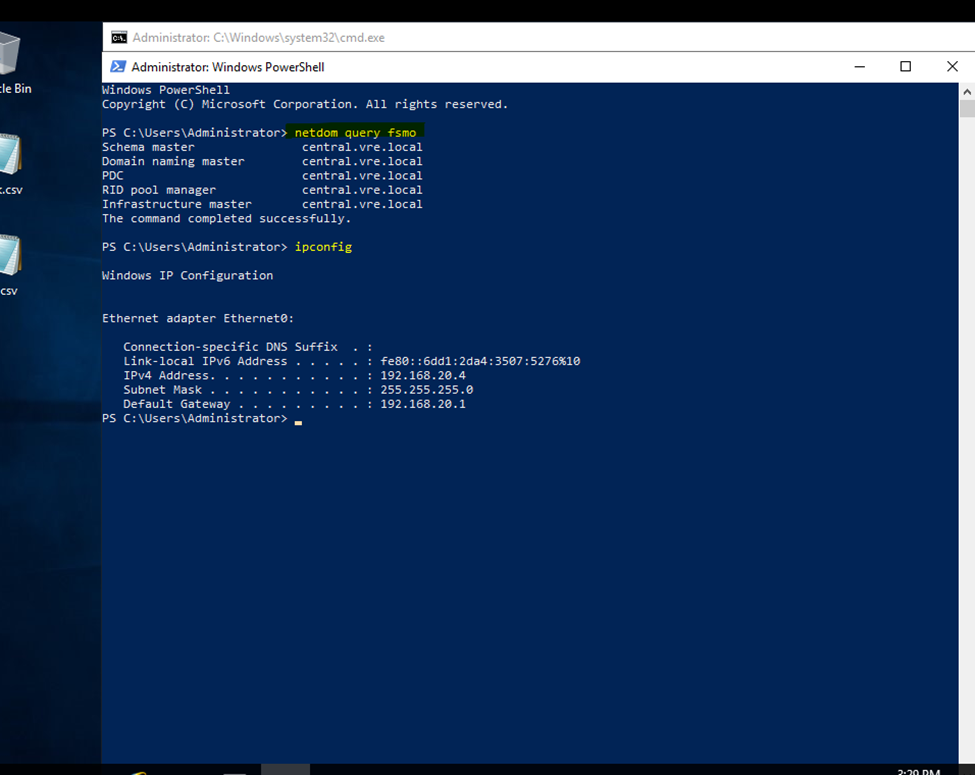
Flexible Single Master Operation (also known as FSMO or FSMO Roles).
Primary Server FSMO Roles
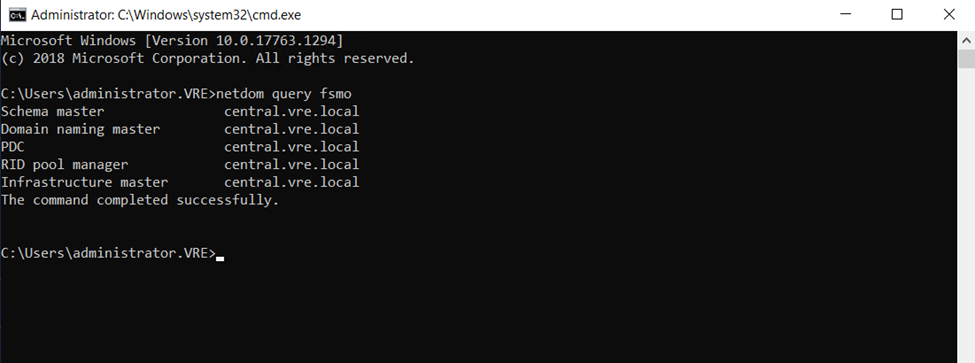
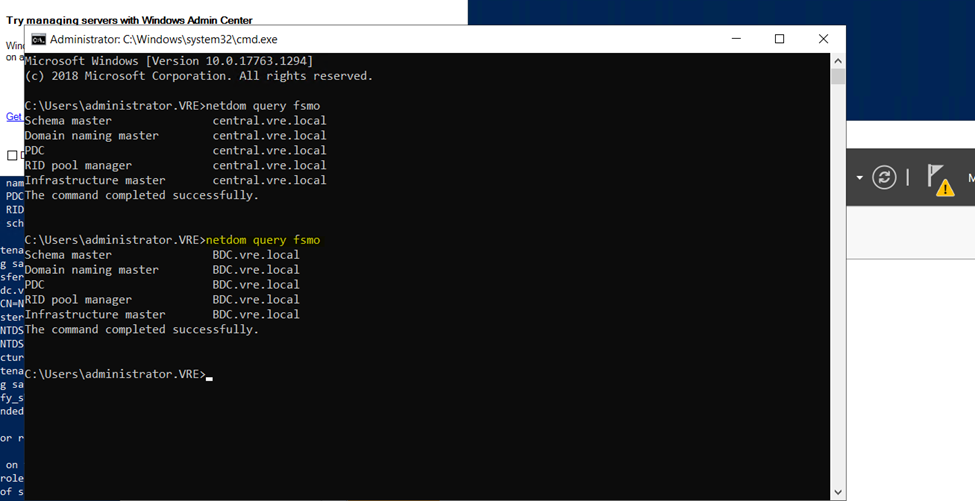
Netdom query fsmo
Secondary server will also getting same roles but secondary server not having complete authority like Primary DC
If Primary Server having issues need to seize the fsmo roles after that Backup DC will retain complete authority
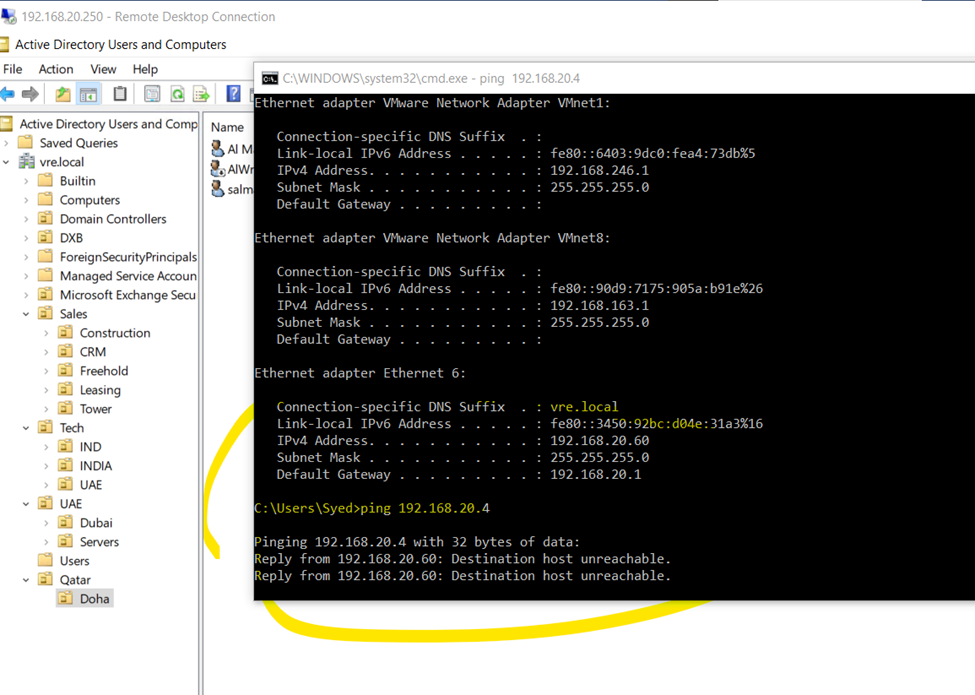
So, here I used to power off Primary Server
Primary DC is not active (Server Down)
Now type in PowerShell
But still, I will get all 5 FSMO roles
In secondary server I am getting all 5 Roles
Type
In Backup DC
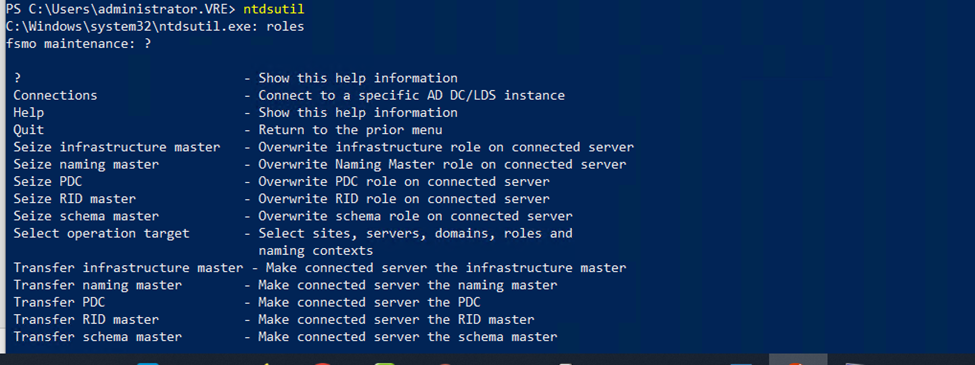
Ntdsutil
PS C:\Users\administrator.VRE> ntdsutil
Just type only roles and press enter
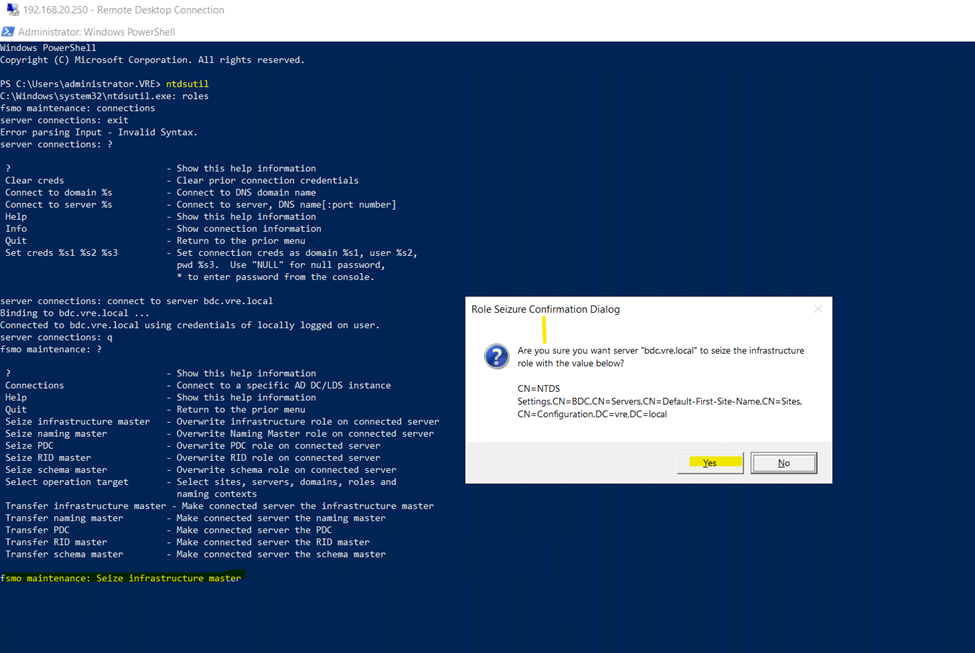
Type connections
Now need to connect to in backup Domain Controller like—
Connect to server bdc.vre.local
Now quit from connection press type q and enter
Here we need to seize all fsmo roles from primary server
Primary server is not running but fsmo roles with primary server need to seize the roles and allocate to secondary server
netdom query fsmo
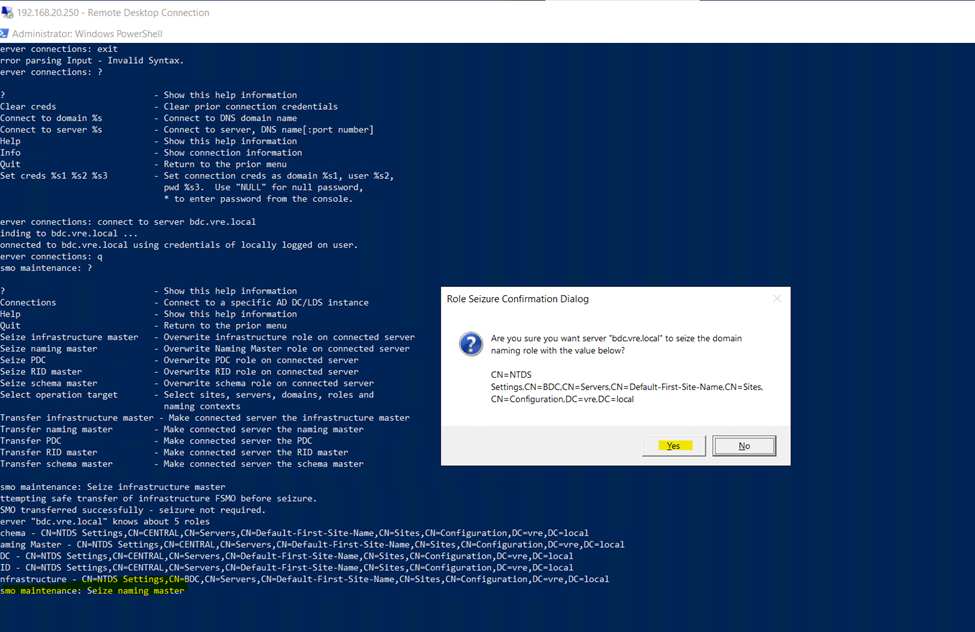
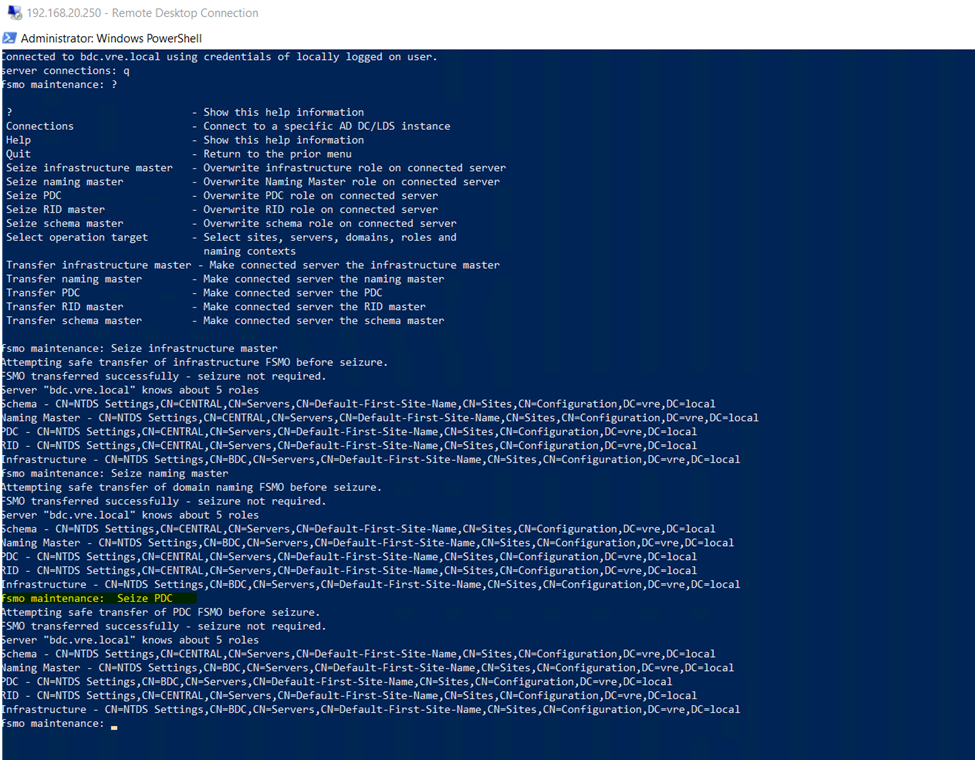
fsmo maintenance: Seize infrastructure master
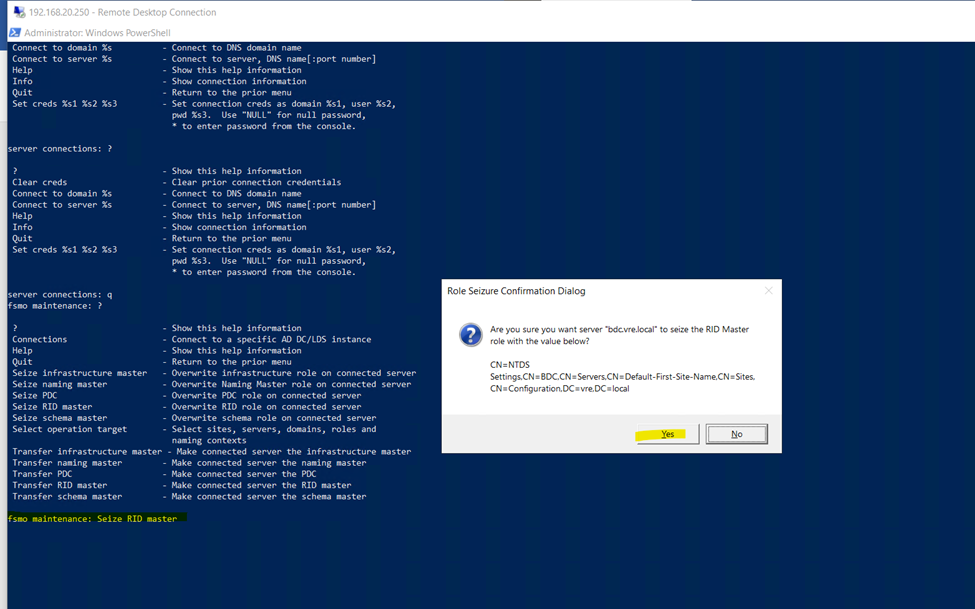
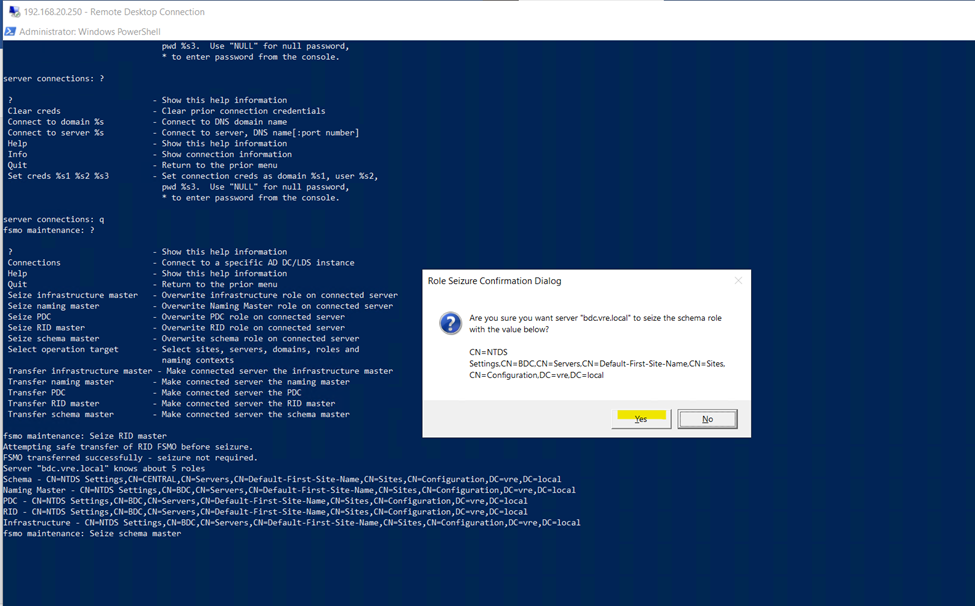
And press
Yes
fsmo maintenance: Seize naming master
fsmo maintenance: Seize PDC
Seize RID master
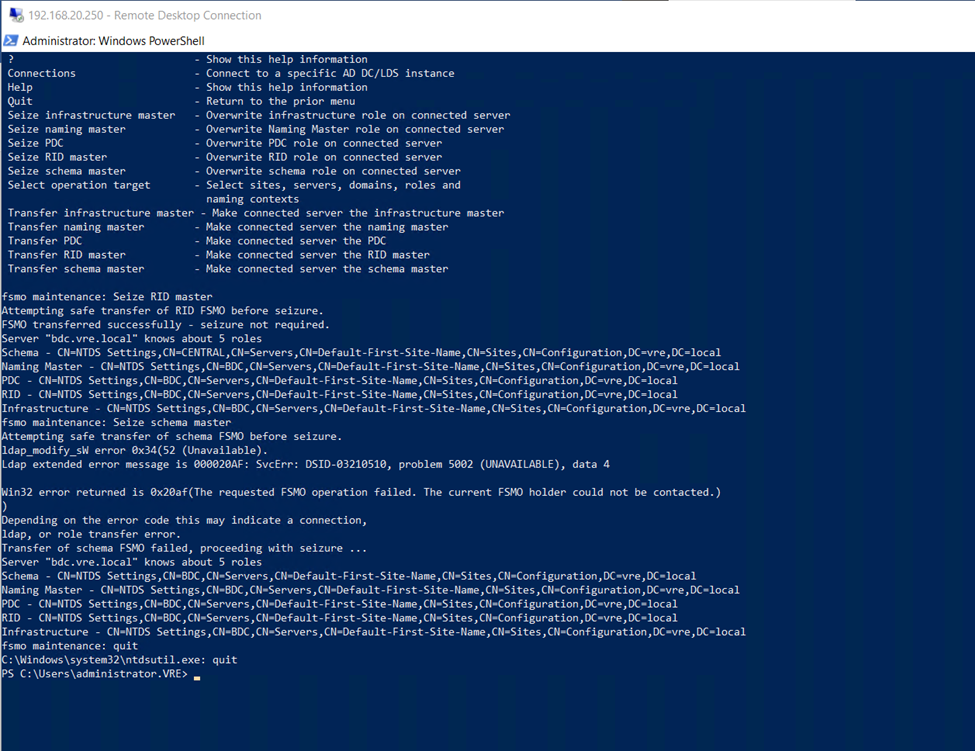
Seize schema master
Now type quit
And quite from fsmo maintenance
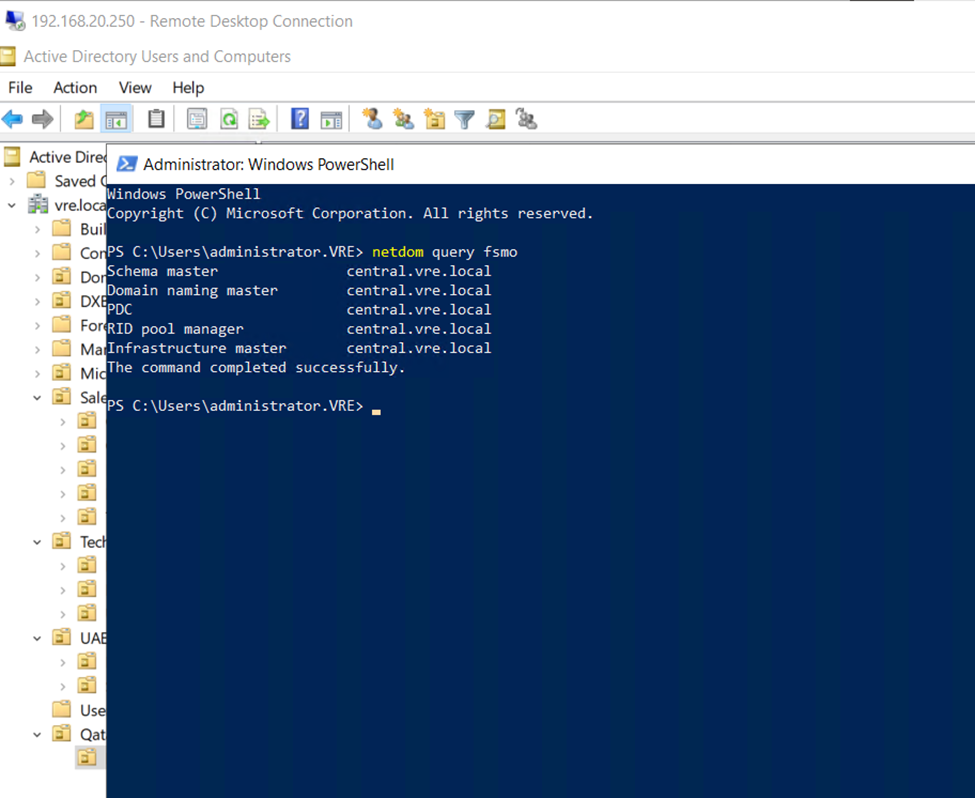
So, after seize all 5 roles from Primary DC and assign to Secondary dc
If you can check after seize all roles
Now Backup domain having all fsmo roles
netdom query fsmo
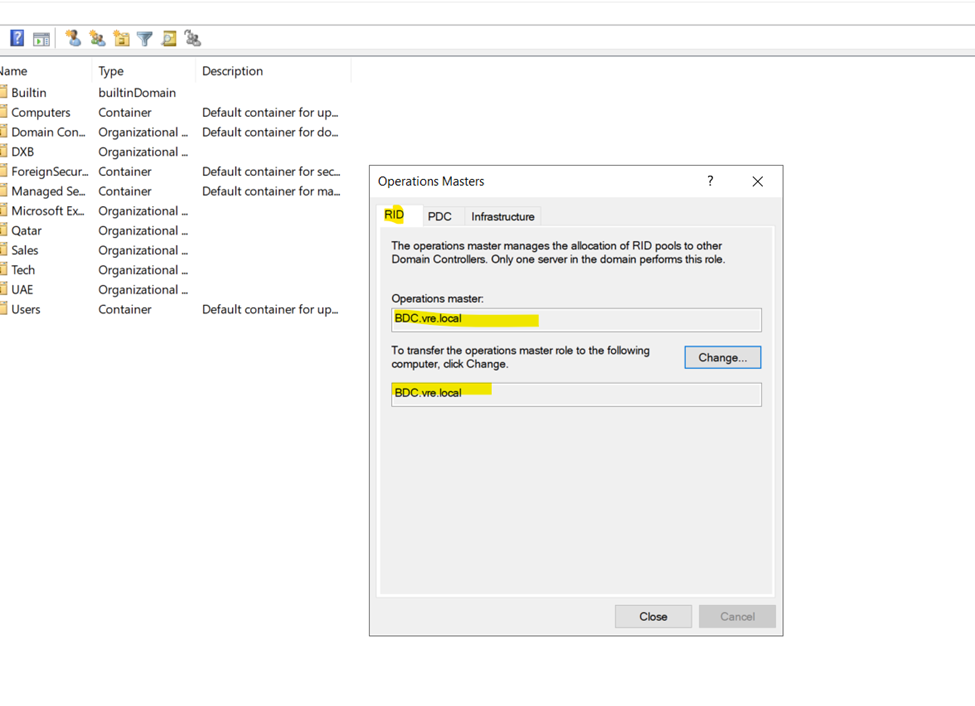
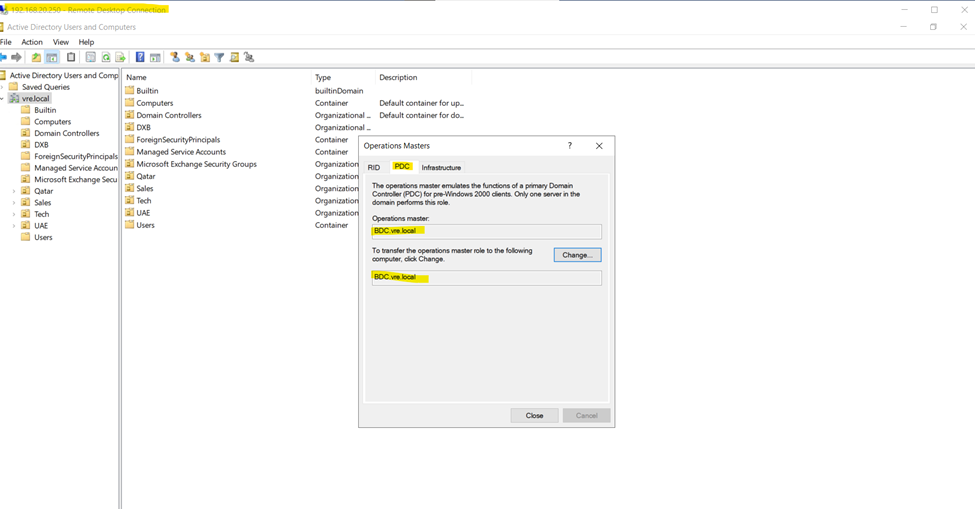
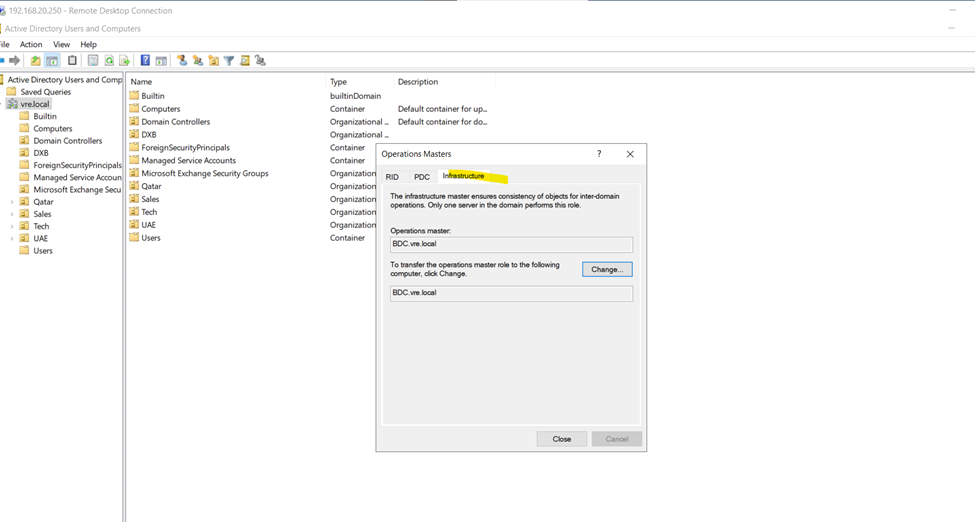
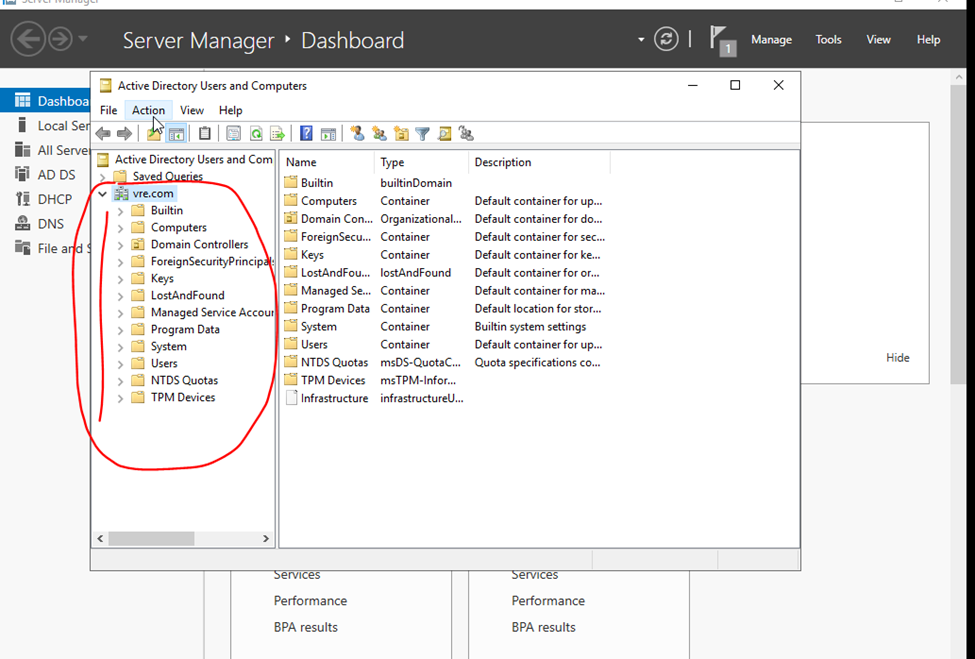
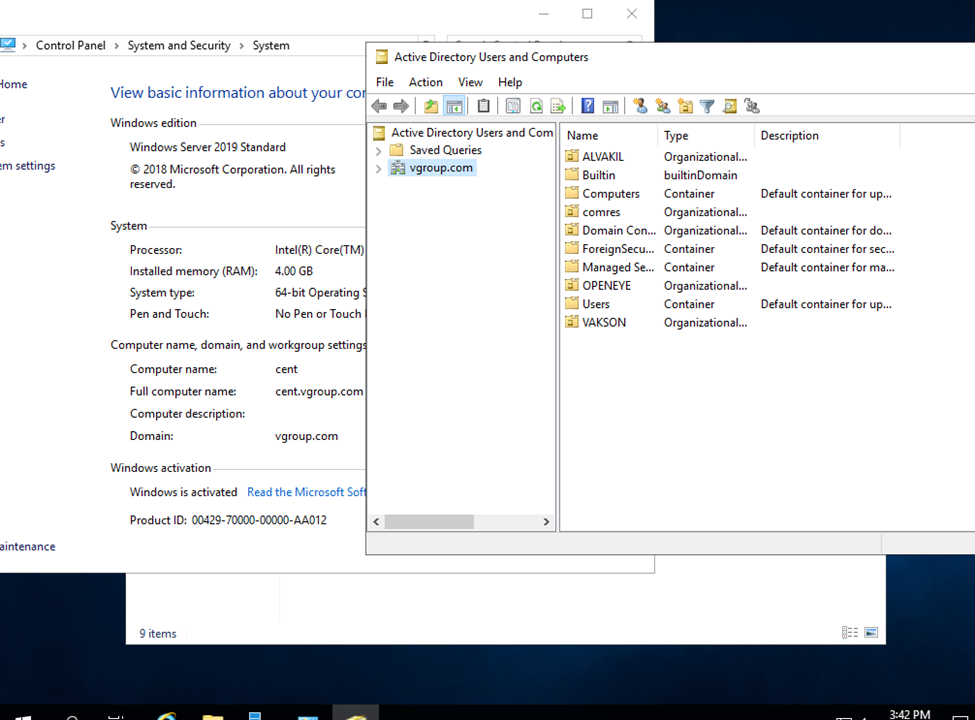
Go to Active Directory users and computers
Right click on domain and click on operation masters
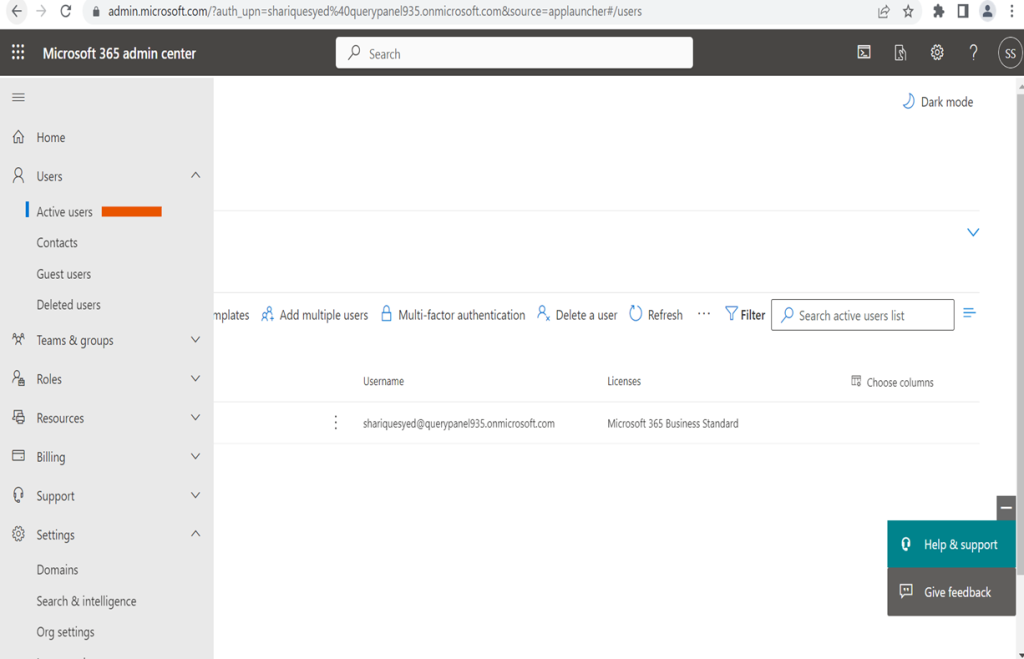
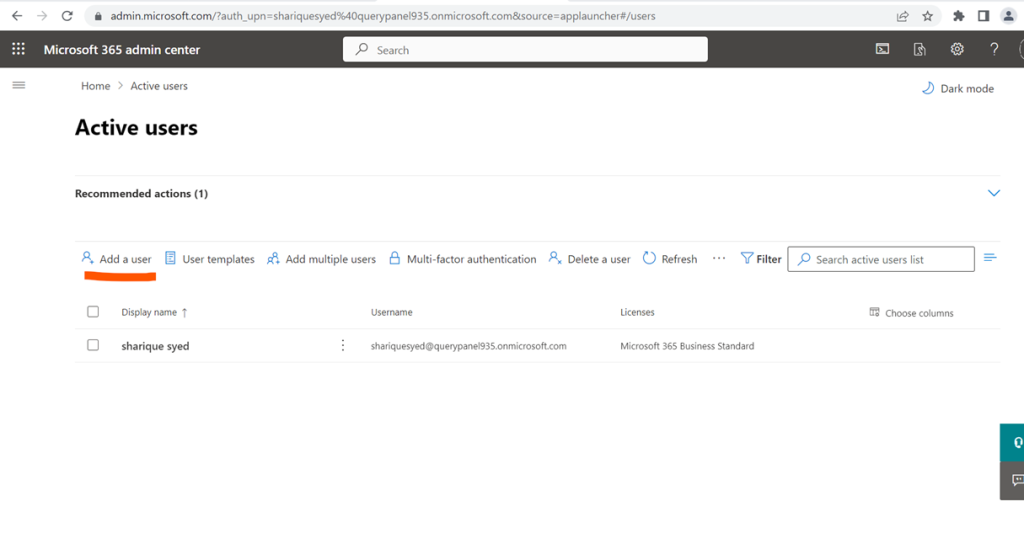
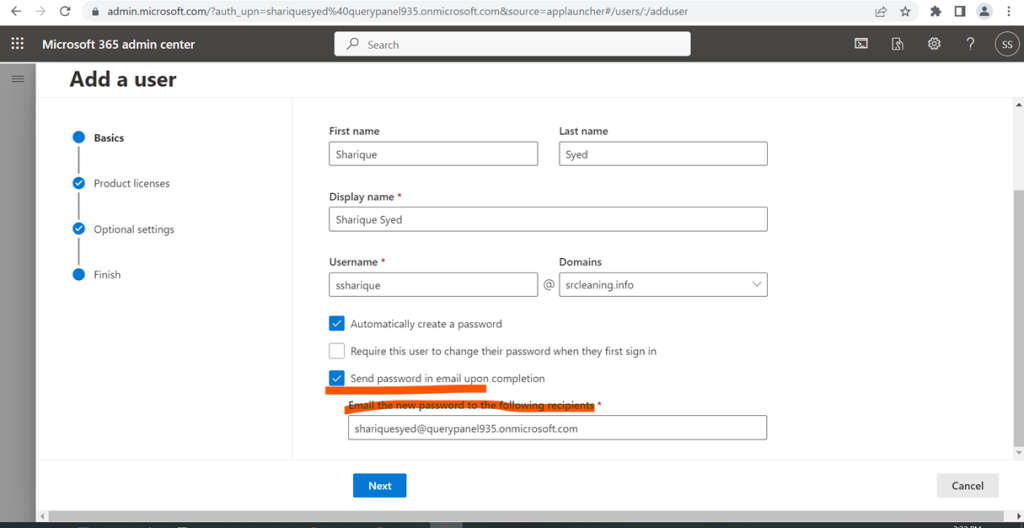
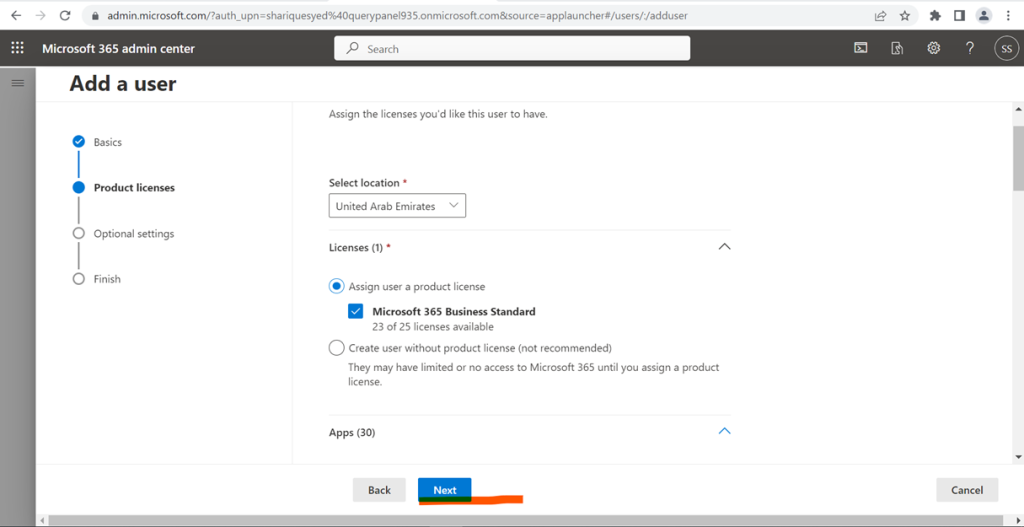
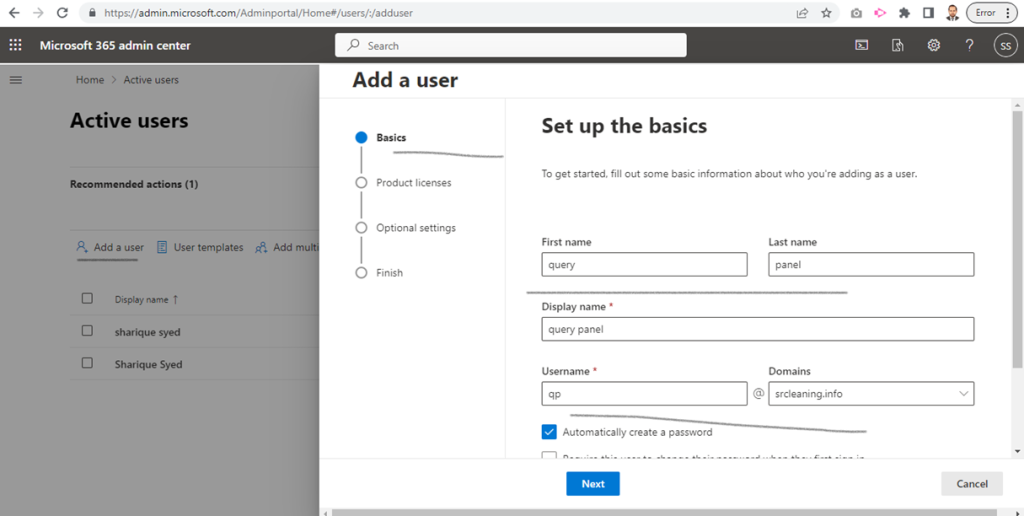
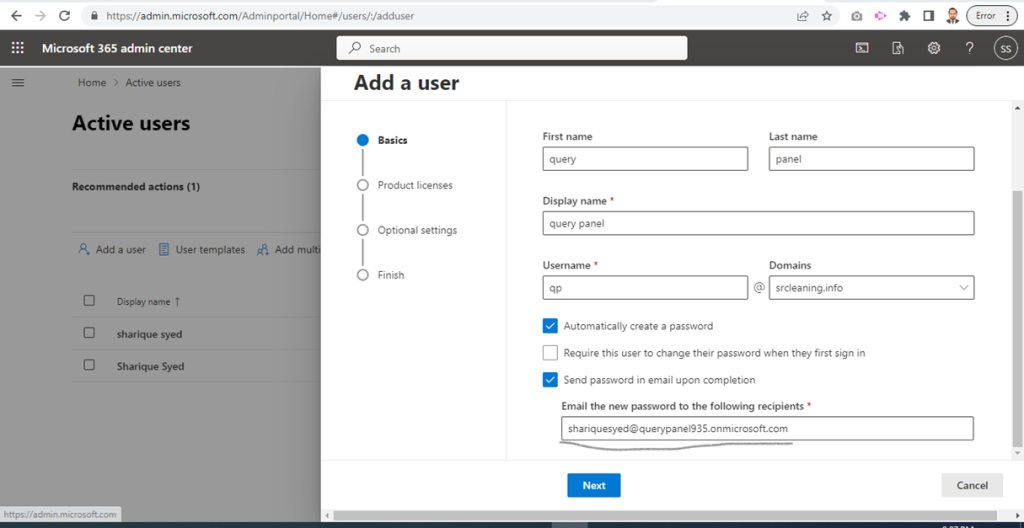
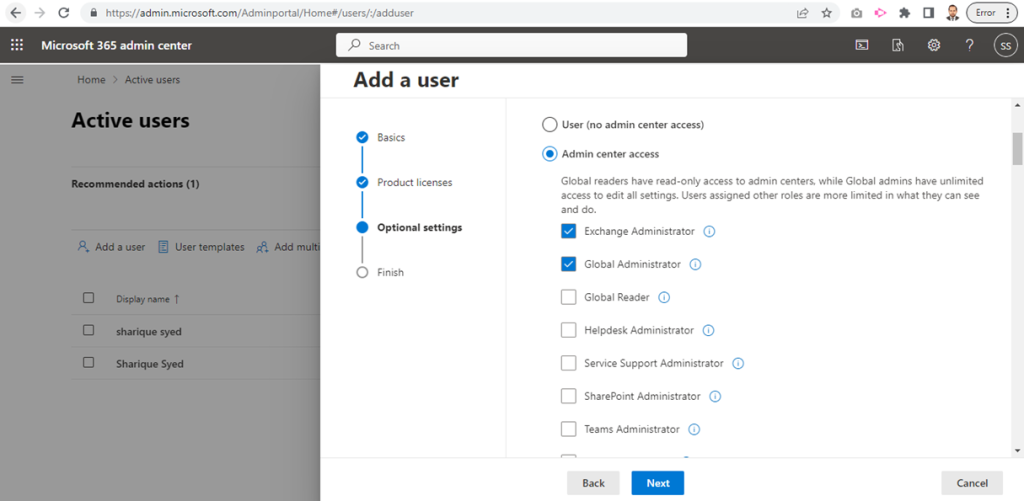
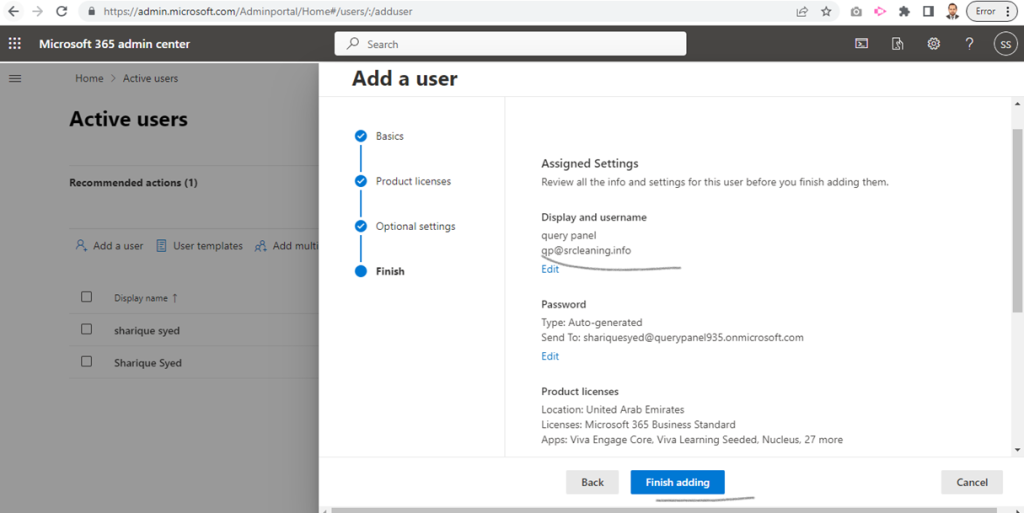
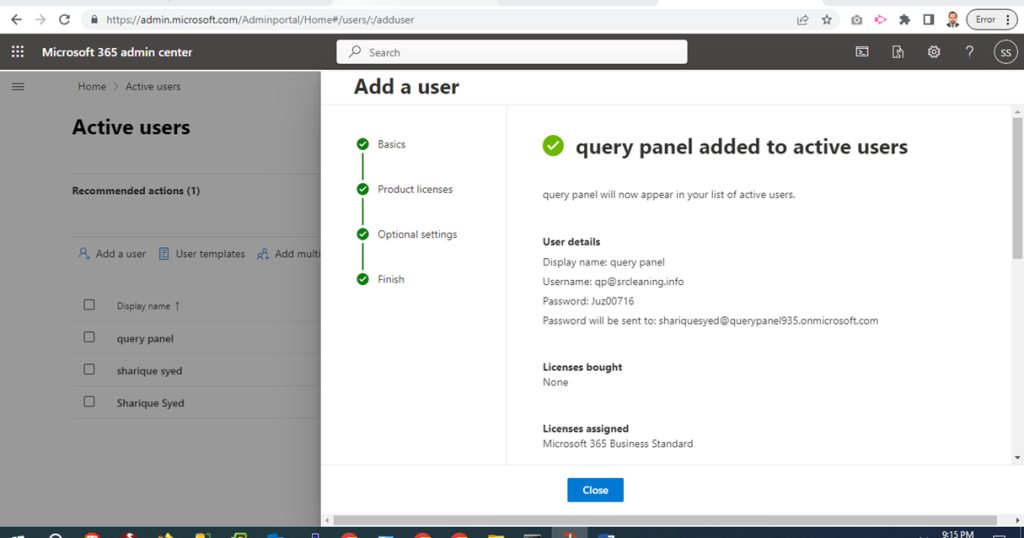
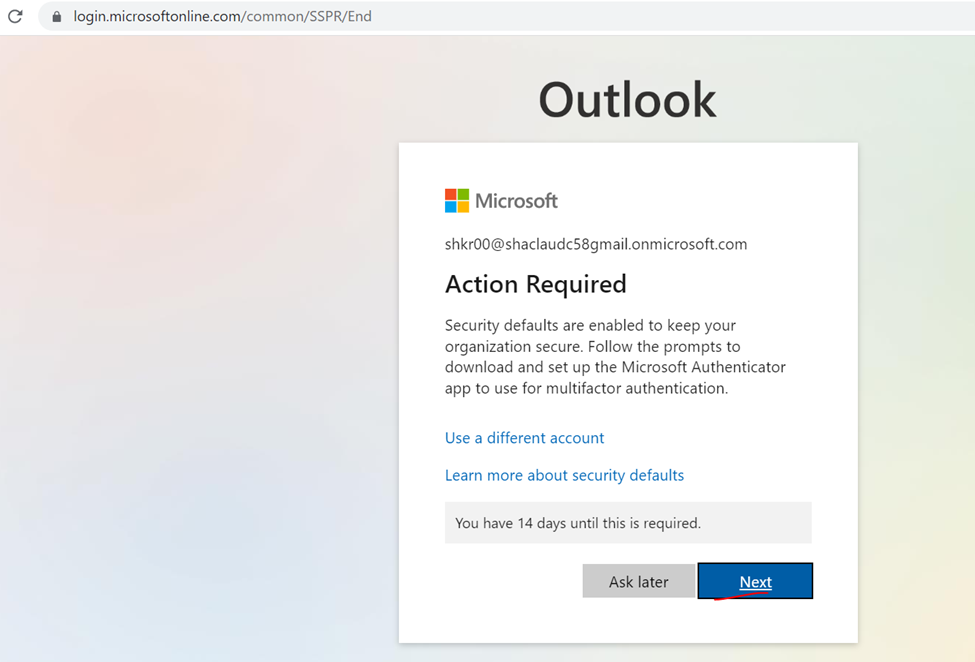
Click to create Global Admin user for syns on Premises Ad to Azure Claud
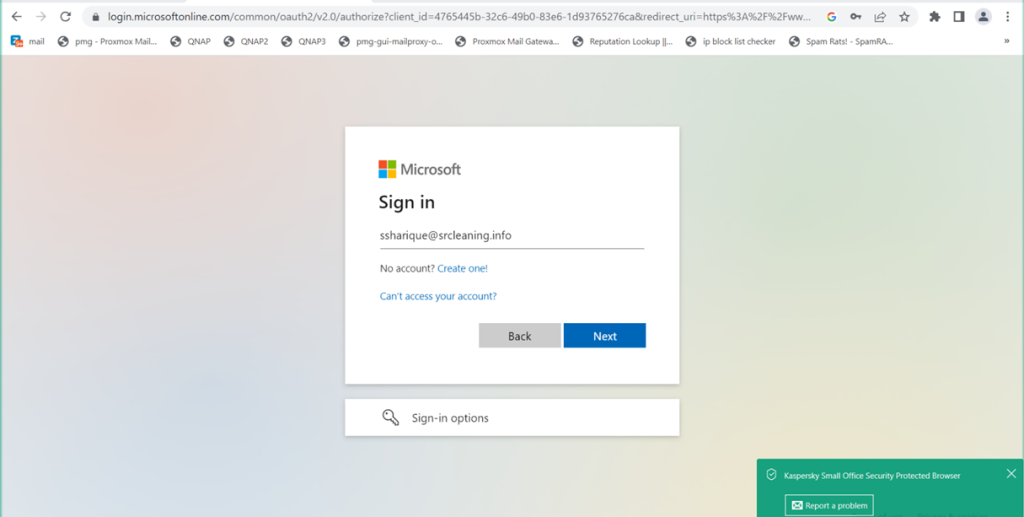
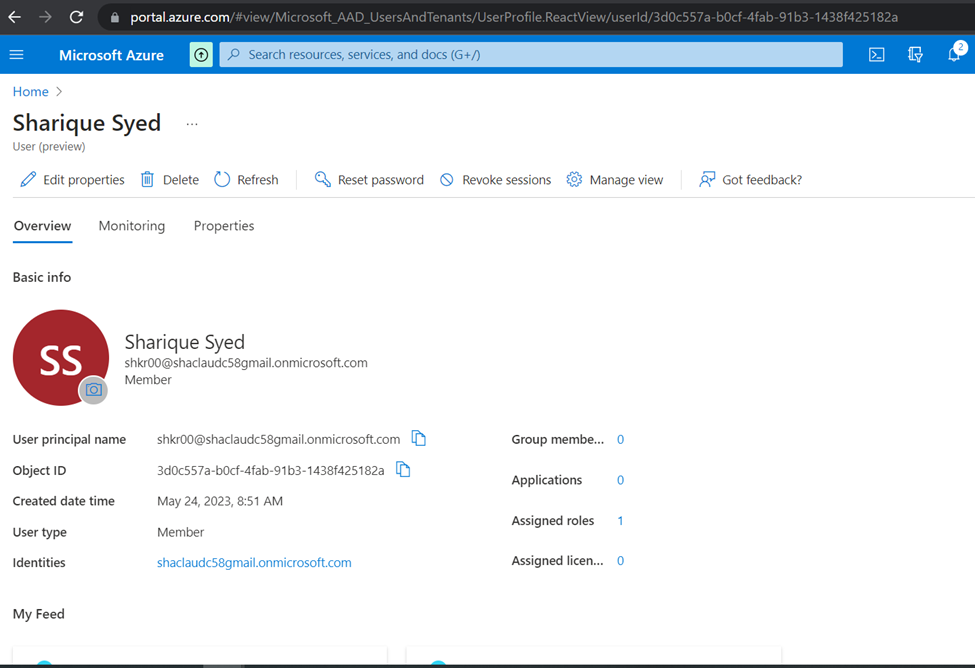
Once user Global Admin User created need to verify it
Once user created while login to first time need to reset the default password and authenticate with your phone application
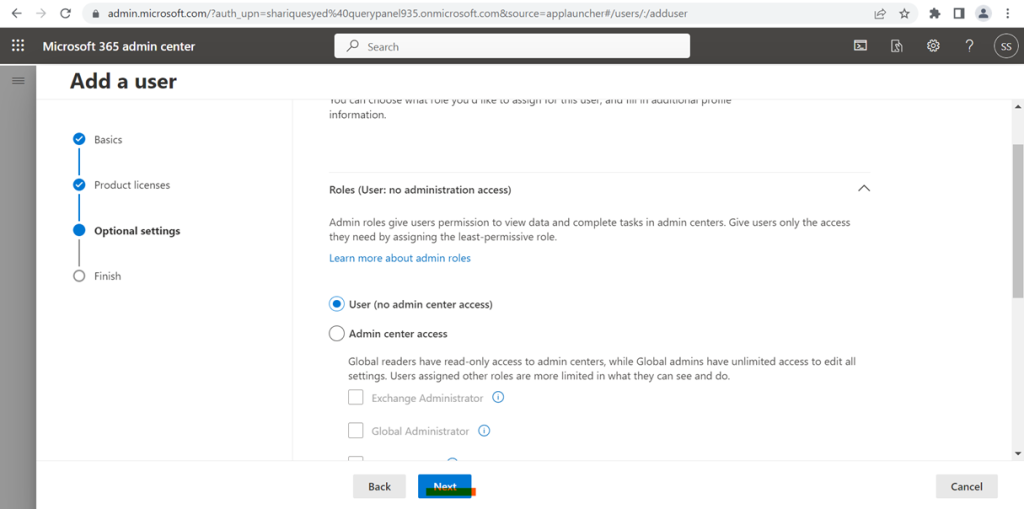
Click to next
Click next
Click next
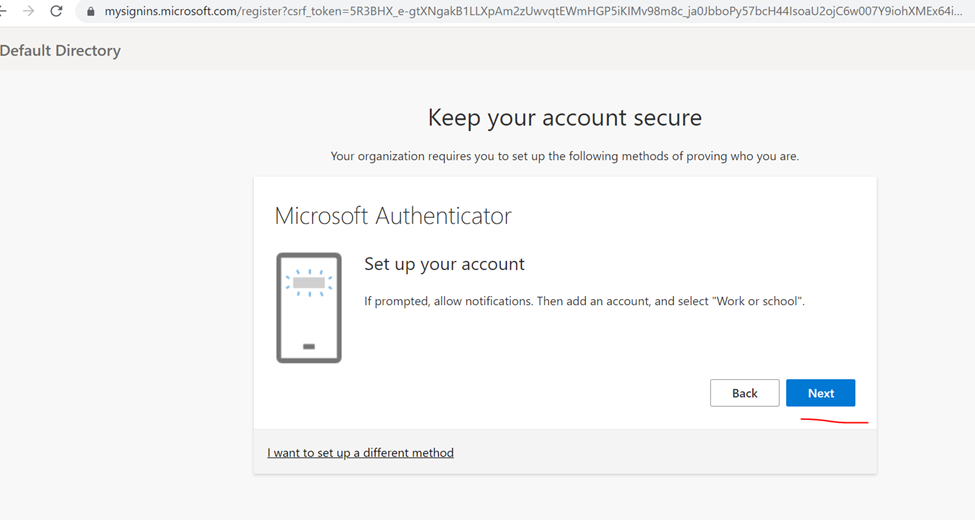
Scan phone app authenticator
Authentication done
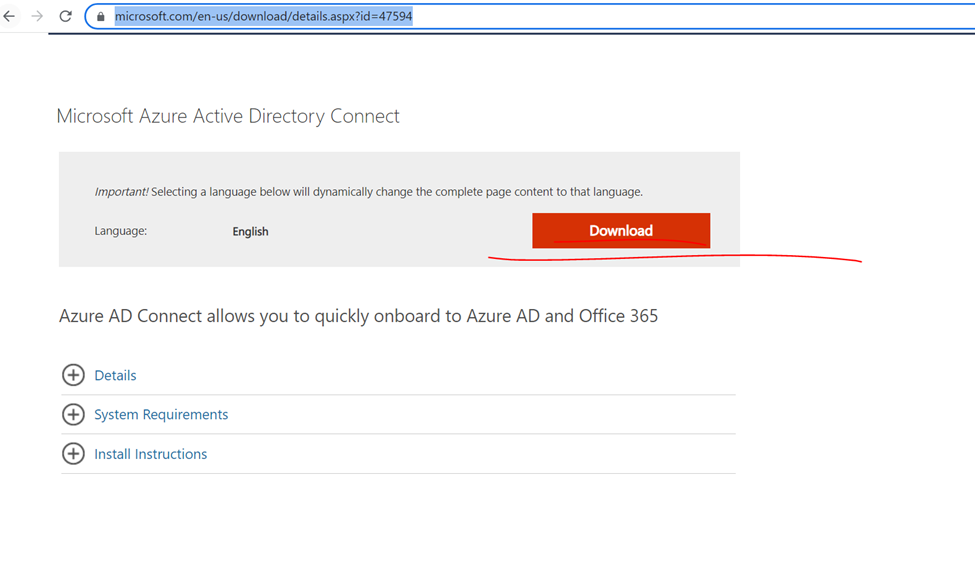
Now need to Install Azure AD Connect to on-premises Domain
Once download done click to install AD Connect
Link : https://www.microsoft.com/en-us/download/details.aspx?id=47594
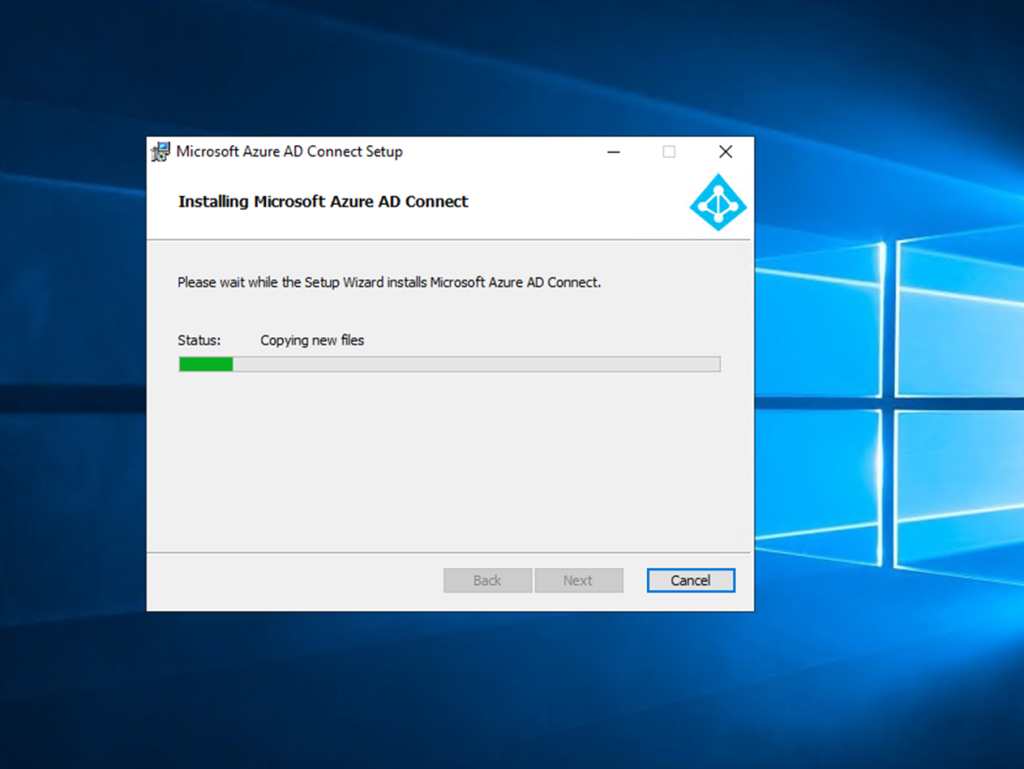
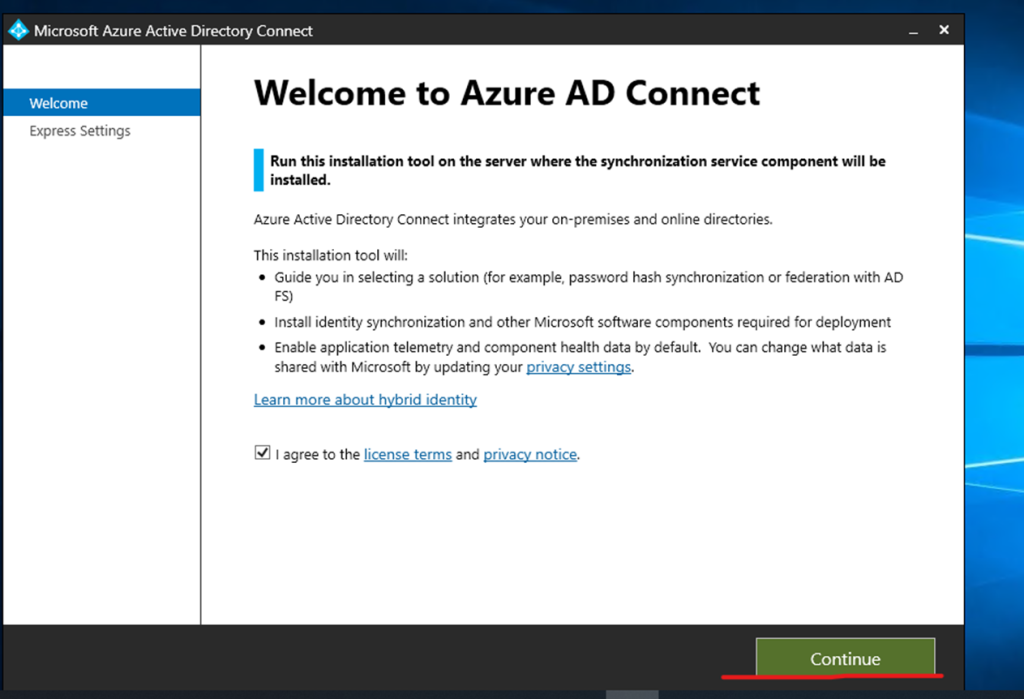
Now installing AD Connect
Click to continue
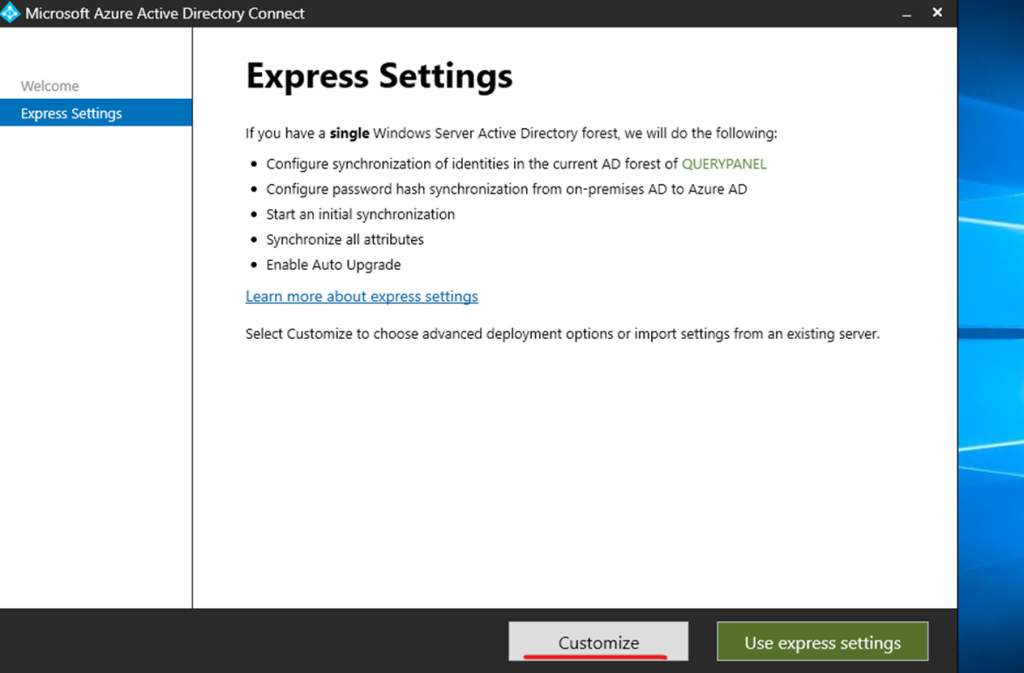
Can use customize and express but here implementing…. Custom
Click to install
If you get error click to specify custom location
Click to next
Azure global admin user
Authenticate it
Click on add directory
Type domain admin username and password
Click and next
Click too next
Synchronization all AD and ou
Identify user and Click to next
Filtering all users
And click to next
Optional features
Configure
And click to install
So, configuration completed
Open synchronization service manager check the status
Check the adds
Status user synchronization with azure directory
Status
Check on azure portal user synchronization status
Overview
Click on azure active directory click all user
Audit logs
Sign and logs
Get-ADSyncScheduler
In every 30 Minutes it’s sync
Forcing a Delta sync on Azure AD
As illustrated above, a delta sync synchronizes all the changes made since the last sync. Forcing a delta sync is crucial, for example, when you have made key changes to users in your Active Directory, and you’d like the changes to reflect immediately. Carrying out a delta sync, for example, speeds up the sync of a new user to Microsoft 365, enabling the assignment of licenses immediately.
Start-ADSyncSyncCycle -PolicyType Delta
Force to sync status
Forcing a Full Azure AD sync
You rarely need to do a full Azure Active Directory sync as and Azure AD administrator. A full Azure AD sync takes a lot of time to sync as it goes through all the Active Directory objects and synchronizes them again. The only use case that you need to do a full synchronization is when you change the Azure AD Connect configuration. However, in case you’d like to run a full Azure AD sync, then use this policy type initial PowerShell command:
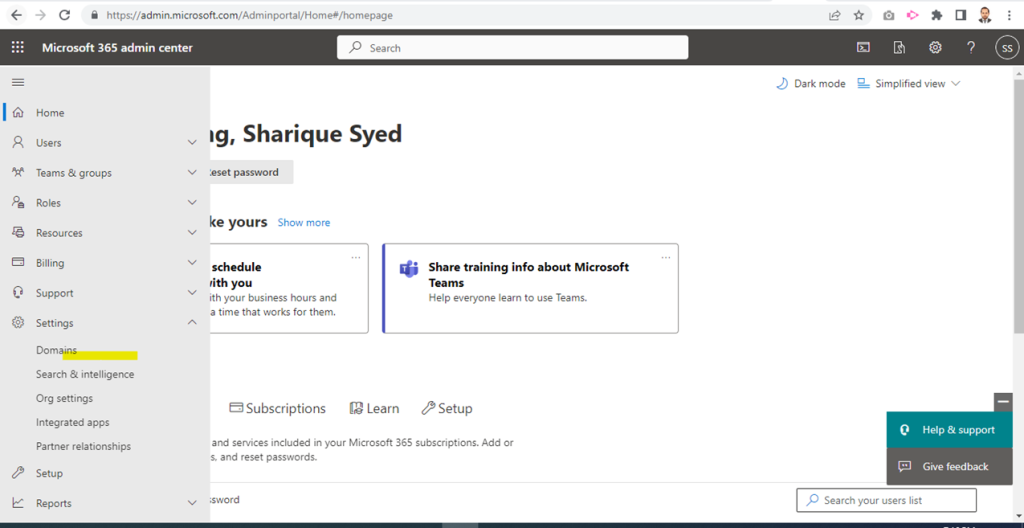
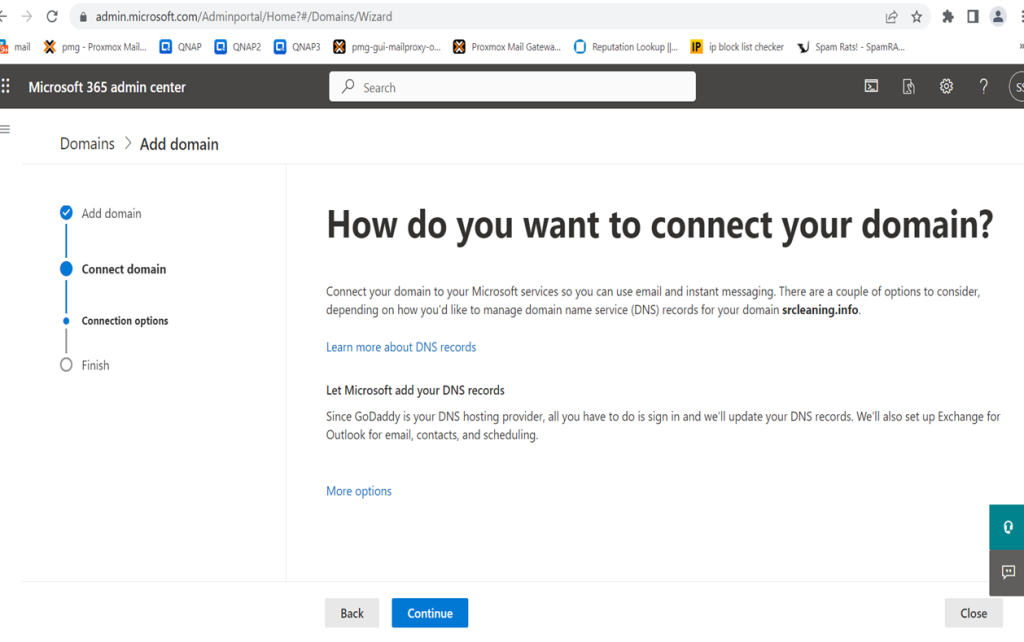
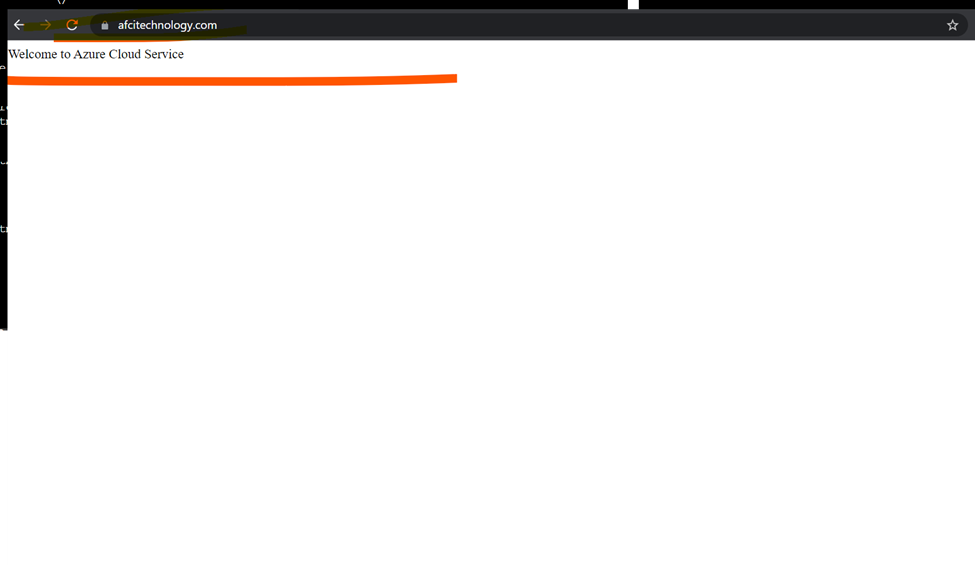
Verify Custom Domain to Azure Cloud
Verify Your Custom Domain in Azure Active Directory
Add your custom domain to Azure AD
Go to Azure portal then Sign in to the Azure portal.
Then Select Azure Active Directory
Select “Custom Domain Name” from Azure Active Directory,
And then Click “Add custom domain“.
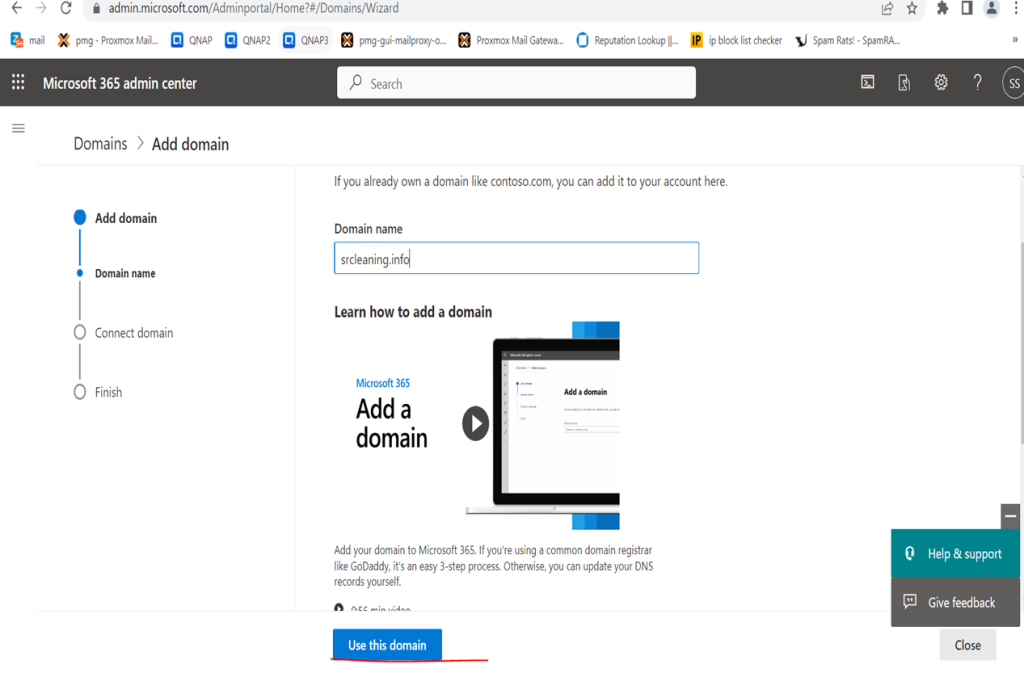
· Custom domain name field, enter your registered domain name.
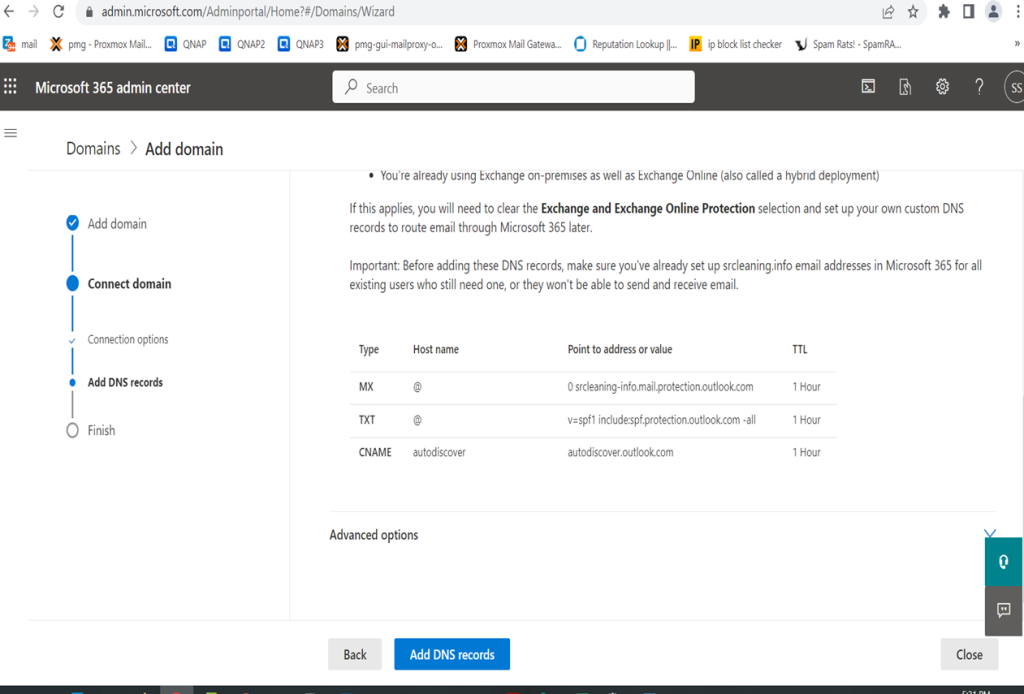
The unverified domain is added. domain page appears showing your DNS information. You need it later to create a TXT record to configure DNS.
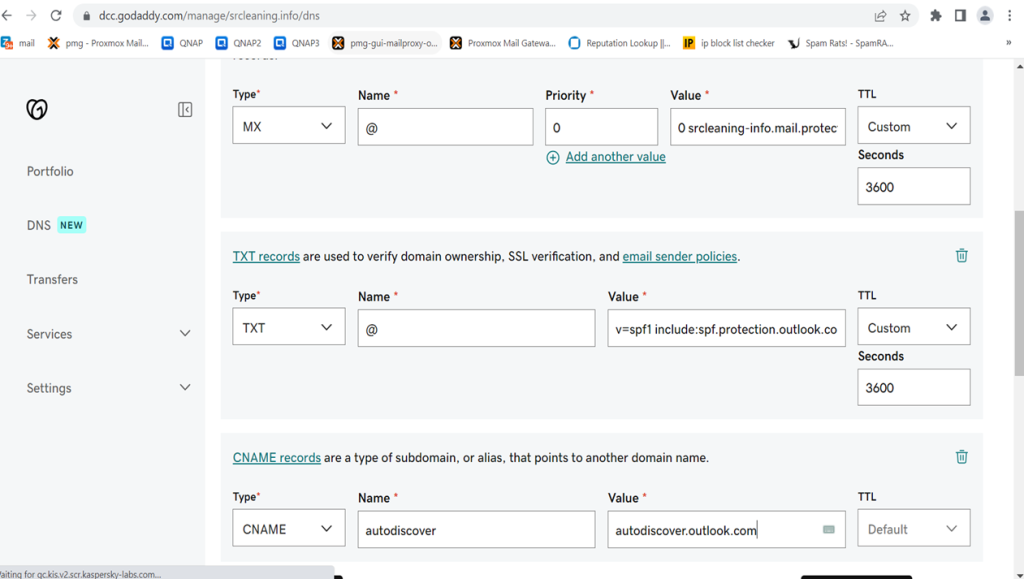
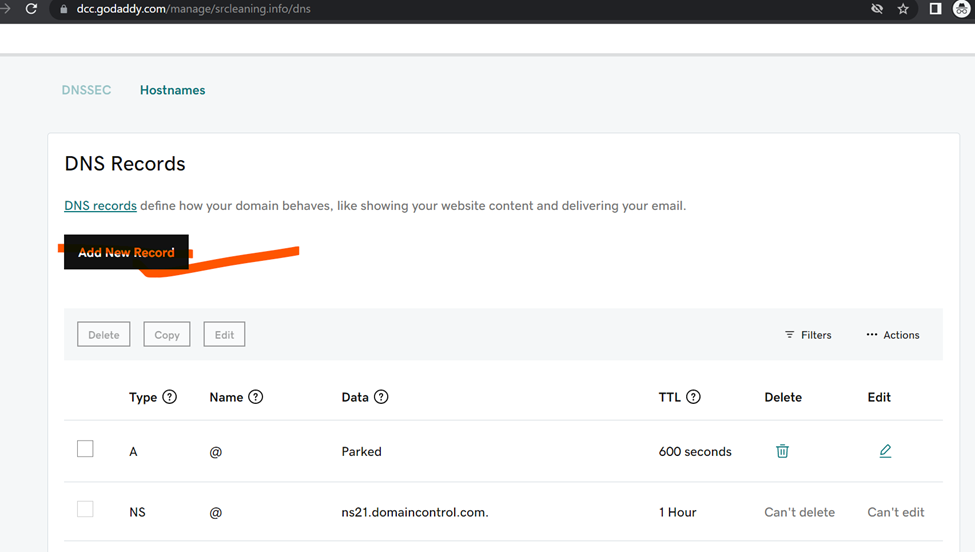
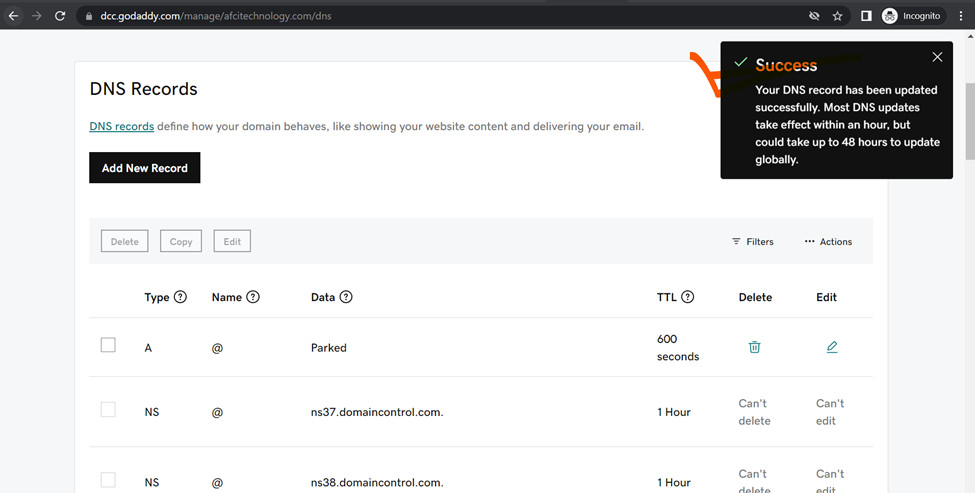
Log in to your GoDaddy account
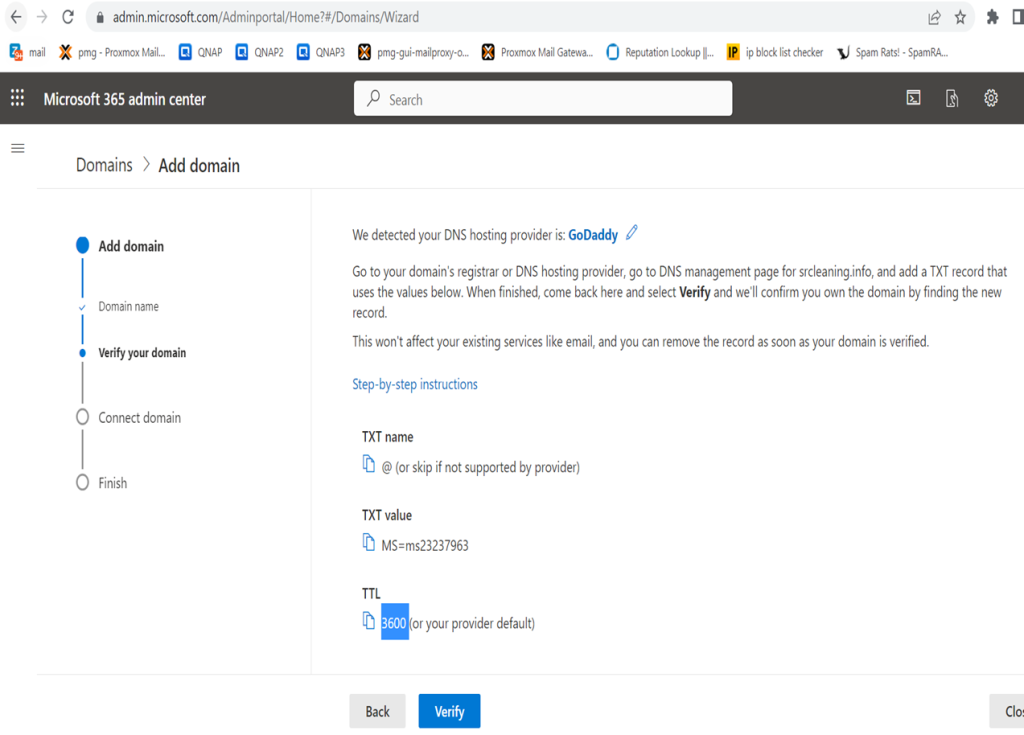
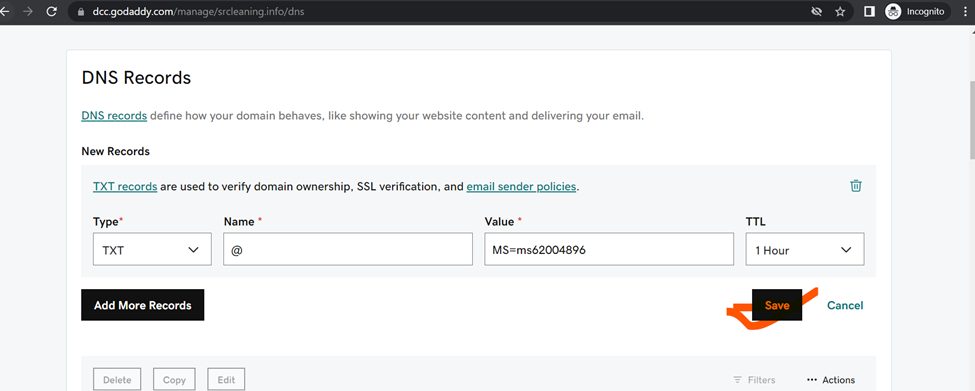
and add field add new record in TXT format mention below
Configure DNS with a TXT Record
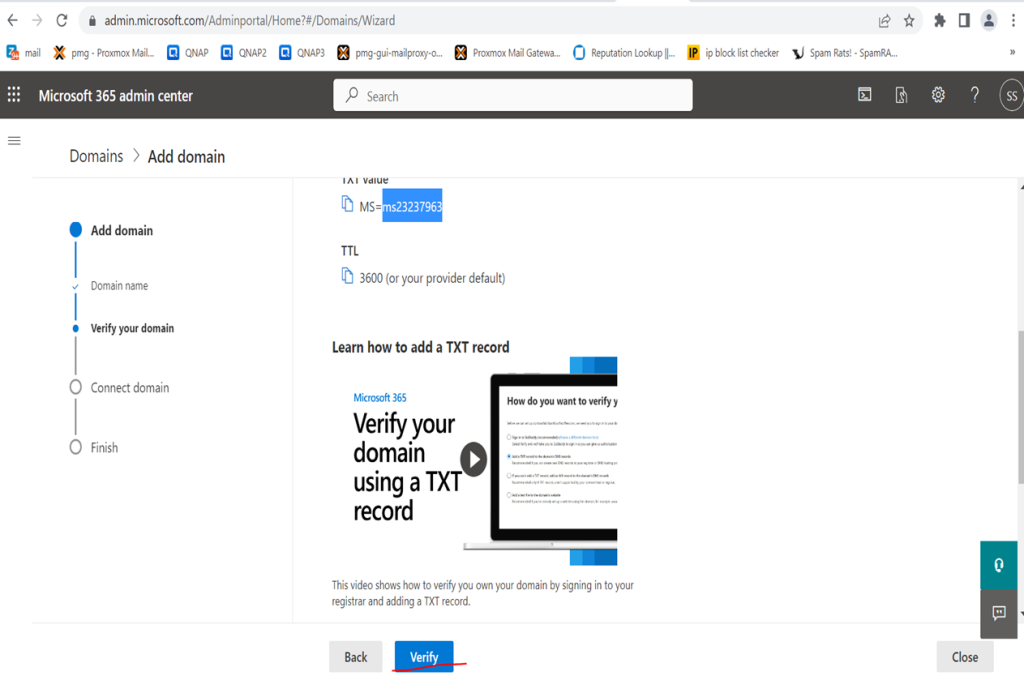
Then click Add to add a TXT record then add Record
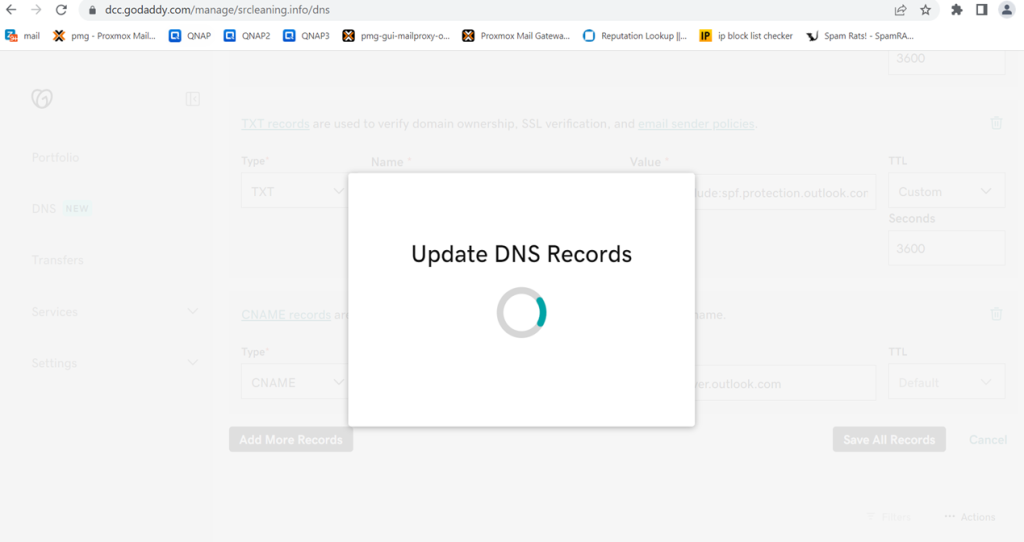
Now click to verify
https://account.godaddy.com/products
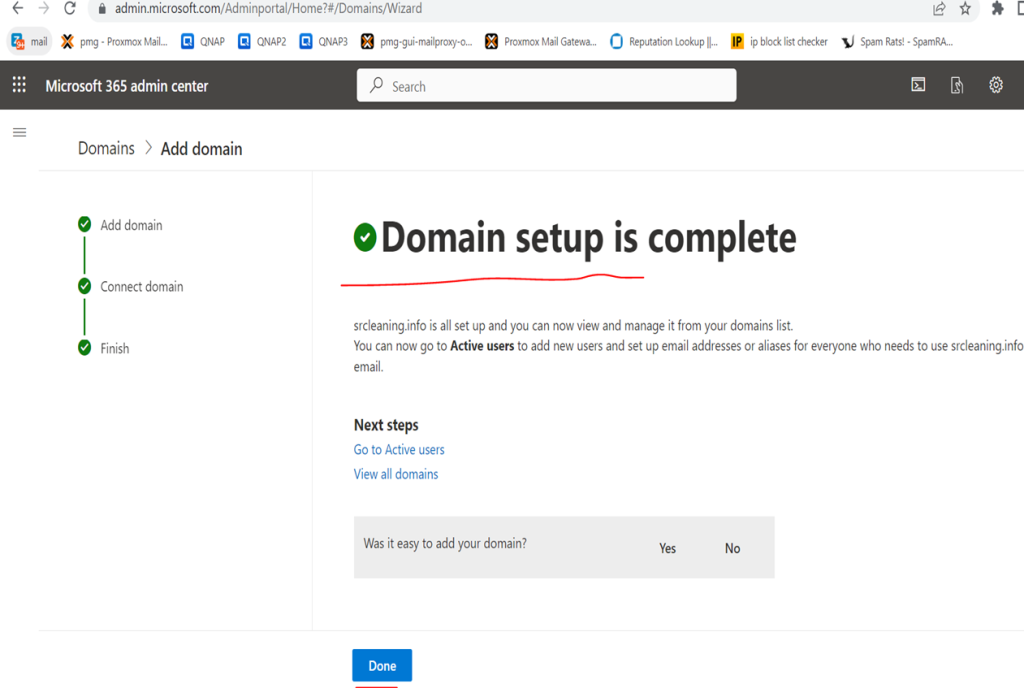
Custom Domain Name is successfully verified
Custom Domain Name is successfully verified
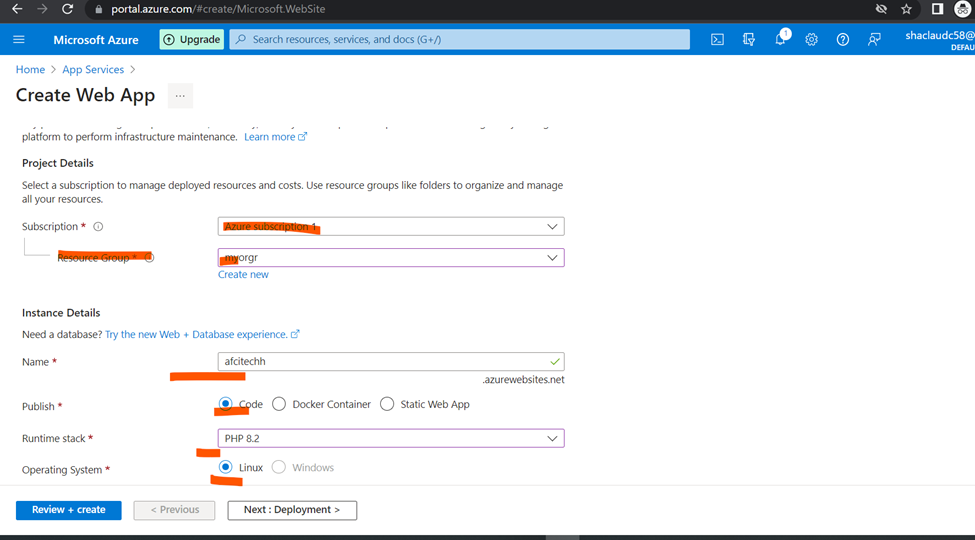
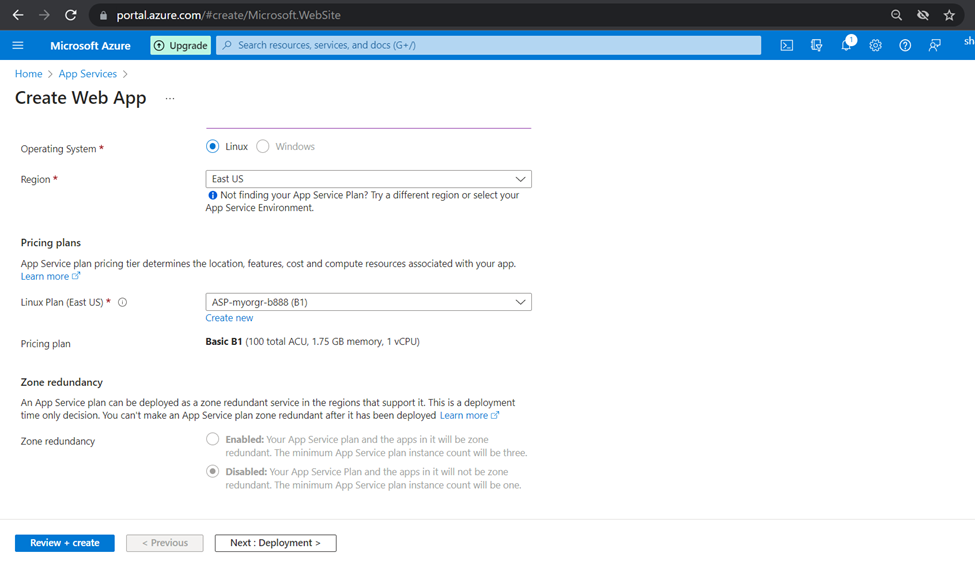
HOW to Host web application in Azure CLOUD
CREATE NEW app services
Assign new application name and select the plan click to next
Adding Custom domains
Note:
Need to add CNAME and TXT record to hosting provider
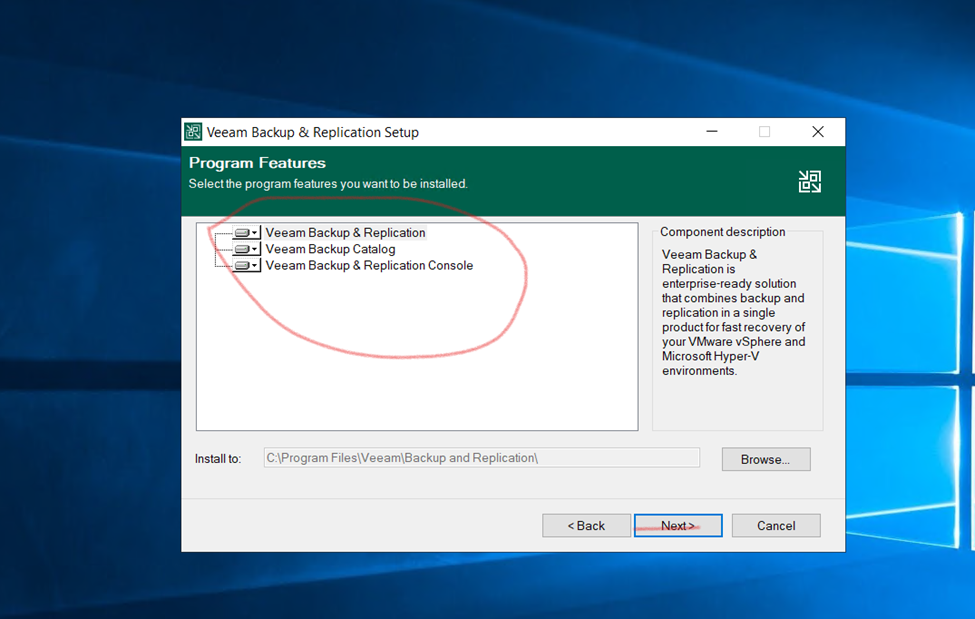
Veeam Backup & Replication is a software solution that protects your data by performing backup, replication, and recovery operations. With this product, you can recover your data fast from all types of infrastructure: virtual, physical, and cloud.
Start the installation by mounting the Veeam Backup & Replication image downloaded from Veeam’s product download page. Use the application of your choice to mount the ISO image or burn the image to a removable device with sufficient storage.
Veeam Backup & Replication is a comprehensive data protection and disaster recovery solution that helps businesses protect their virtual, physical, and cloud workloads.
If you are looking for a comprehensive data protection and disaster recovery solution, Veeam replication and backup is a good option to consider.
Here will cover every single steps
Steps to Veeam replication and backup:
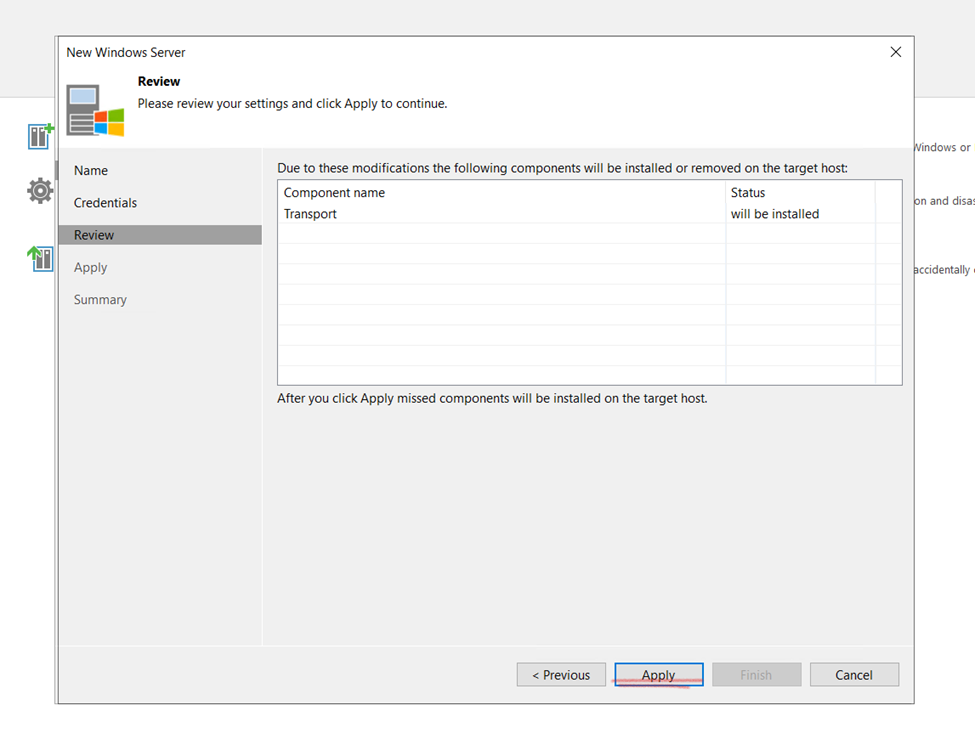
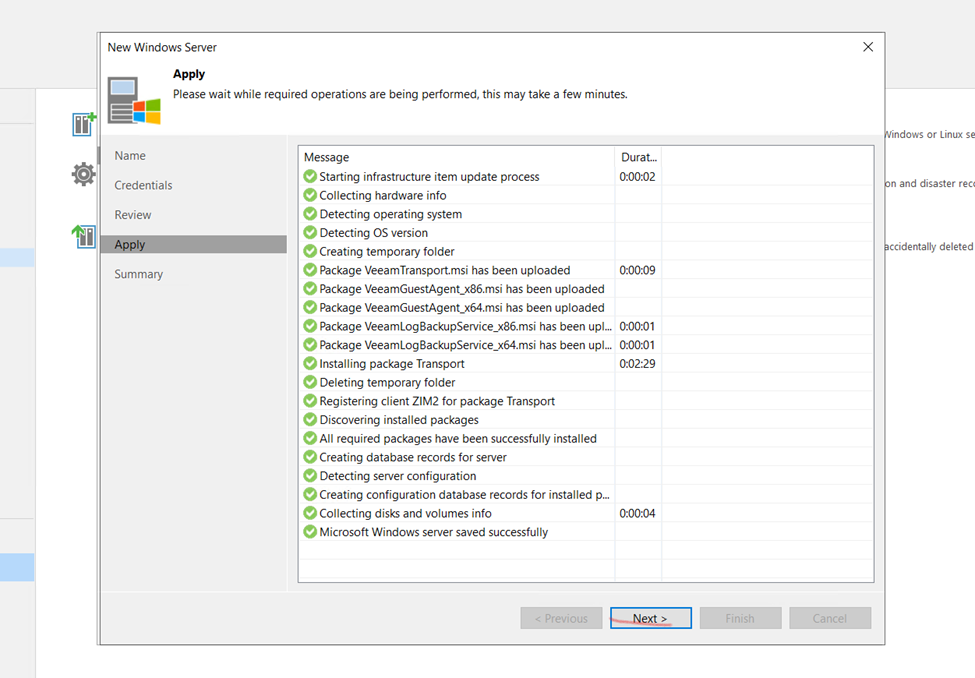
Click to Install
Select Community Edition and click to next
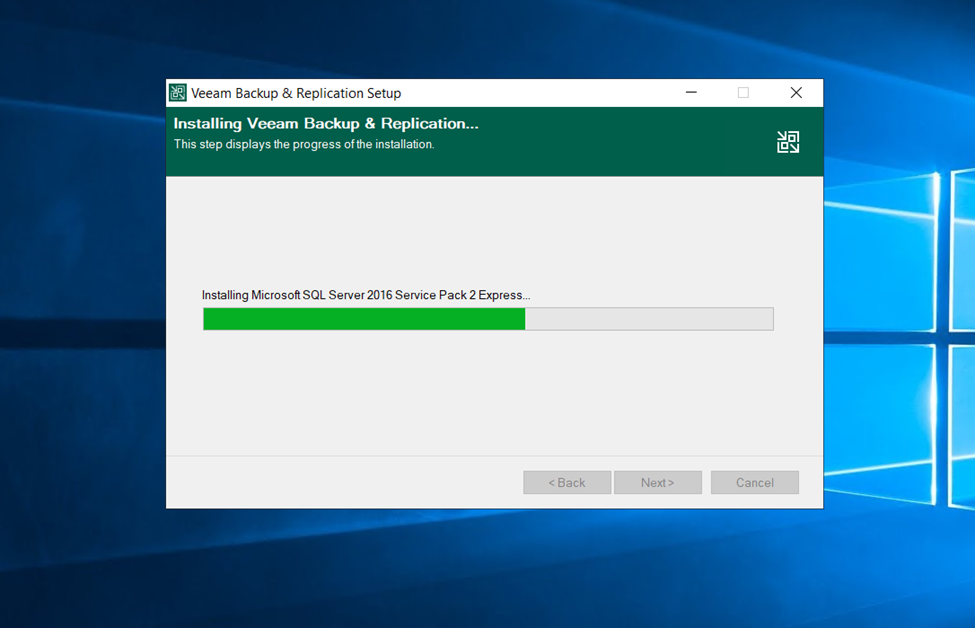
Installing Program Features
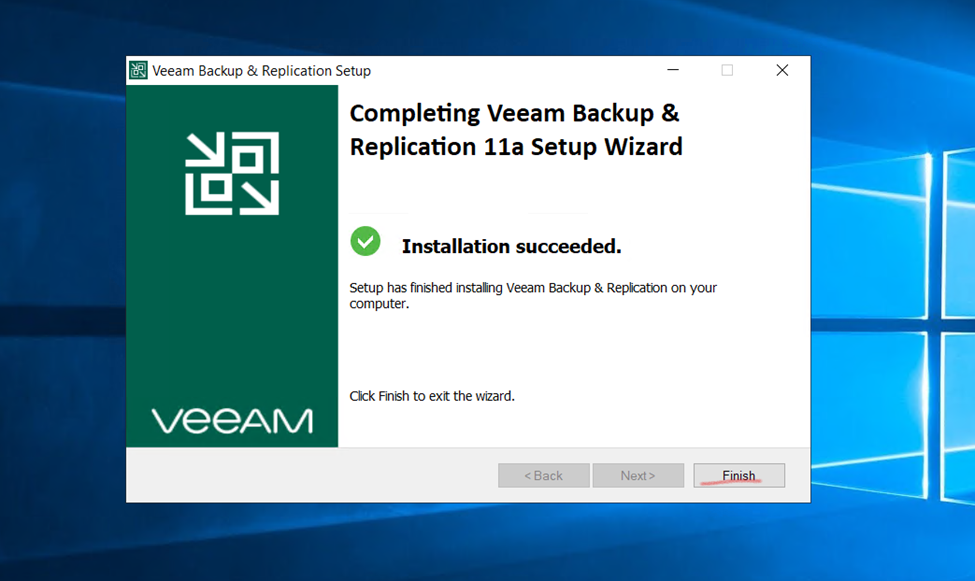
Veeam replication and backup Installation is Completed.
here,
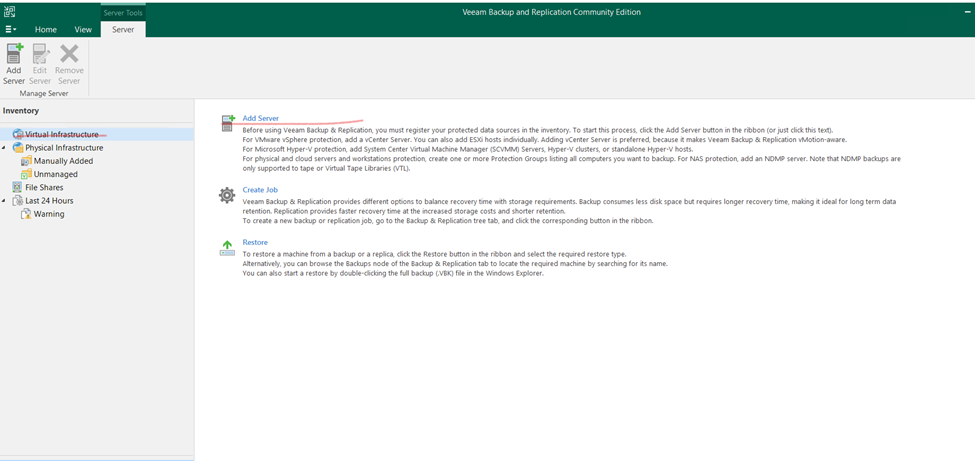
First Adding Virtual bare metal Esxi Server.
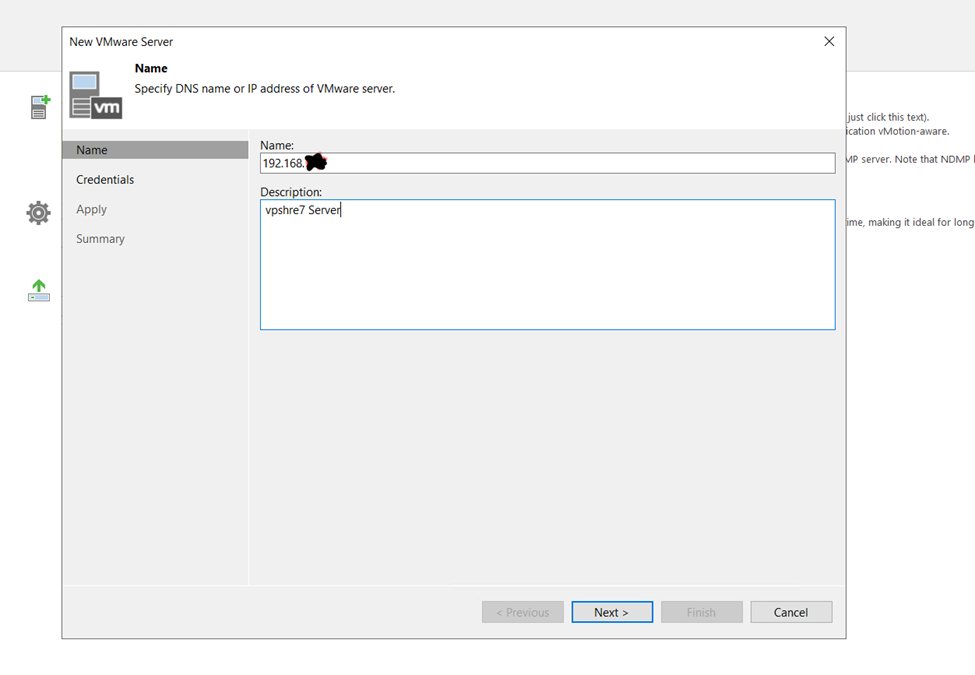
Adding Esxi Server into Veeam Backup & Replication
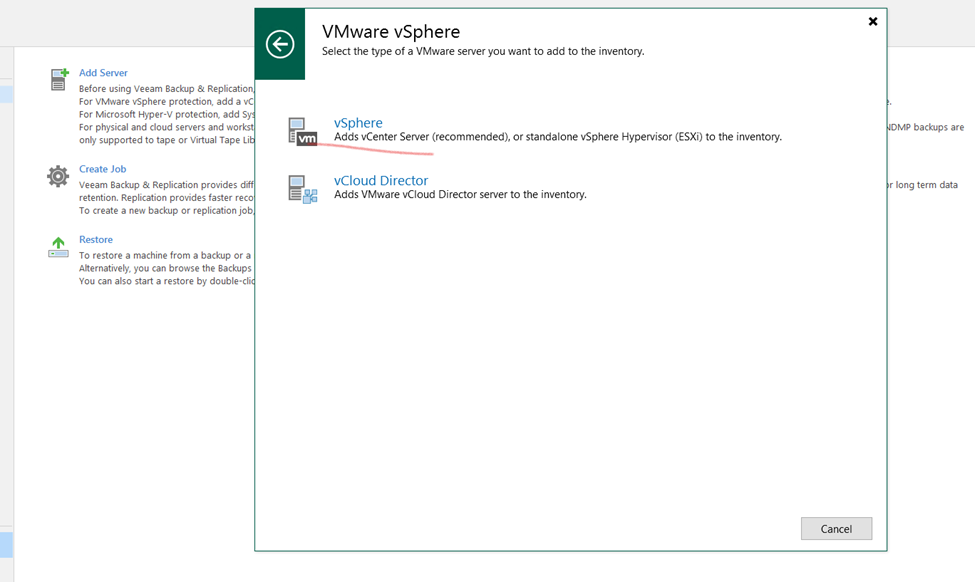
SELCT your Vmware vSphre Virtualization
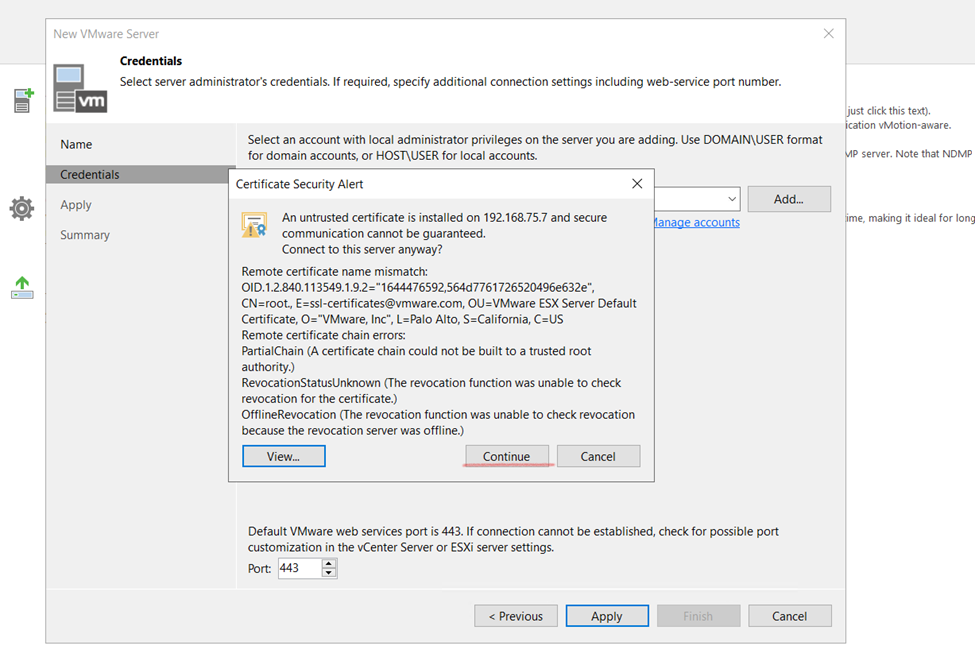
Enter your Vsphre hosts details
Vpshre username and password
Generate Certificate
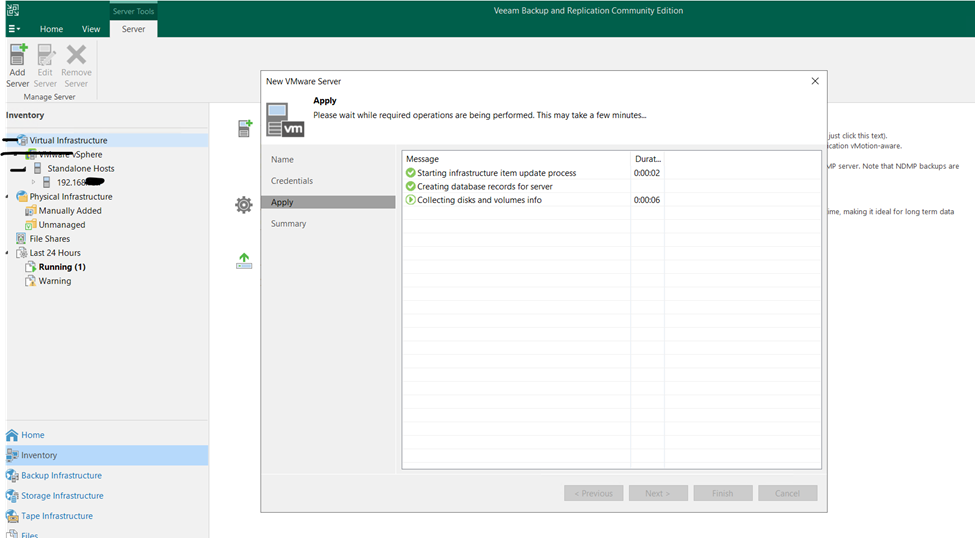
click to apply and add
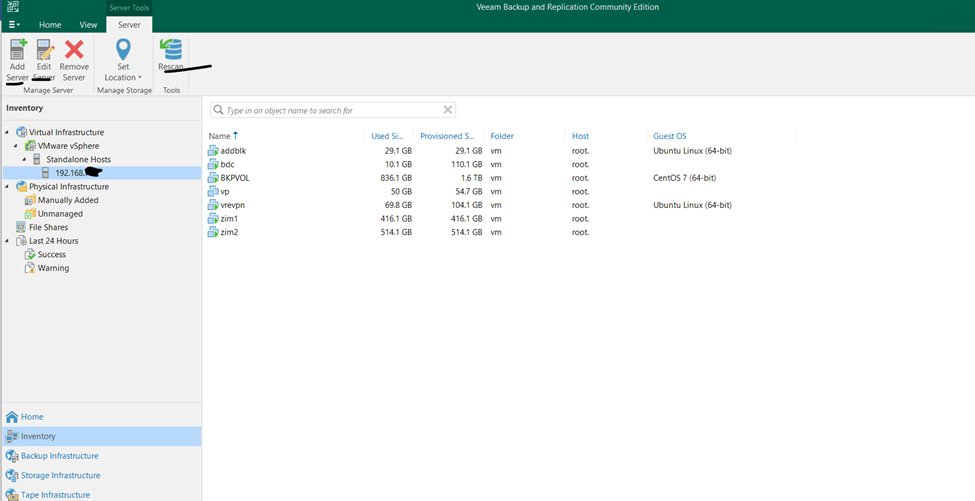
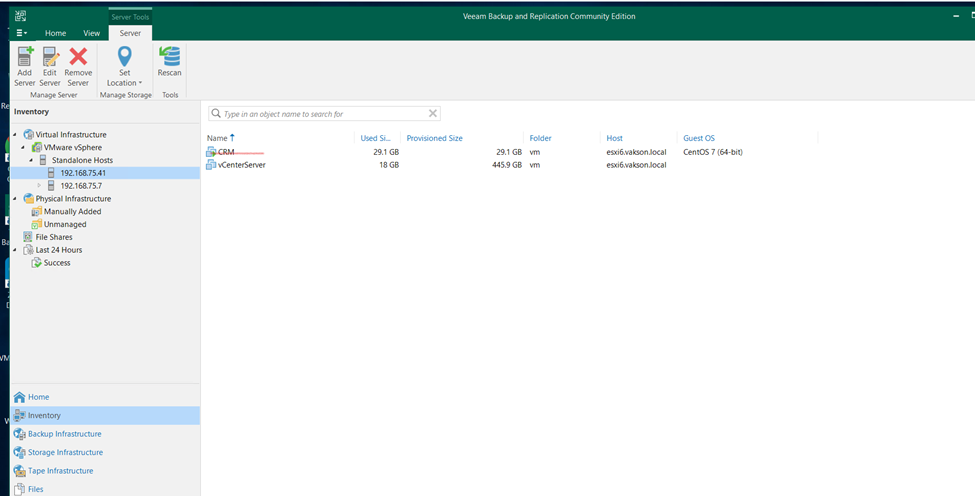
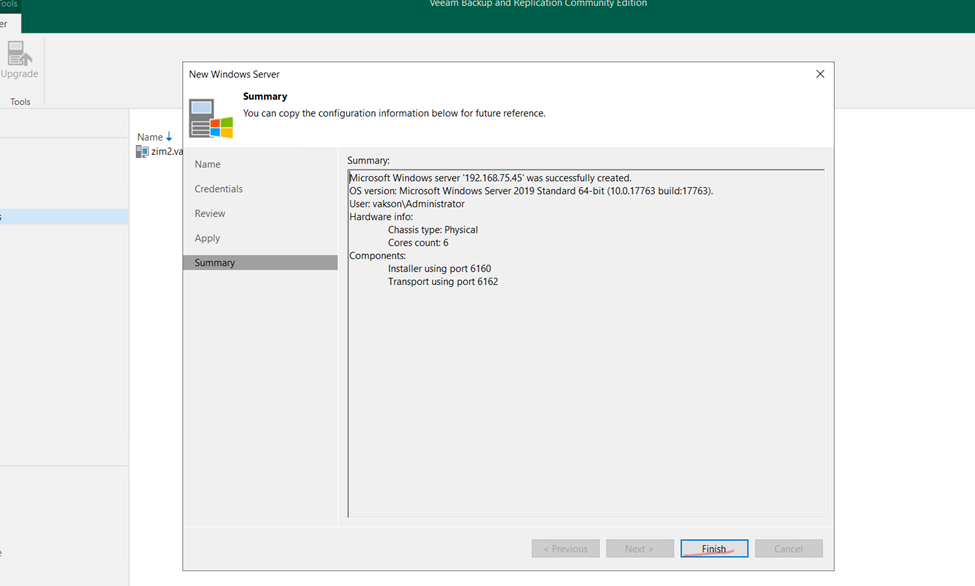
Finish it and check the added Vsphre satatus
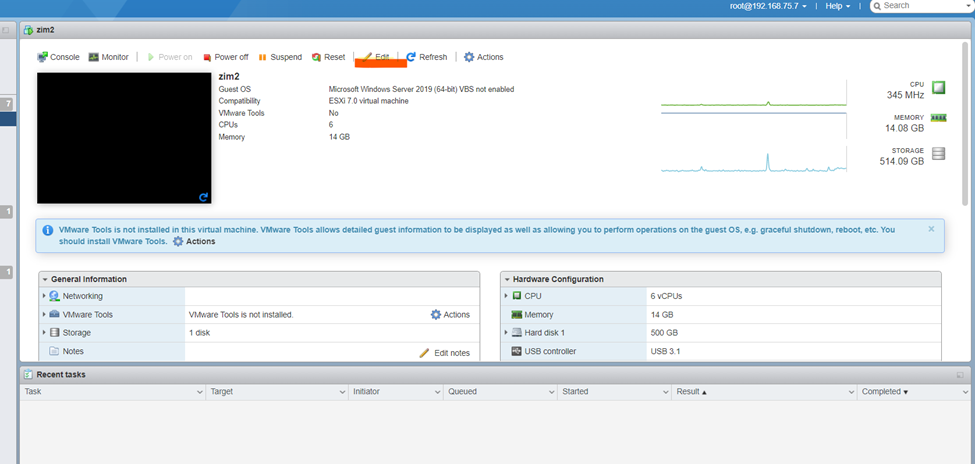
so, as you can check the screen attached Vsphre Server all vm is appearing
Hypervisor VSphres Server Attached
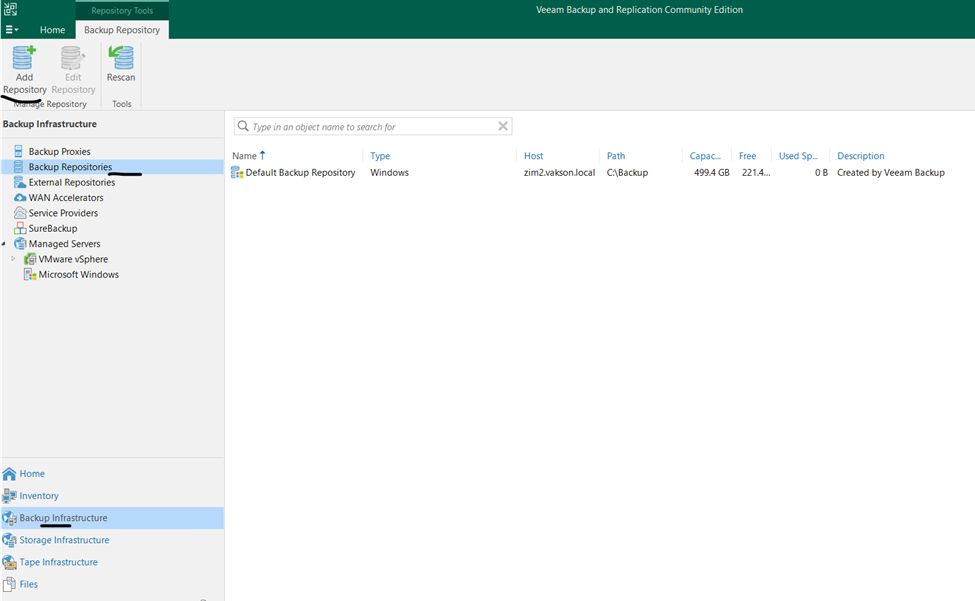
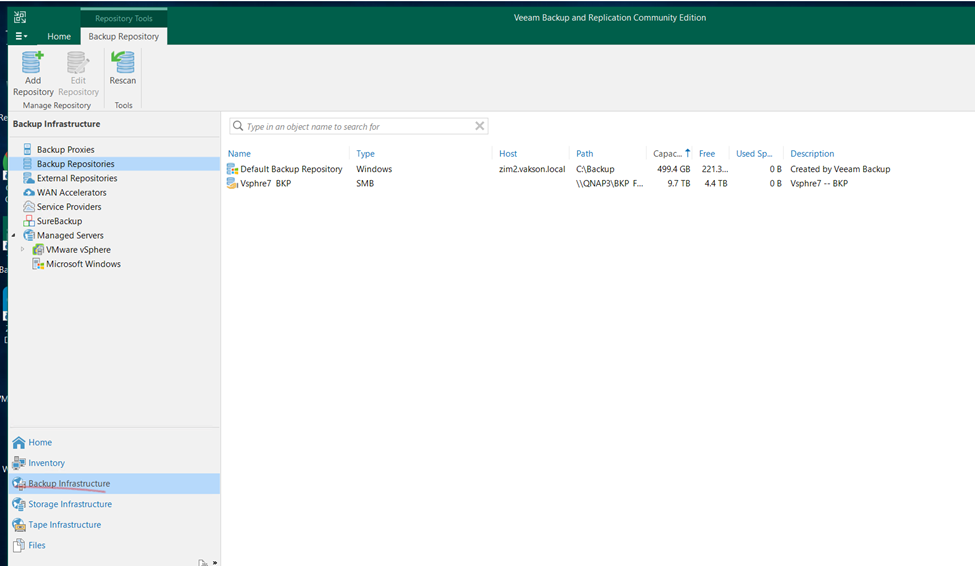
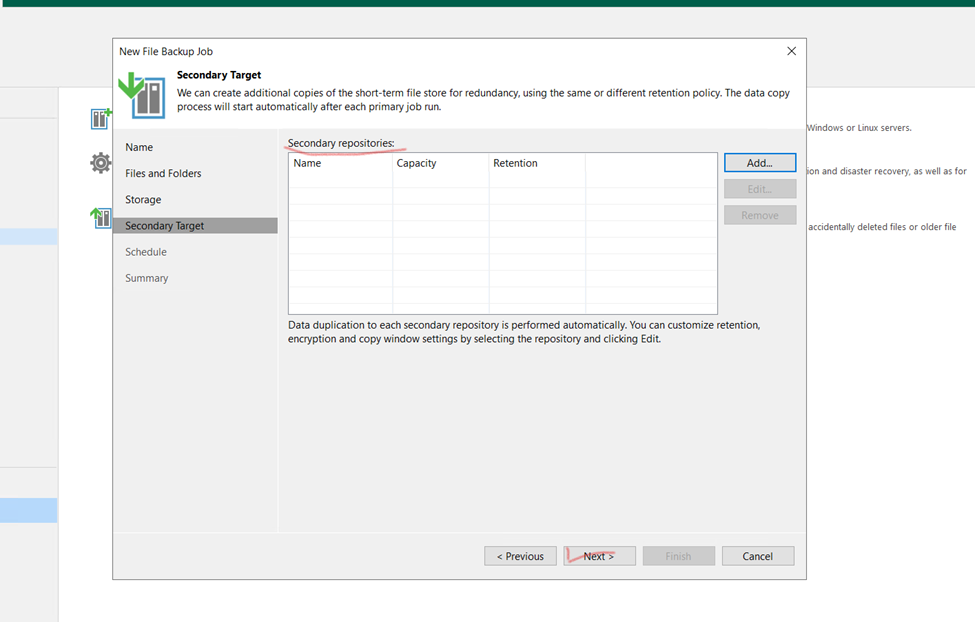
SO HERE I AM ADDING EXTRAL BACKUP REPOSOTORIES
Click to Veeam
Backup infrastructure
Backup Repositories
(Using this method to externalally taking backing to another server not to same server)
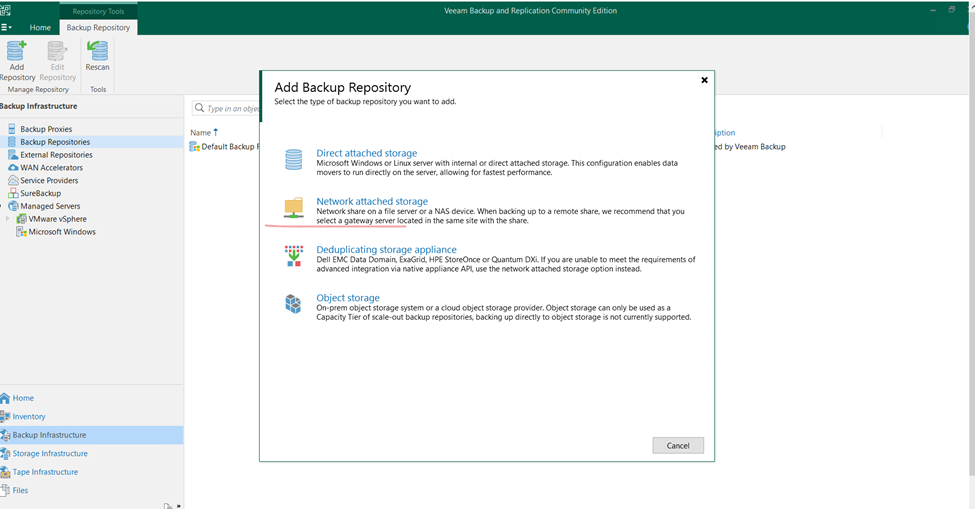
Now click to add
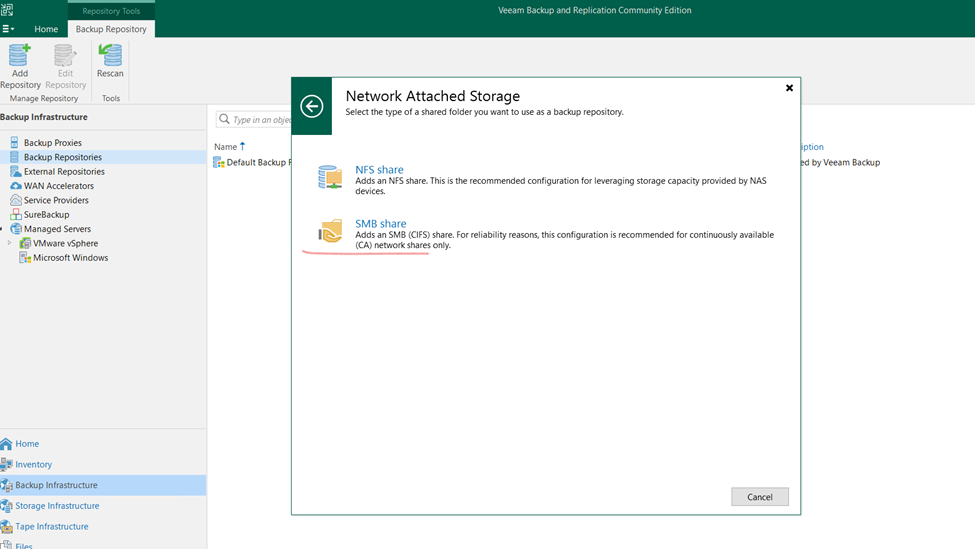
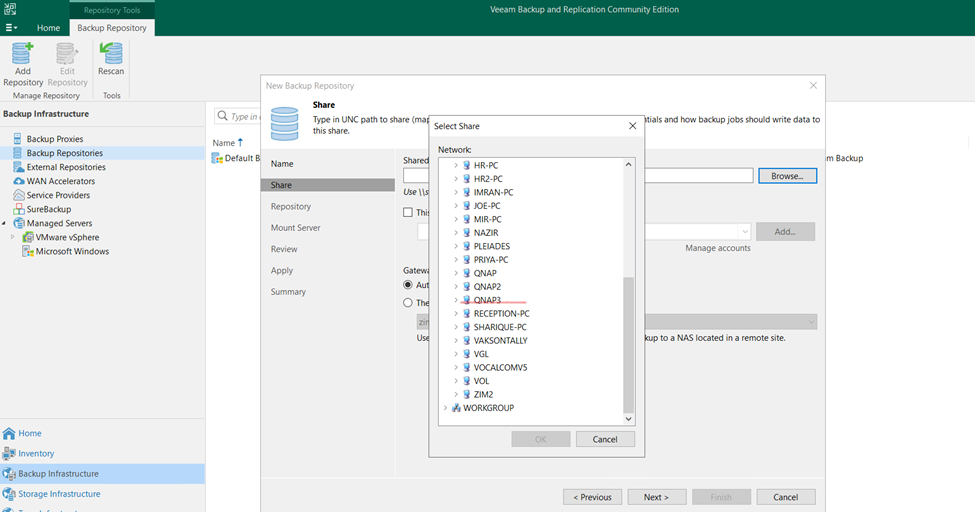
Selecting Network Storage
SMB Share
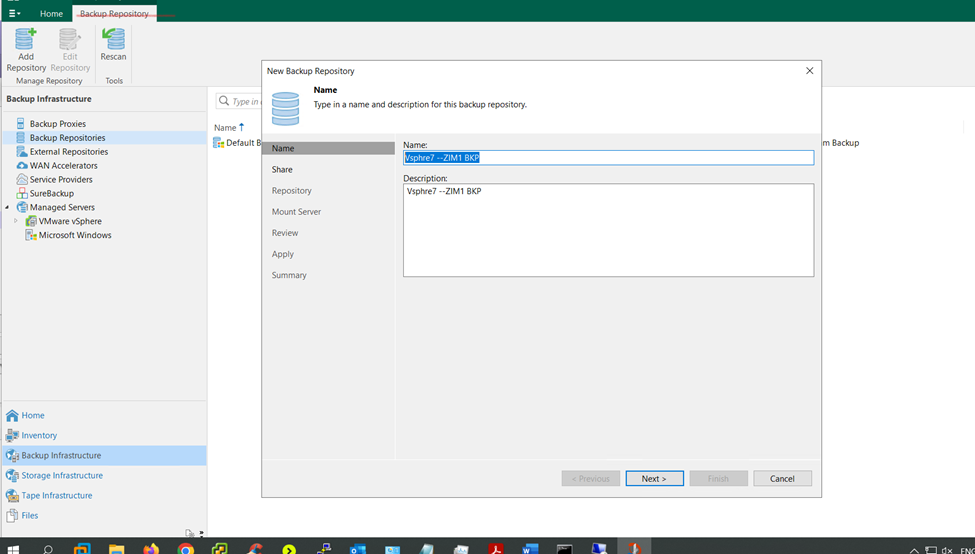
Give the name to Repository
SELECTING BACKUP Storage server
Backup Server Location
Backup Server Location
in below scree that’s the backup repository location
click to next
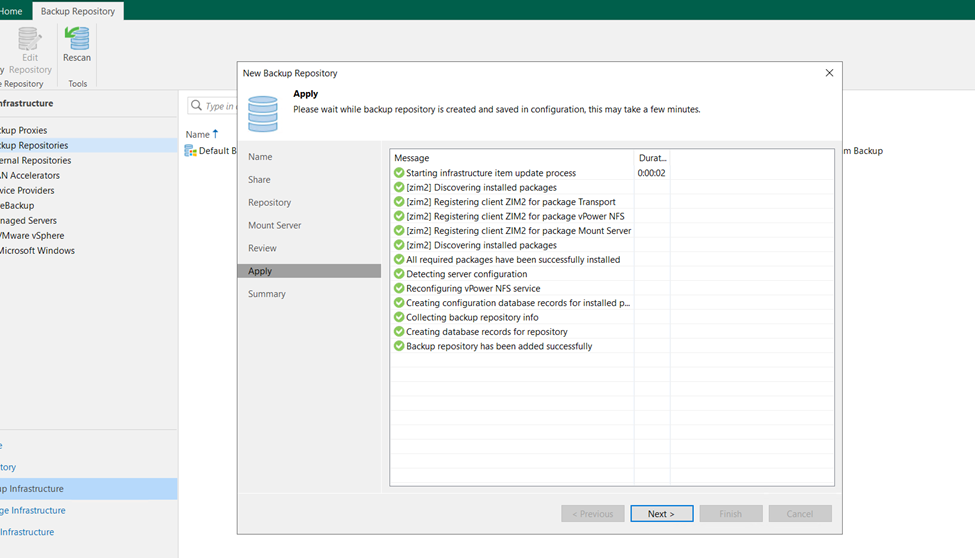
Mount Server
Click next
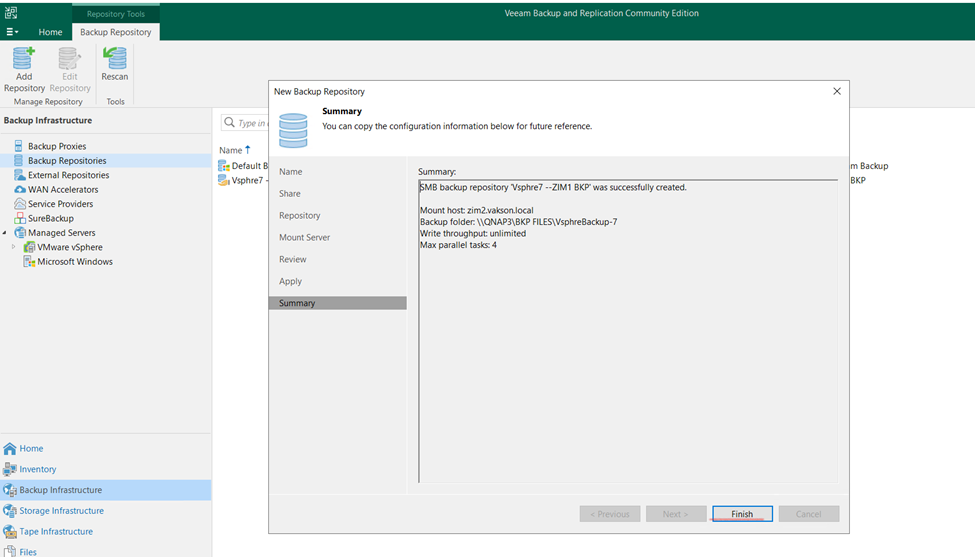
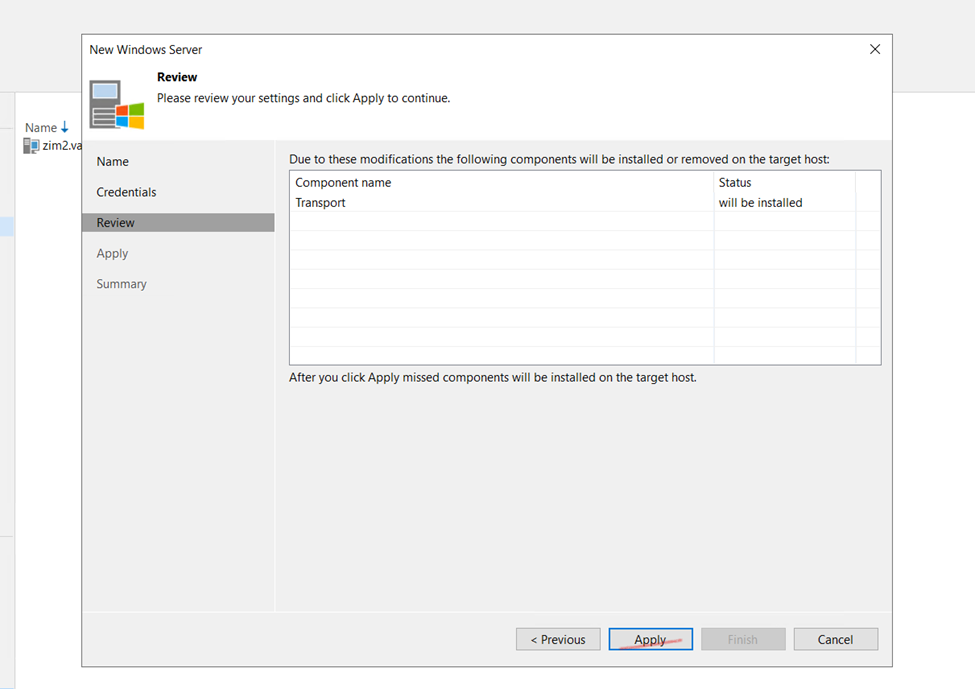
Review and check and click to next
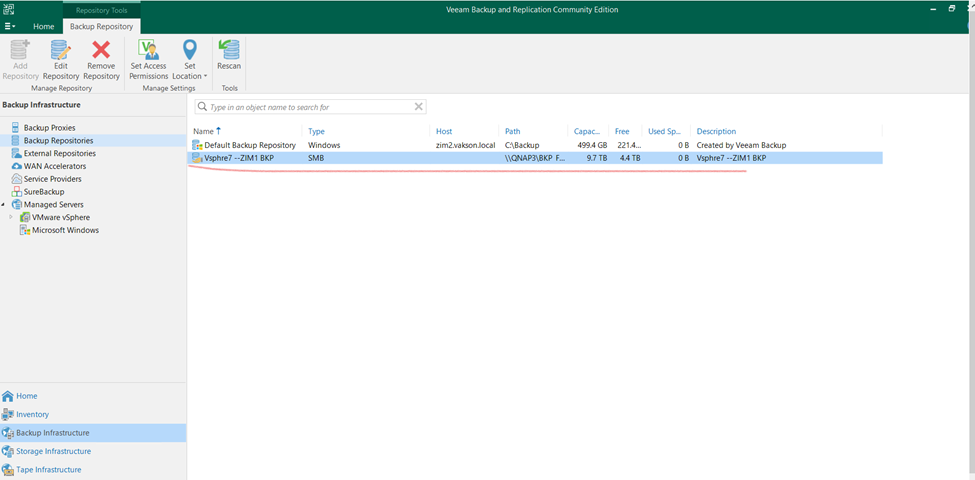
so, Backup repositories created successfully
Click yes and okay
newly created backup repository
now I wanted to take my VM BACKUP NOW Creating VM BACKUP
Assign VM Backup name
here, I will create backup from vsphre virtual machines
select vsphre vm
ADD MACHINE need vm username and password
Select backup repository
Incremental backup
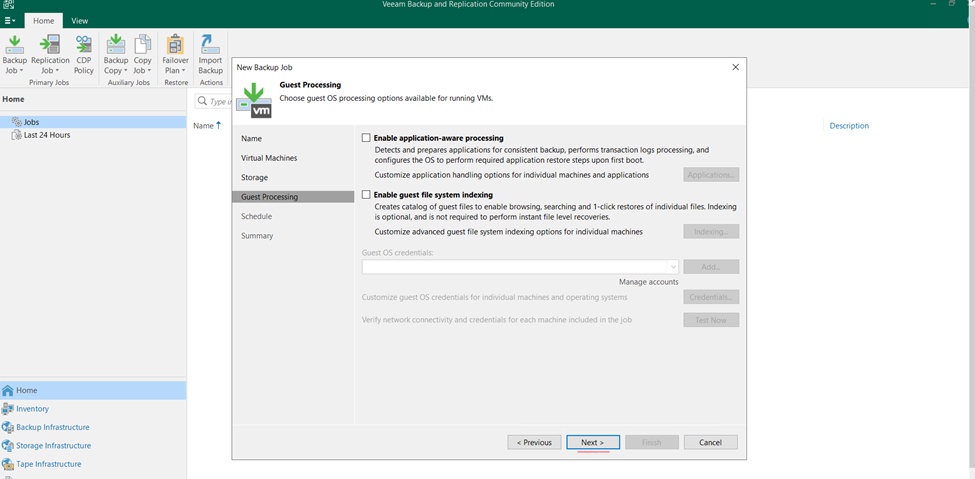
Guest processing make as default and click to next
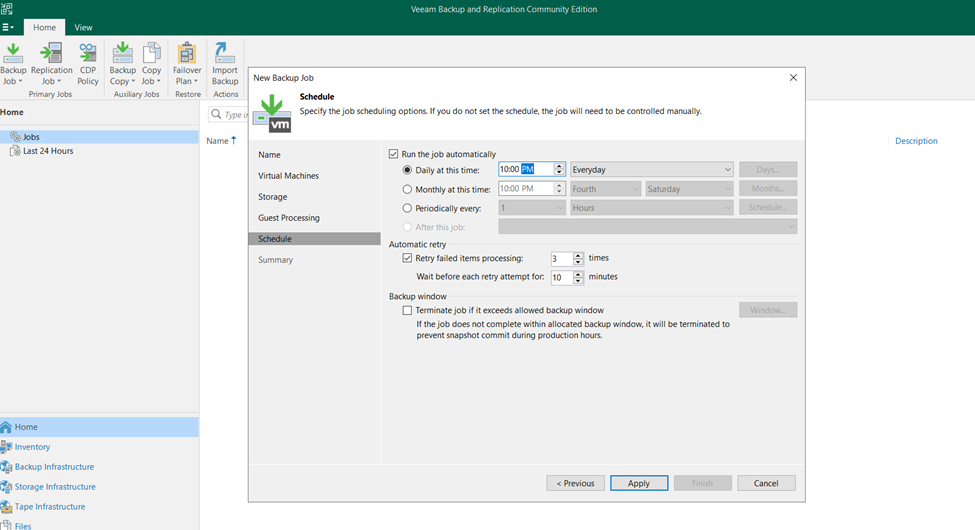
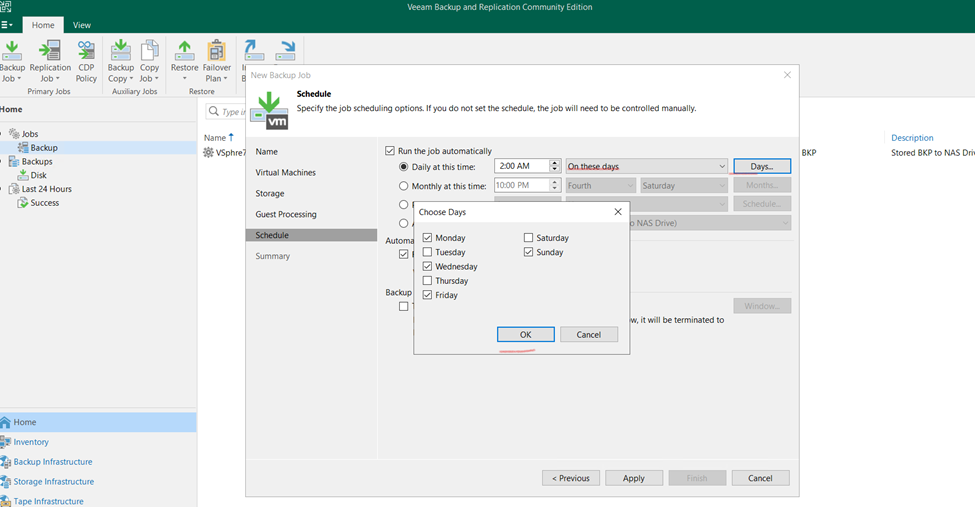
schedule backup synchronize time and apply
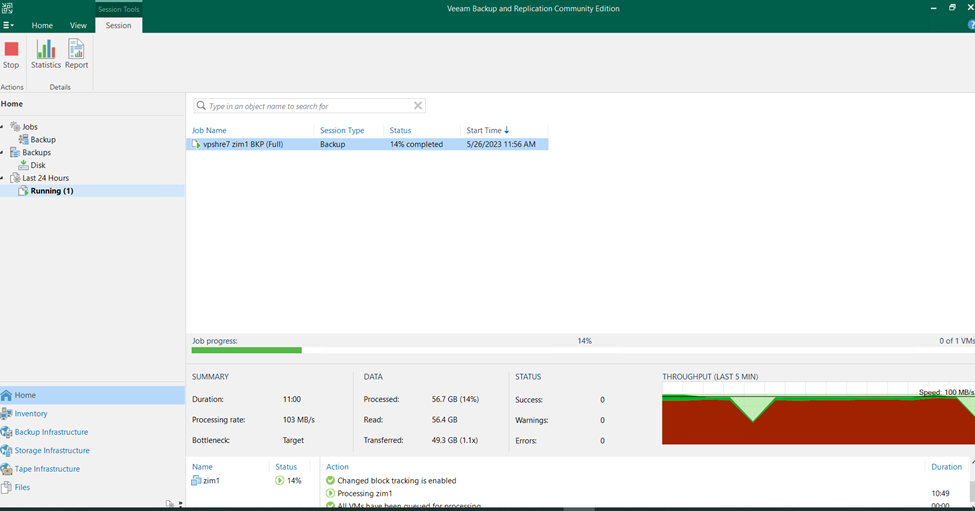
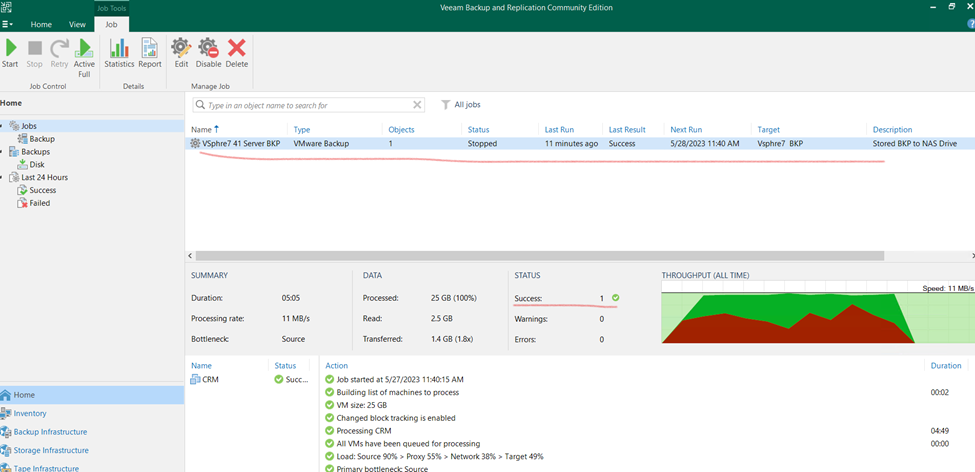
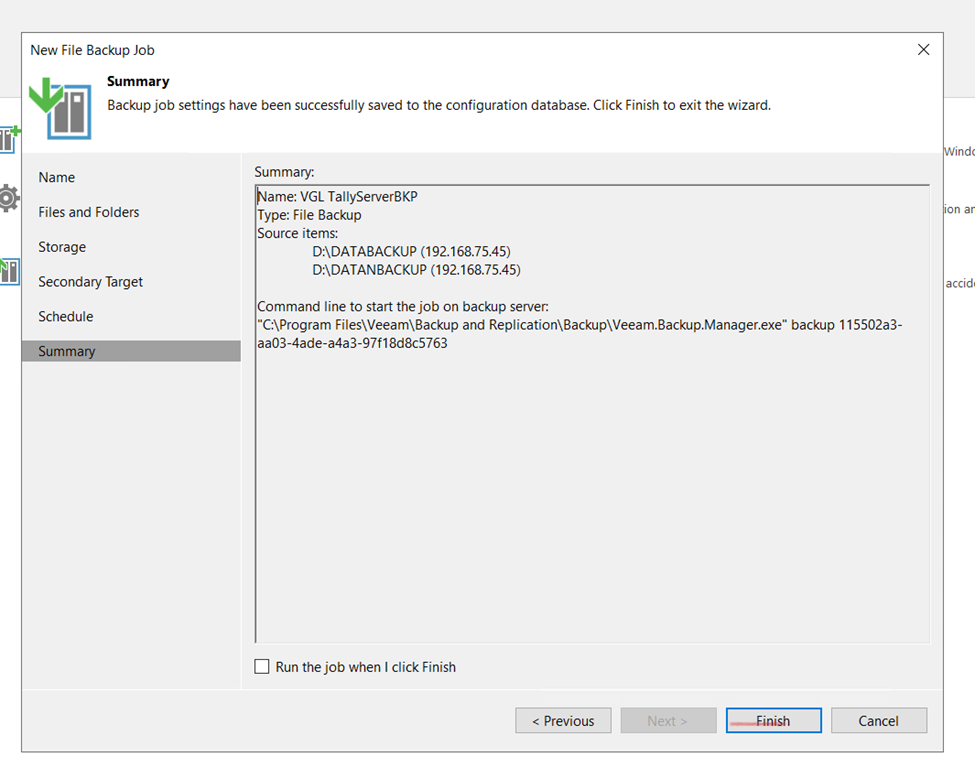
so finally finish VM Backup schedule
created vm backup
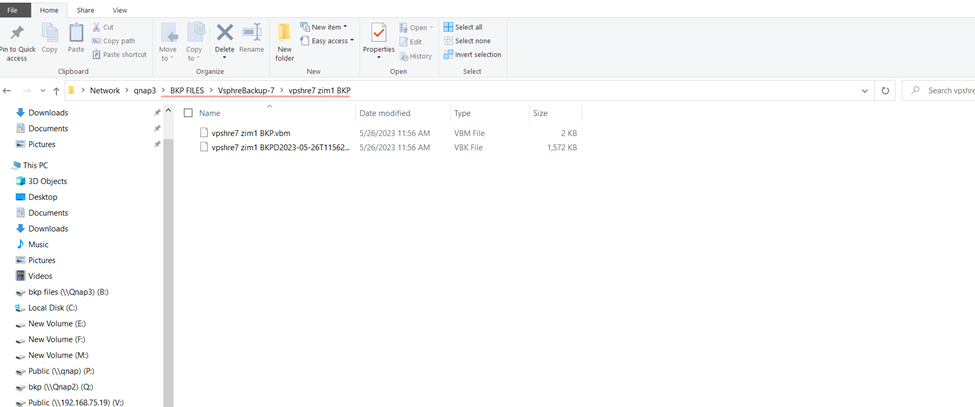
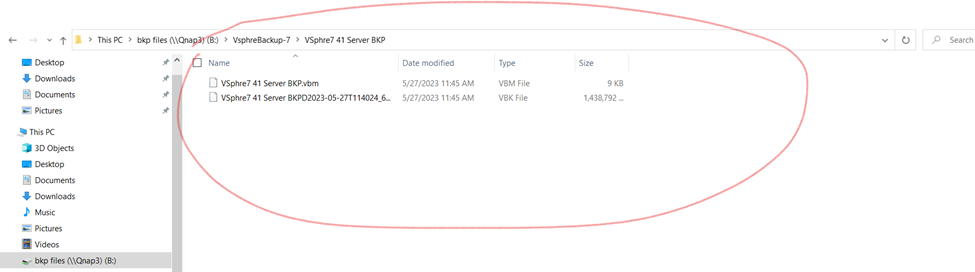
so check the vm backup status once backup done check the backup repository directory
as you can check here backup vbm and vbk file created
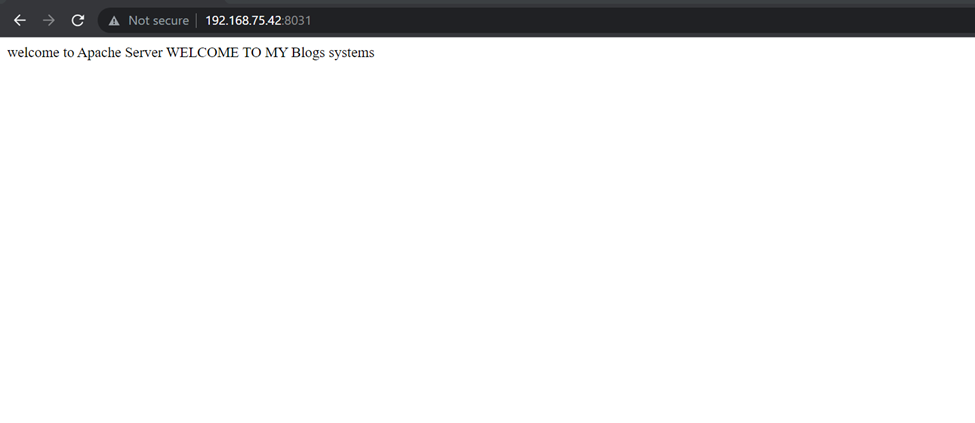
Here Taking Backup to Linux Apache Server Using Veeam Backup & Replication
So here I am having Apache server running on Cnetos 7 server in vpshre 6.7.
First, I will schedule the backup and also will restore the backup.
Having this running server
Running Server
Creating backup to crm application server
Click on Backup Infrastructure
Having backup repositories
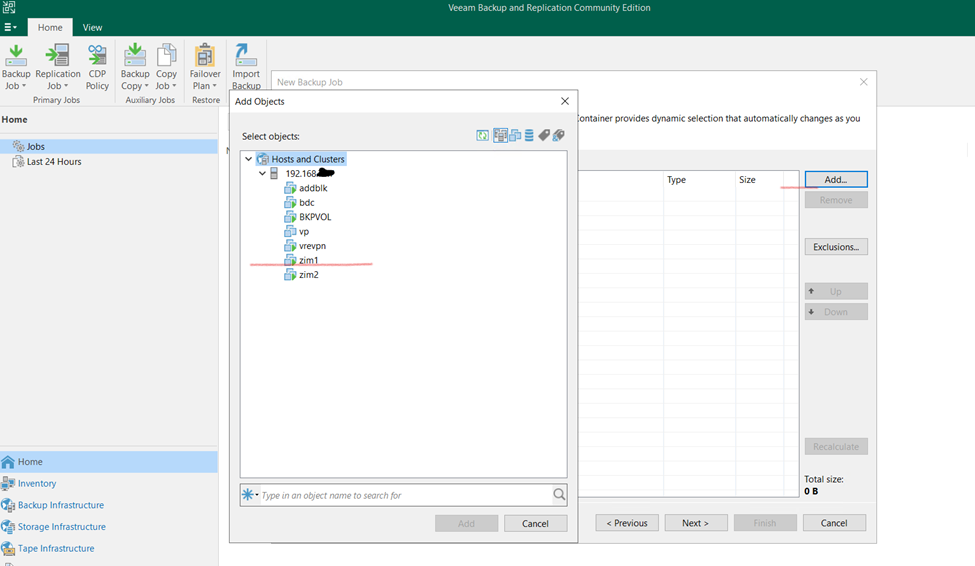
Click to home and select backup job having virtual machine need to select that.
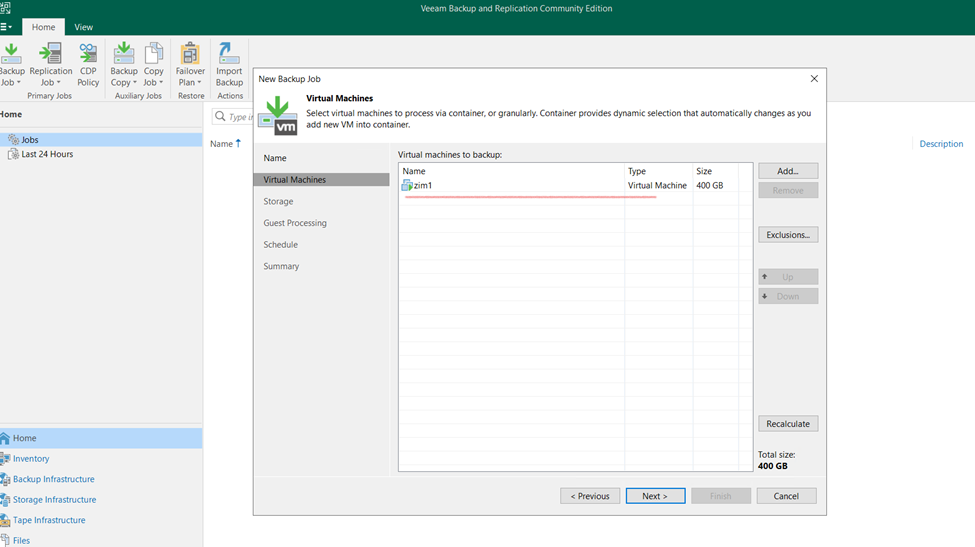
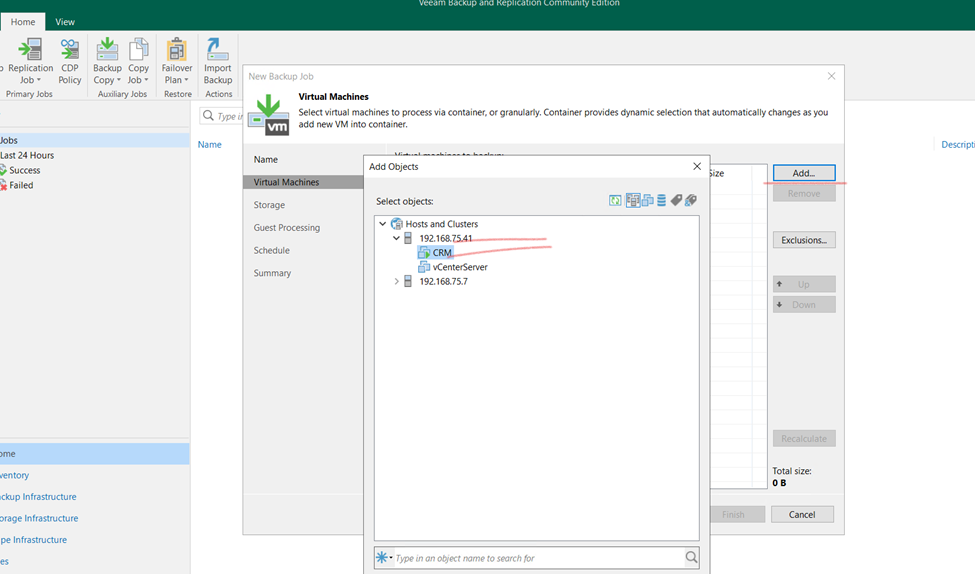
Assign the name
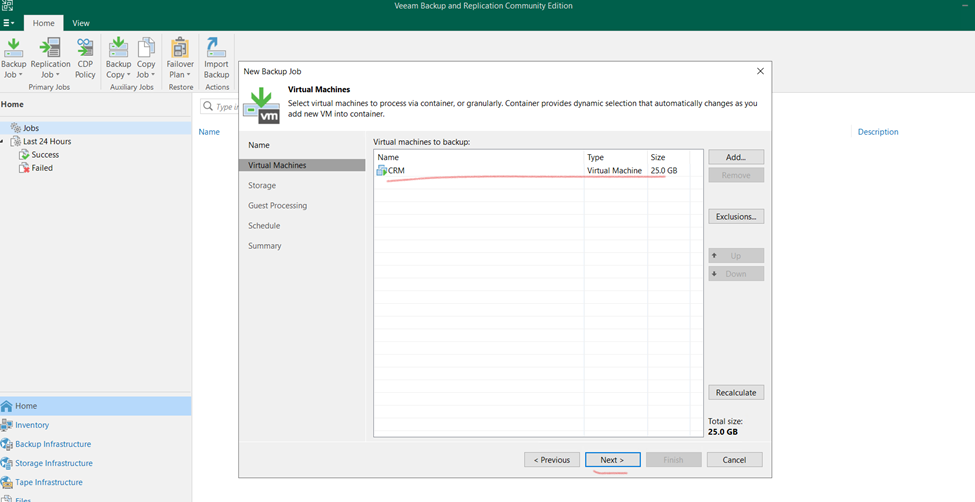
Virtual Machine Select EXSI Host and select VM for Backup and ADD that
Once done and click next
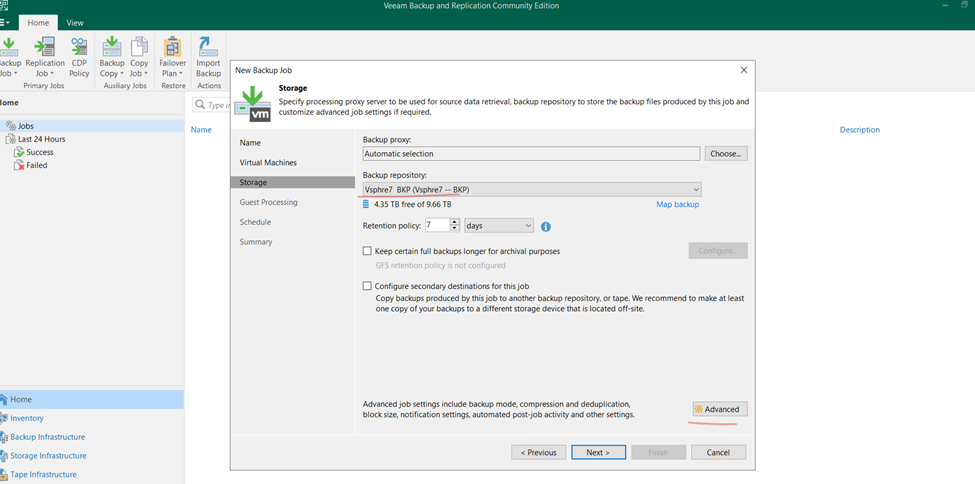
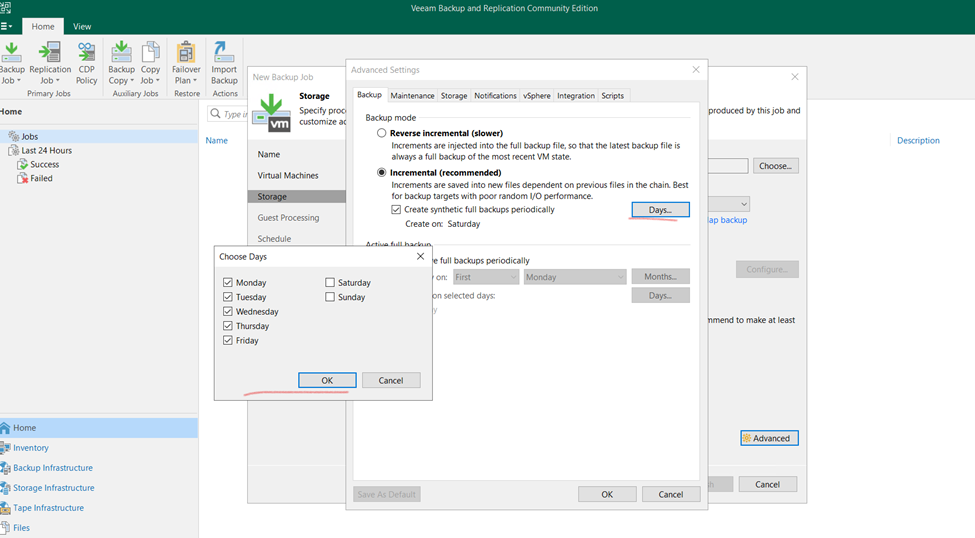
Select backup repositories and click to advanced for schedule backup time
Select Incremental backup days (it’s up to scenario)
And click too next
Here schedule time need to select click apply and finish
Or
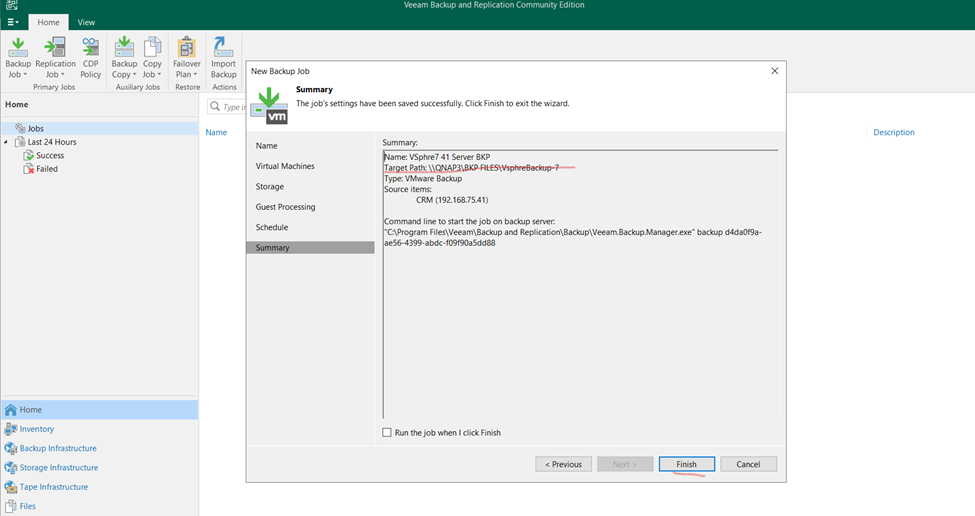
backup location and click to finish
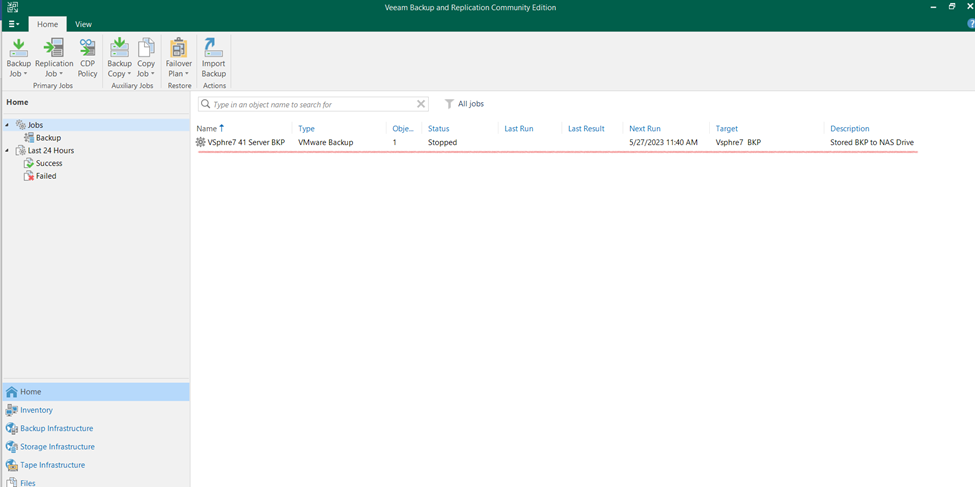
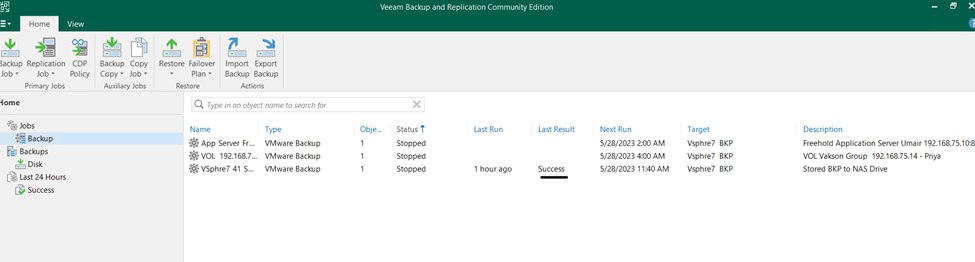
So, schedule backup job is created
Now it’s started on schedule time.
Once schedule backup done will delete the current running machine and will restore server
BACKUP IS COMPLETED
Backup stored on Backup repositories attached
Here,
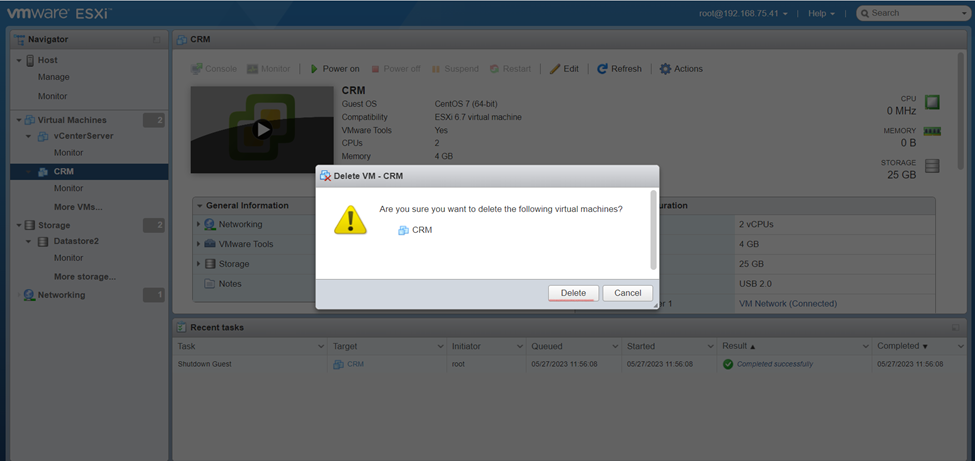
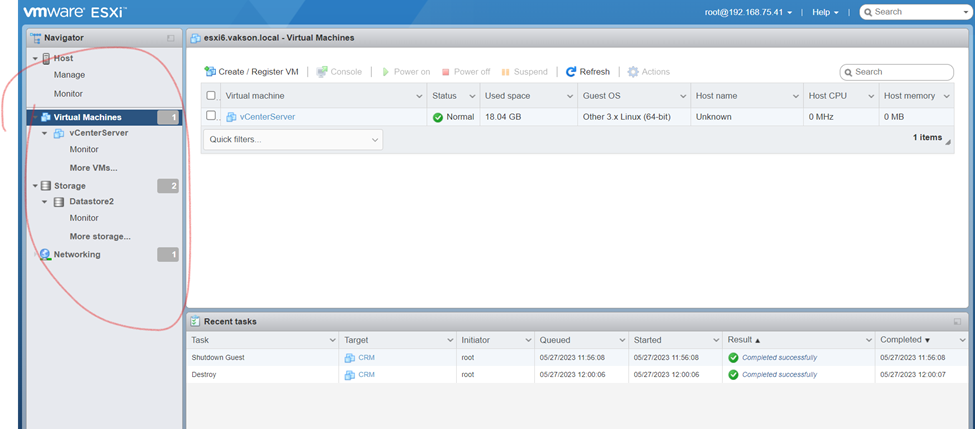
CRM Server Deleting
Deleted Server
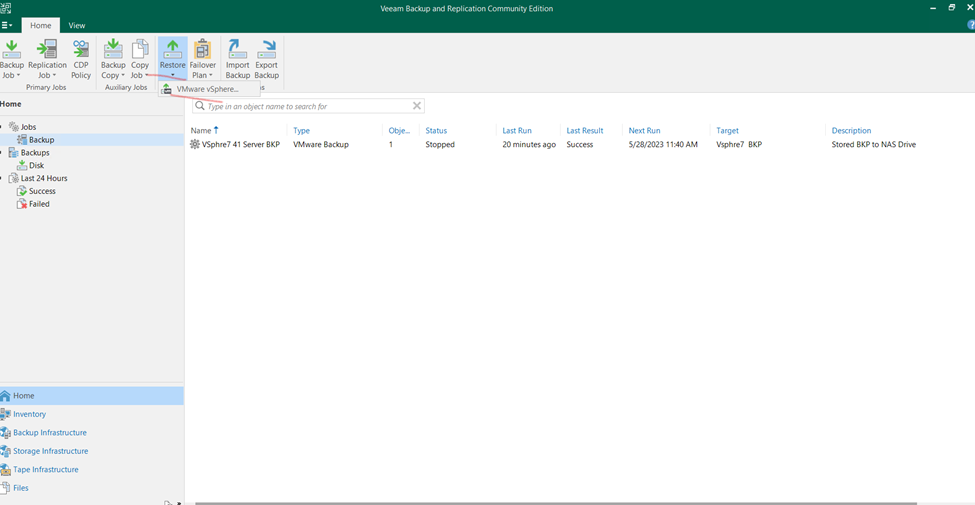
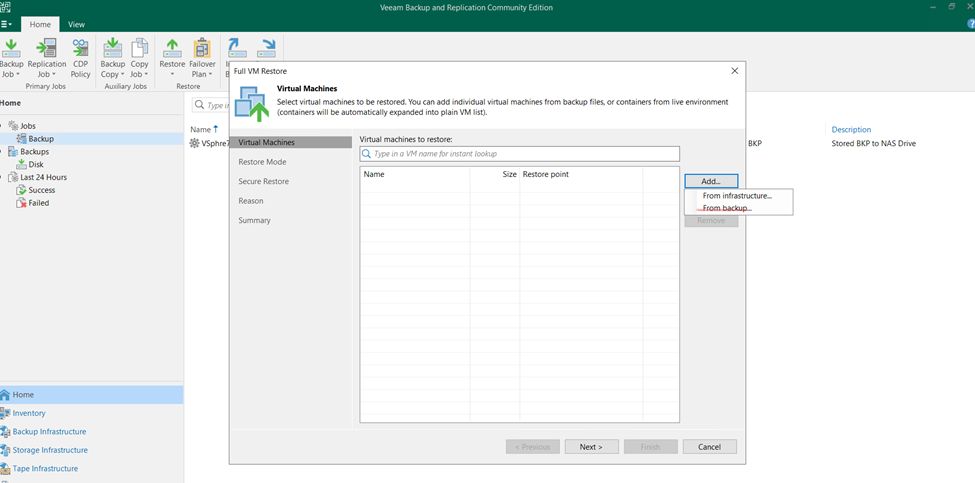
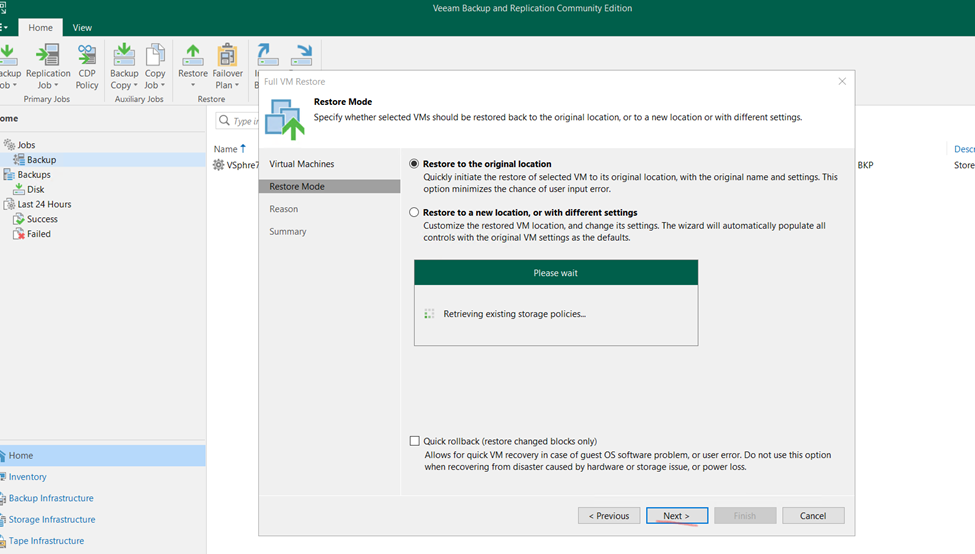
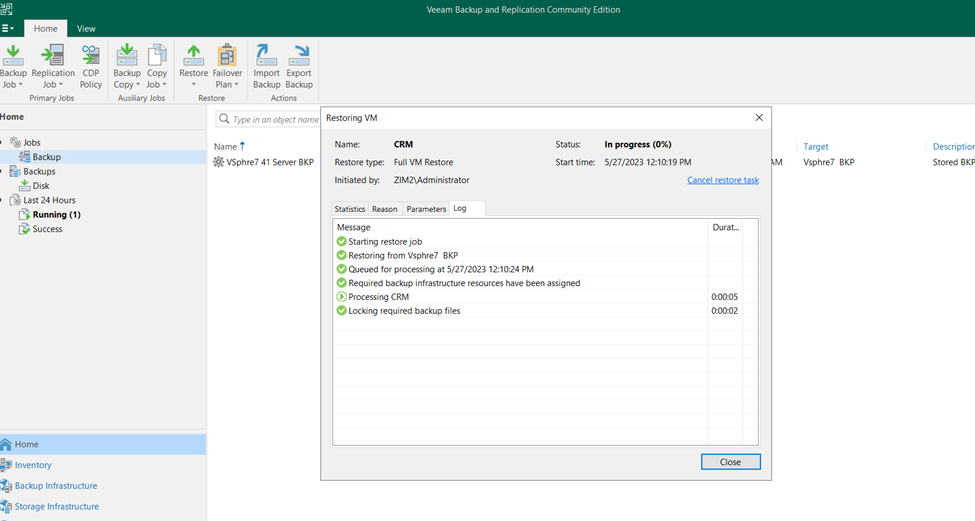
Restoring Entire VM
Click on Restore Select Vmware Vsphre
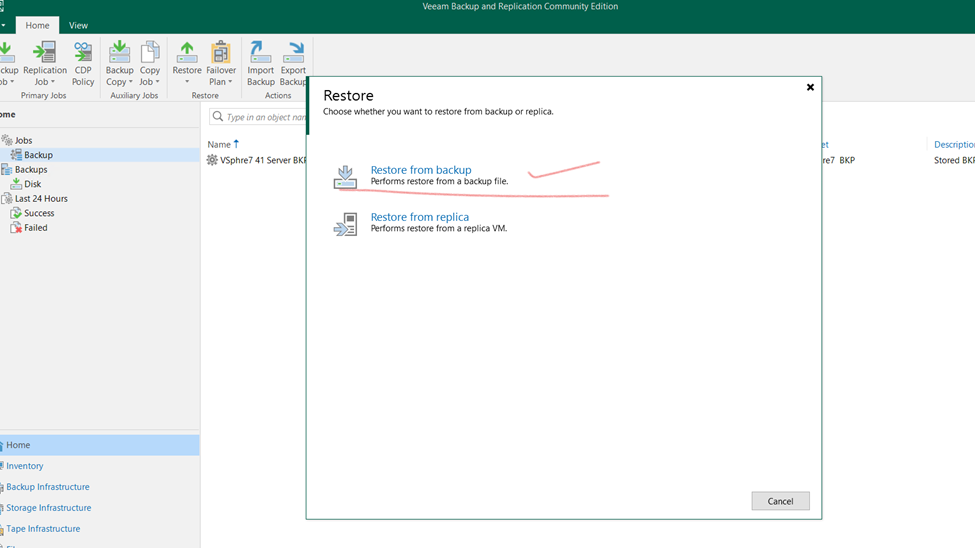
Select restore from backup
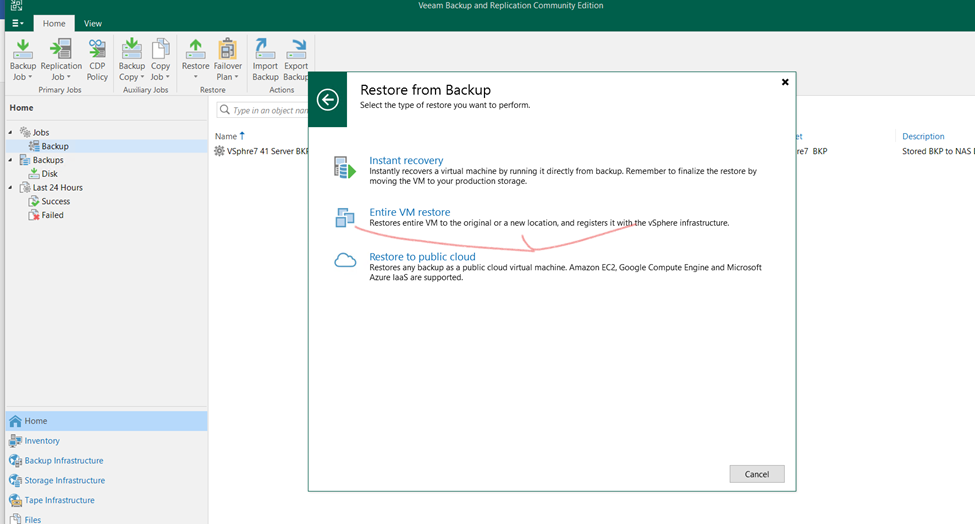
Restoring entire vm
Entire vm
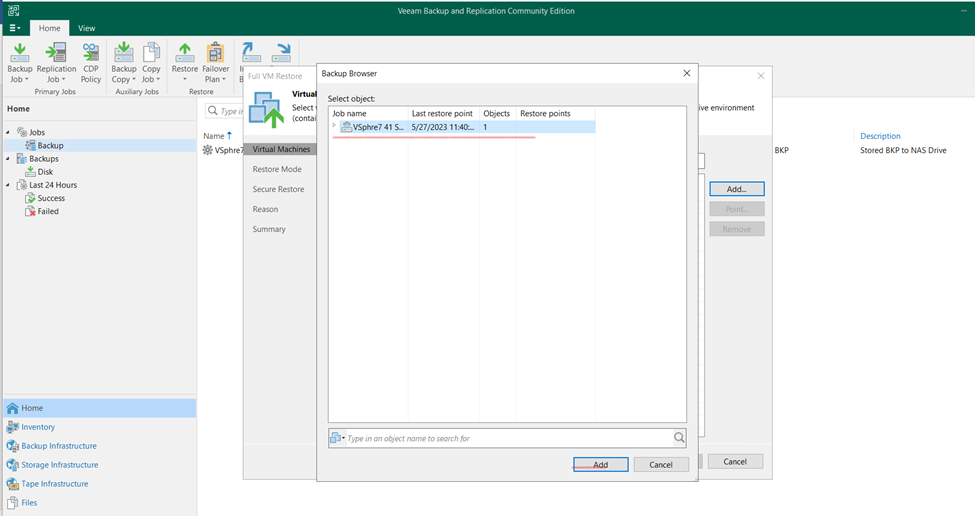
Click on from backup
Select the backup repositories and click to add
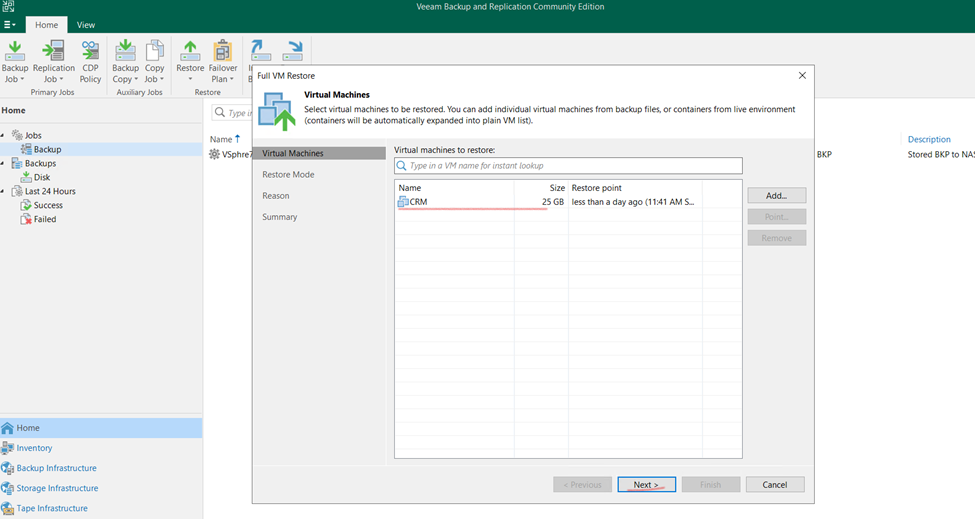
Click too next
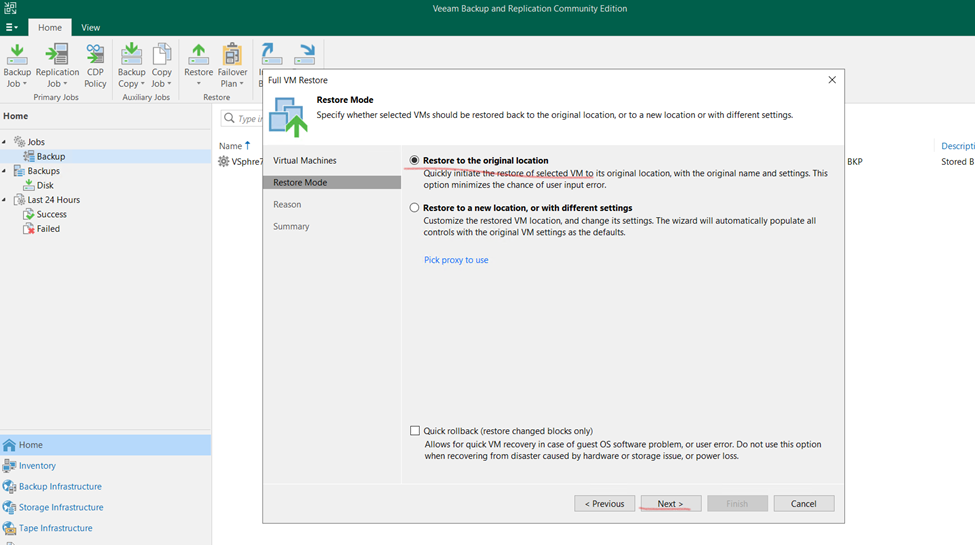
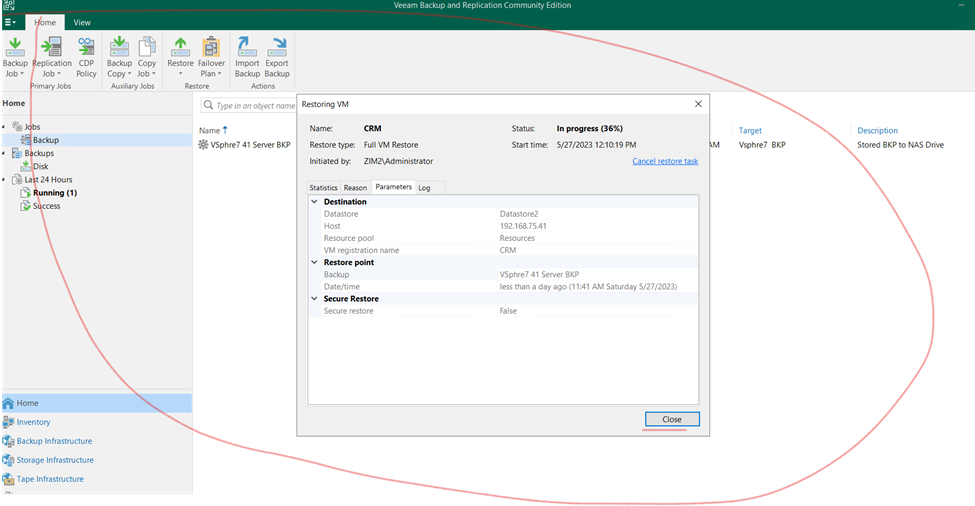
Select the restore to original location
Click to next
Now checking files available in which location
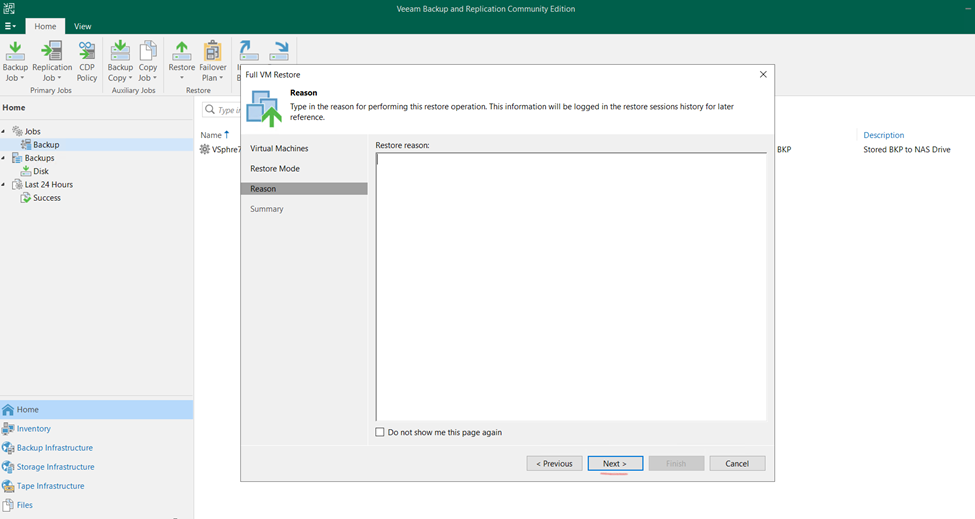
Now click next
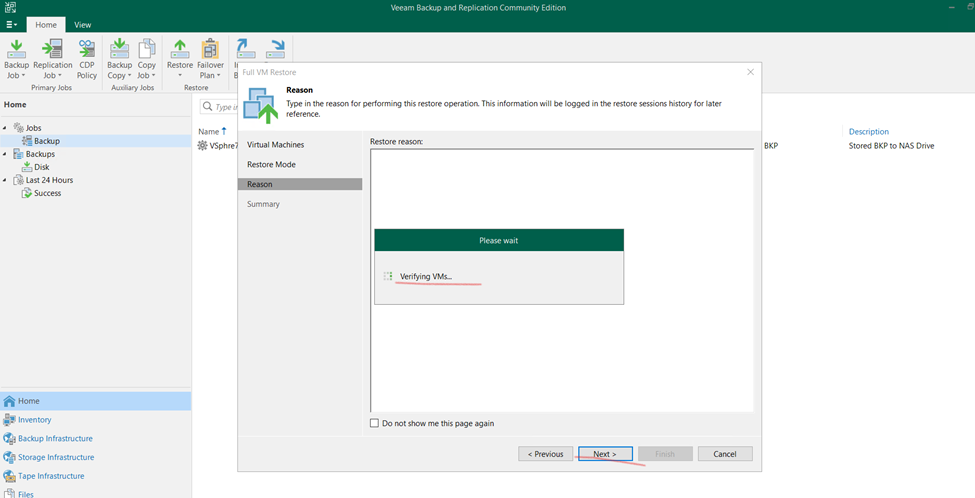
Verifying vm
And click to next
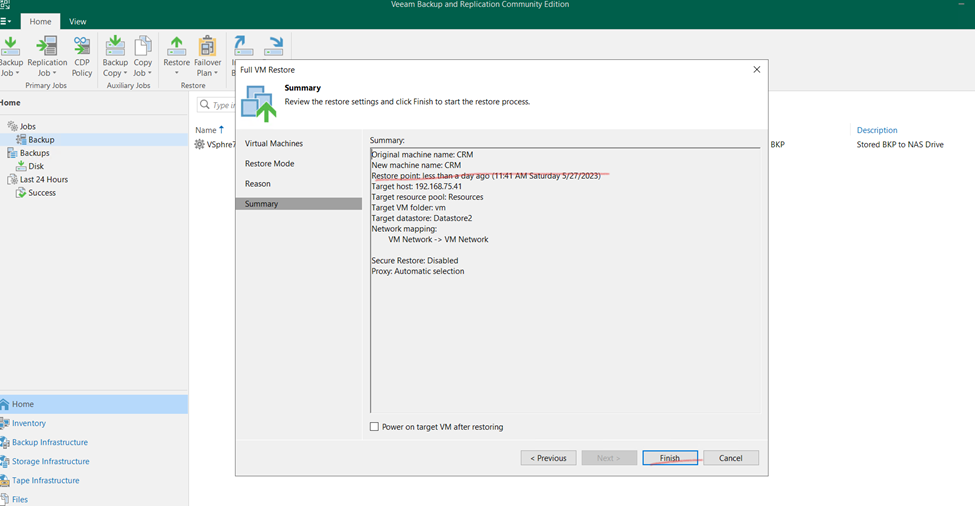
Now click to finish
Now need to wait and once done recheck the machine
Process still running
Restore done and close
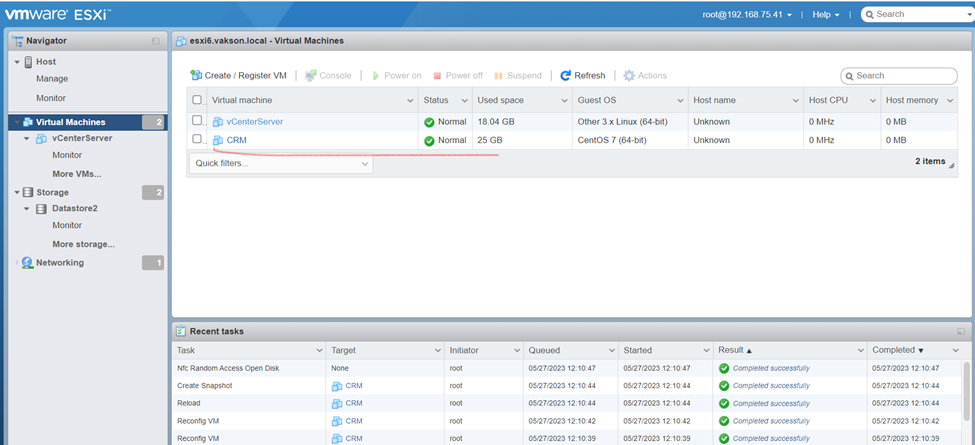
Now, as you can check on exsi server same virtual machine restore
turn on restored server and checking the Server status
So, after restoration server running fine.
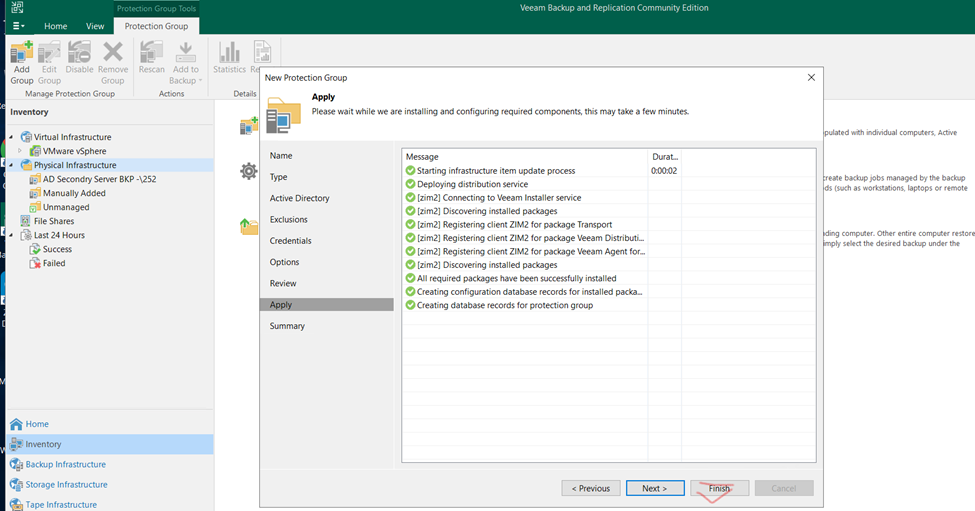
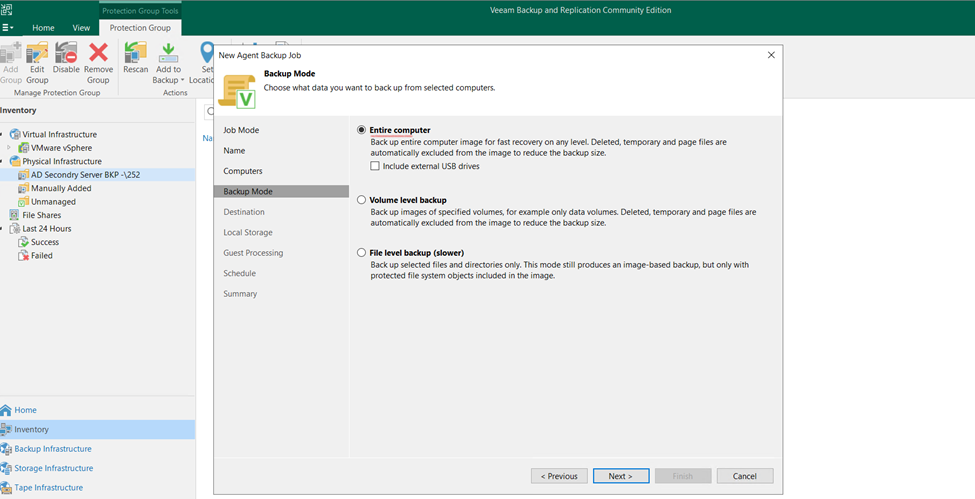
Physical Server Backup using Veeam Solution
Click on Inventory and select Physical infrastructure click on
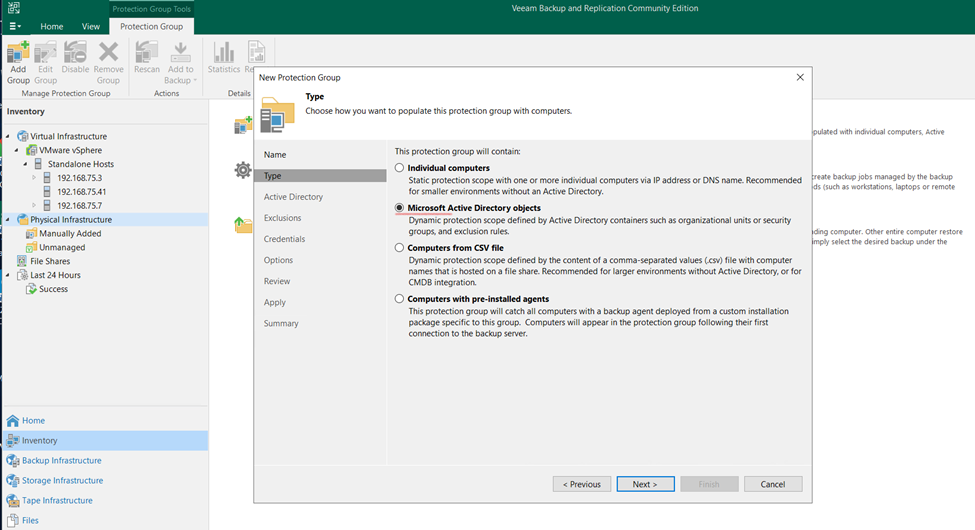
Click on Protection Group
Type the name and select to next
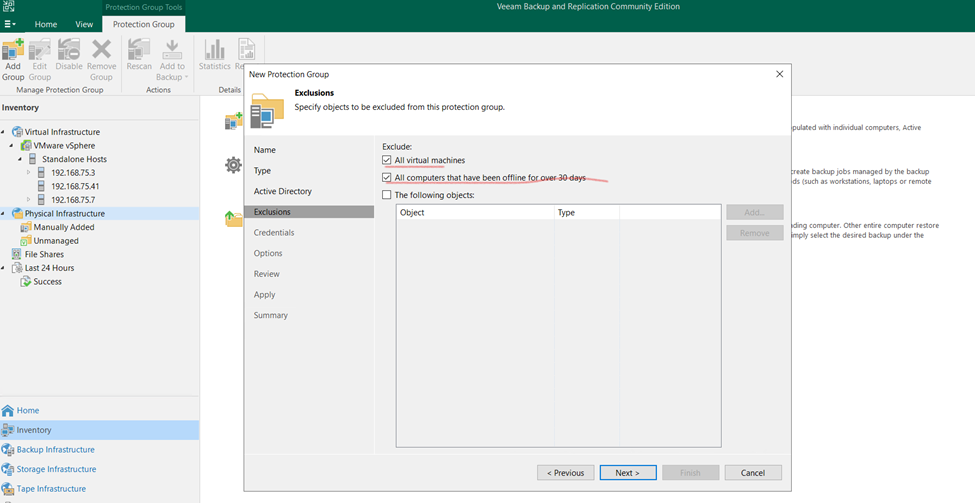
Here we can take Individual computer backup also but I need to take backup of Domain Controller
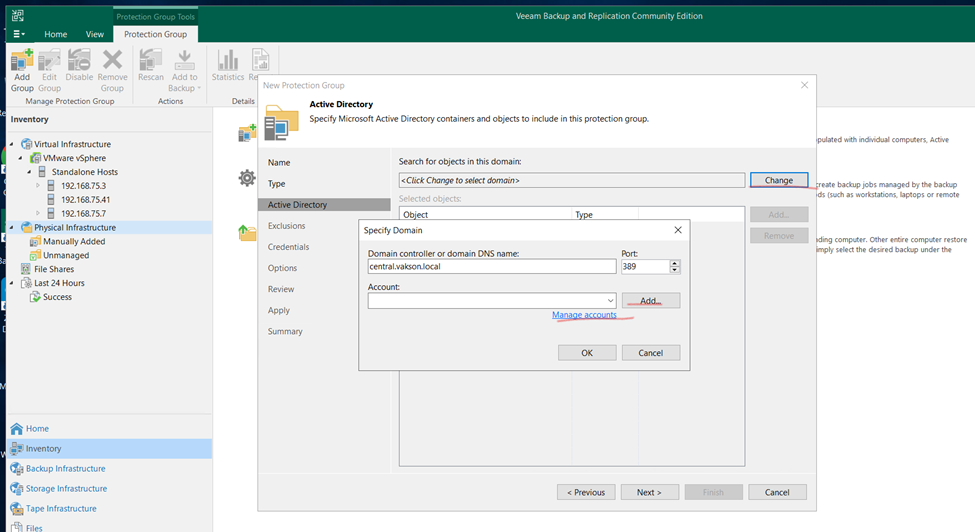
Select AD
Select DC and click to next
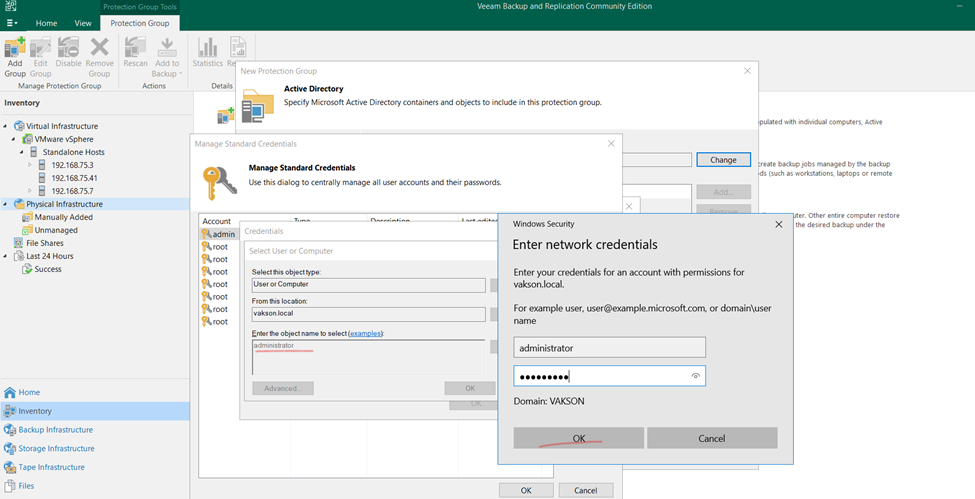
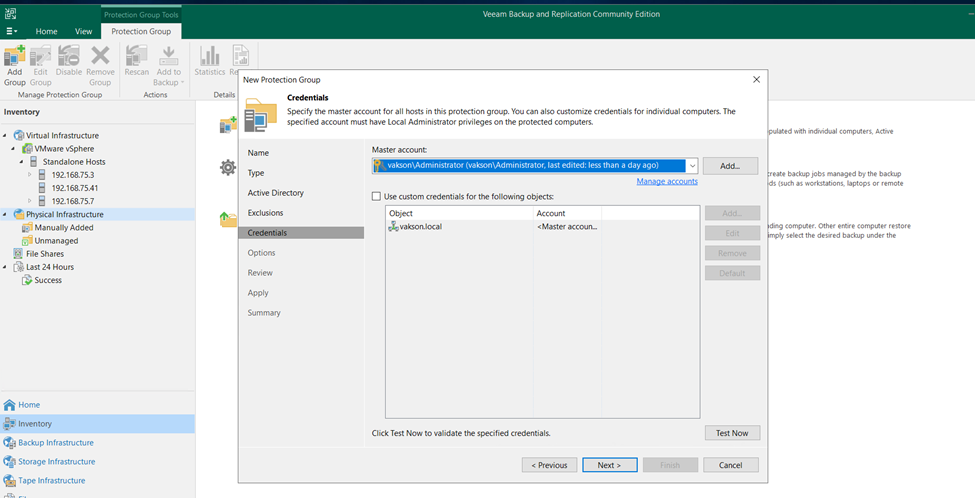
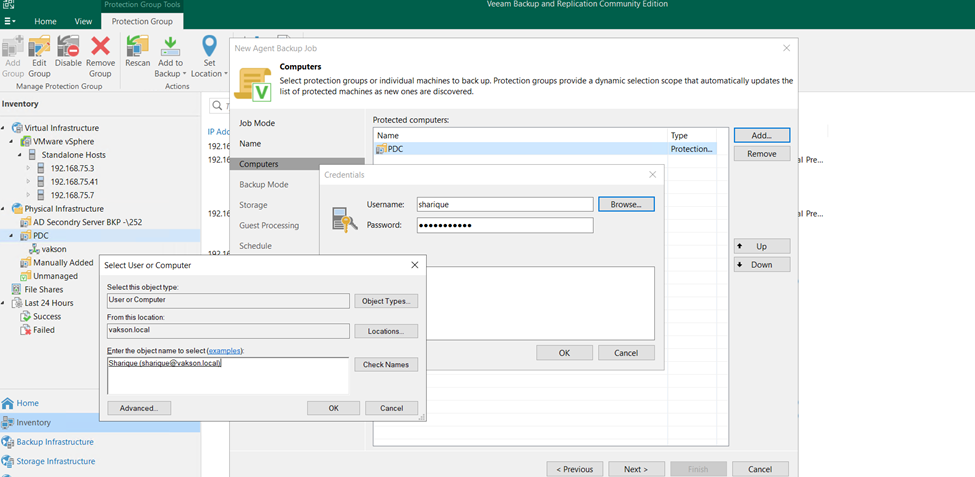
Click on add button
Click to Browse
And type the Domain Controller username and password
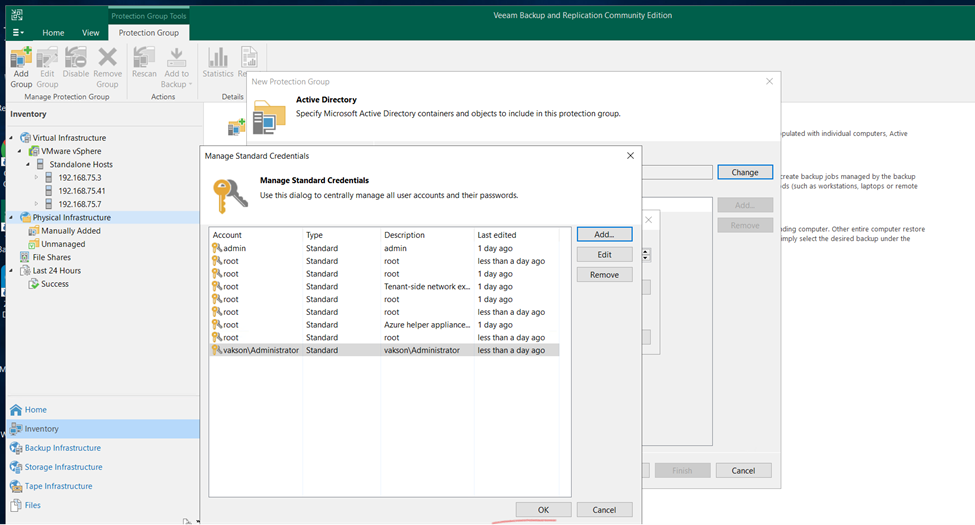
Once added click okay and next
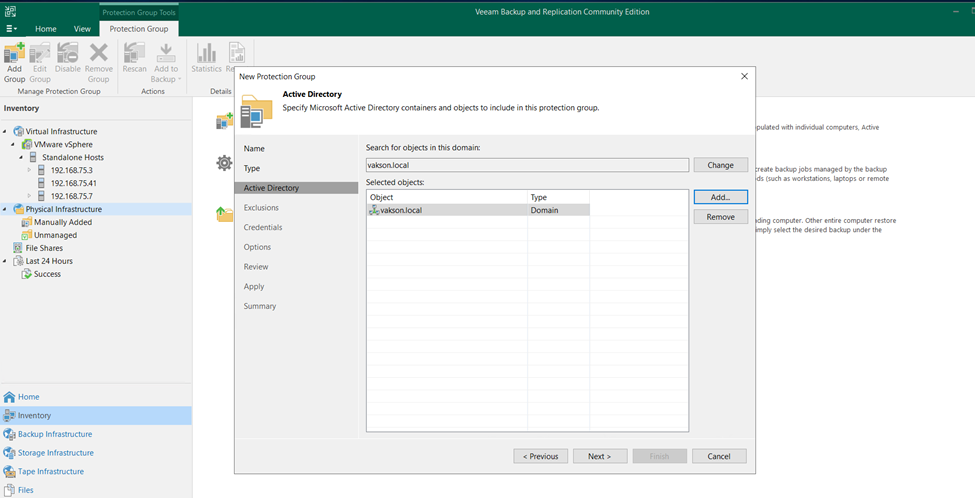
Click to next
If will select all AD User it will Select all computer attached to DC
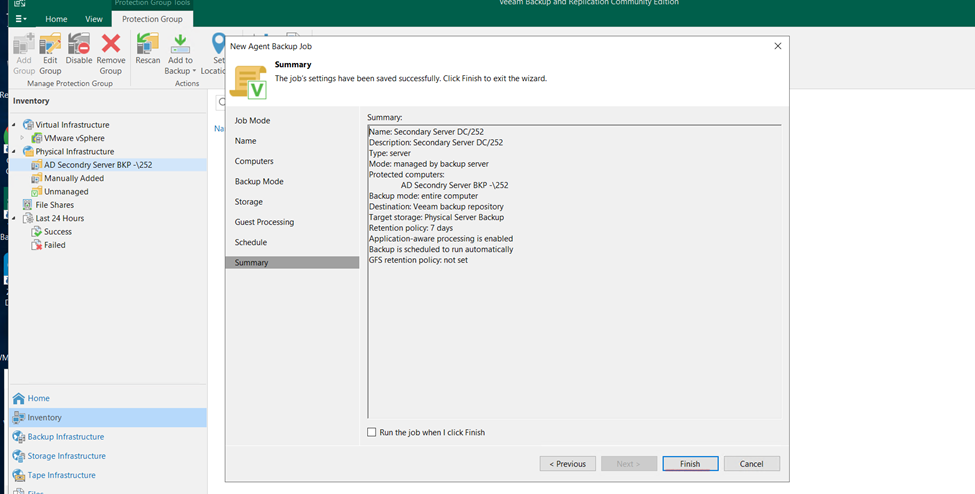
So here I’m selecting Only Secondary DC
Here selected all DC Infrastructure
And click too next
Selected VM also if Hyper V if installed so it can take all Backup
Click next
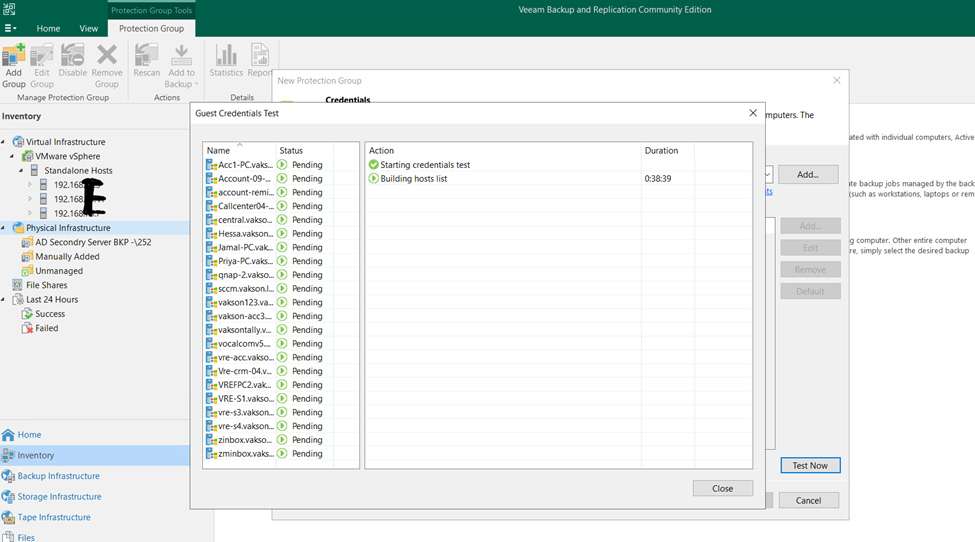
Test Now
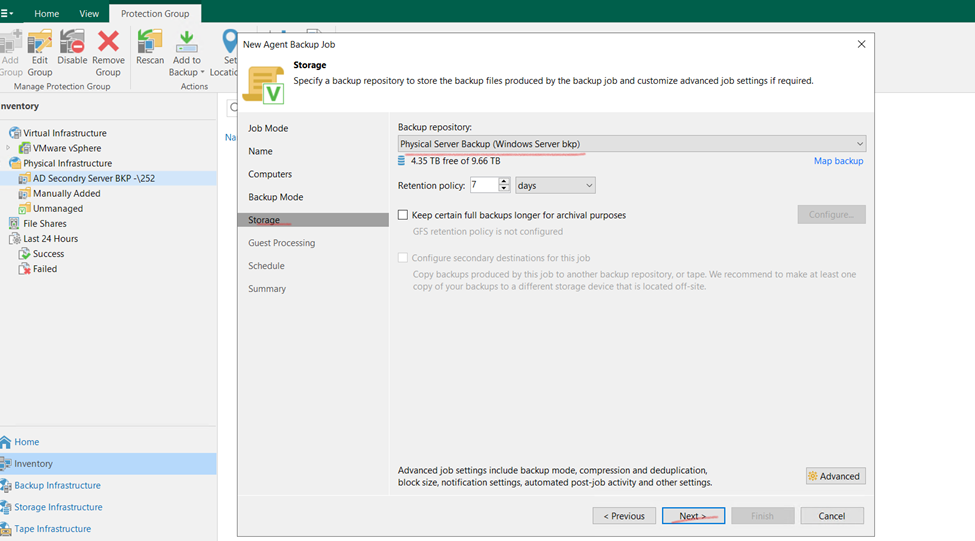
Selected Secondary DC Backup Days
Click okay and apply and click to finish
Now click to finish
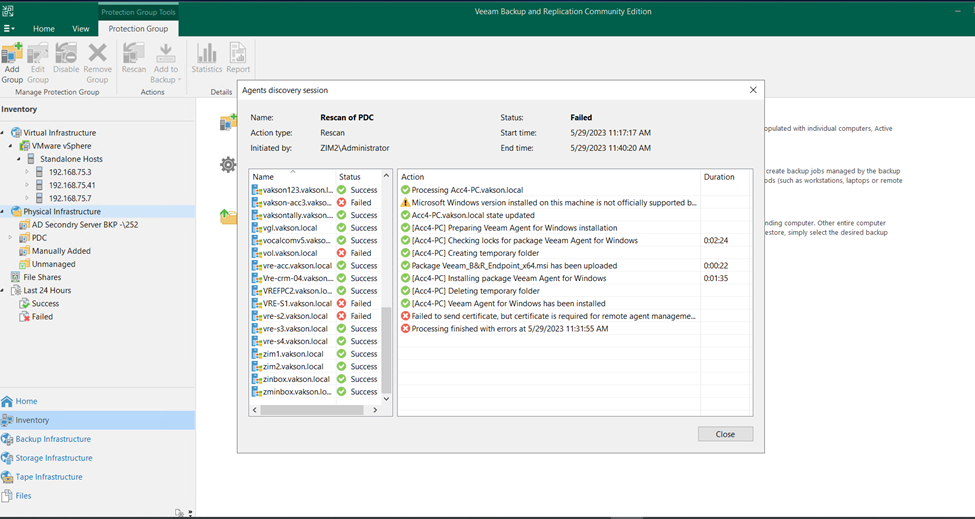
Protection Group Created
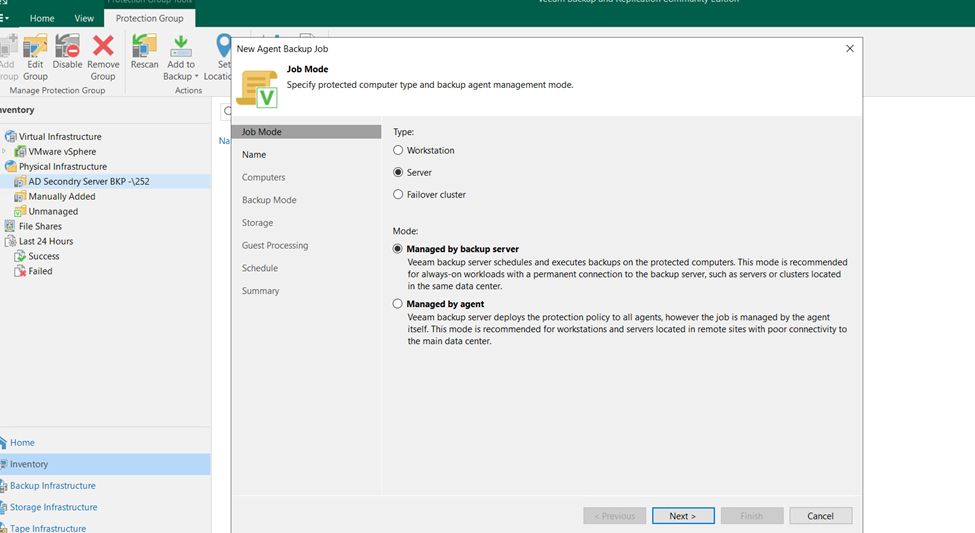
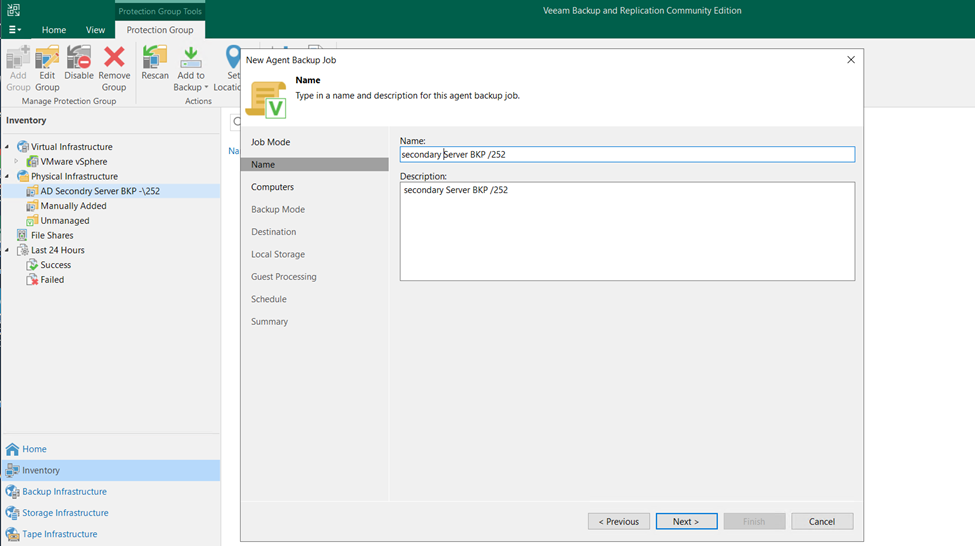
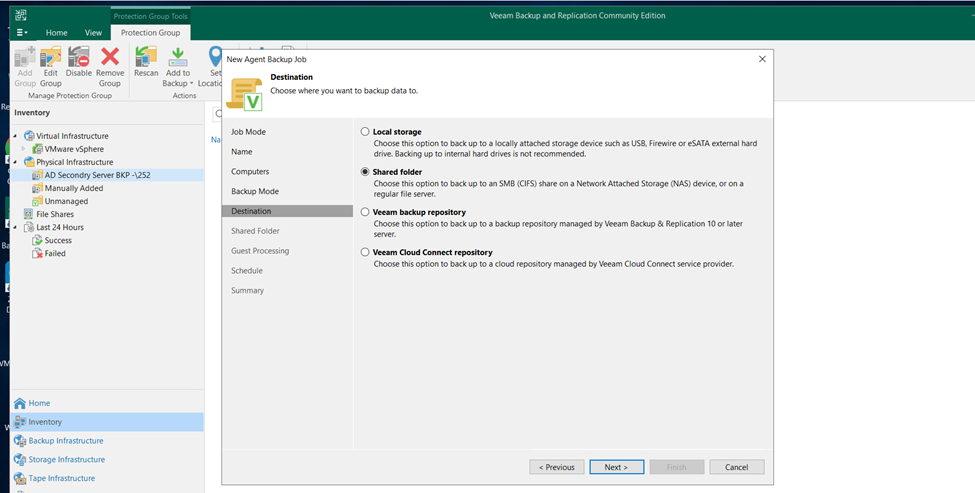
Now Creating Back Schedule for Physical Server
Right click Select new backup job (Linux or Windows)
Click to new job and create
Or Individual Computer and Server
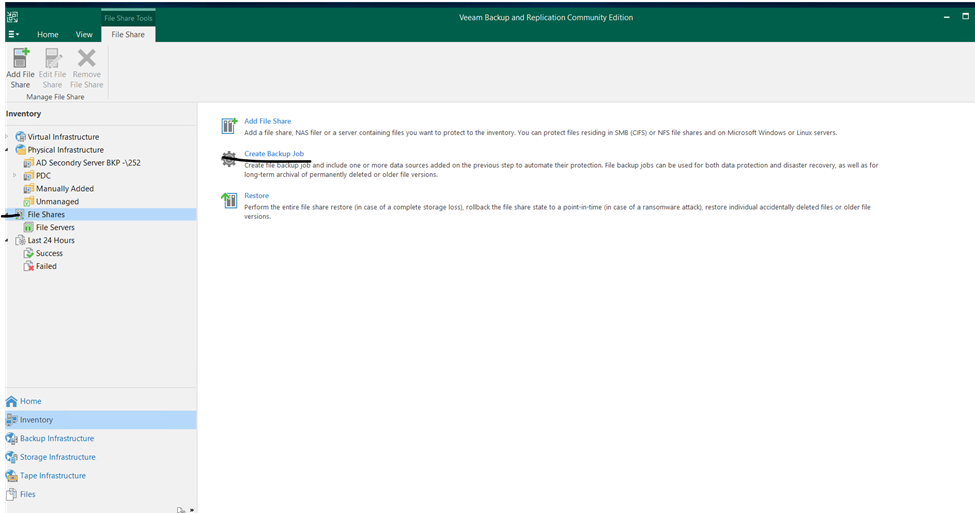
Veeam copy files
Veaam Files Level Backup
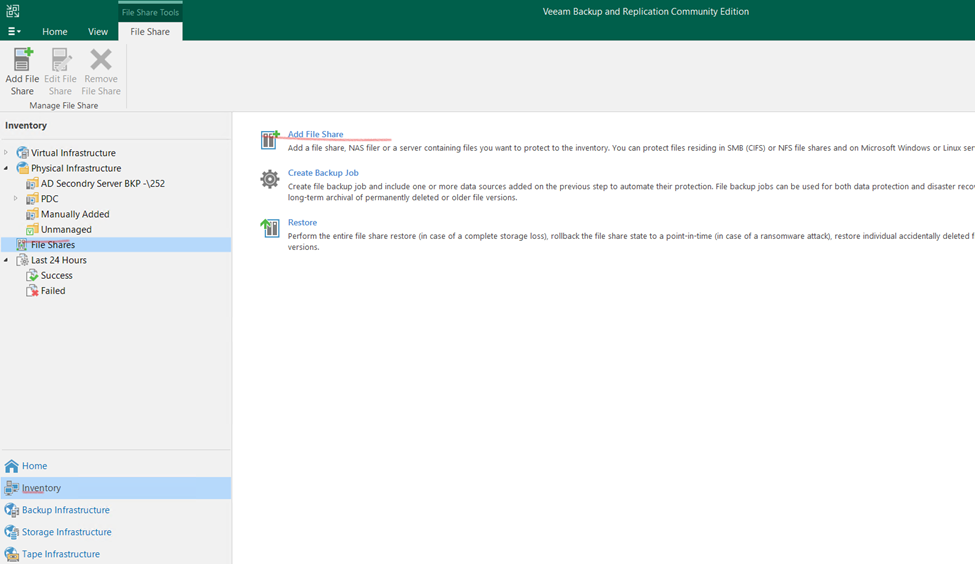
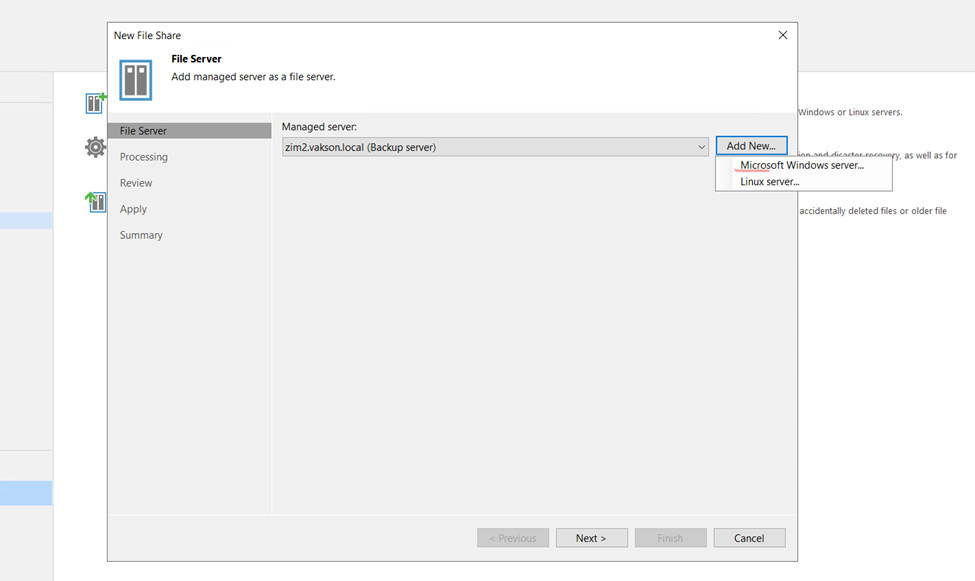
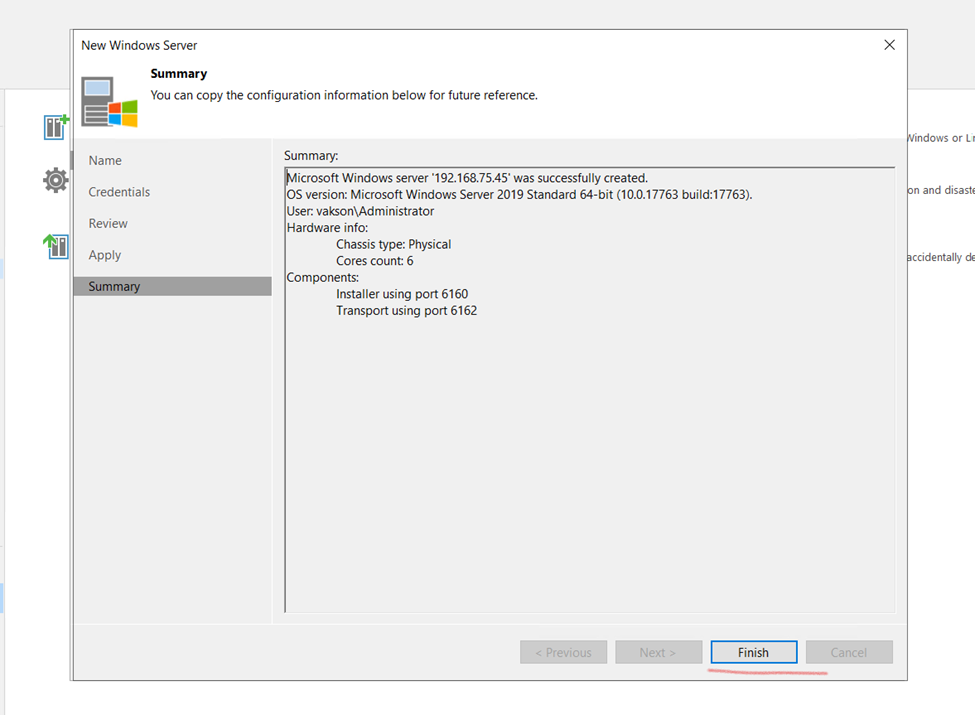
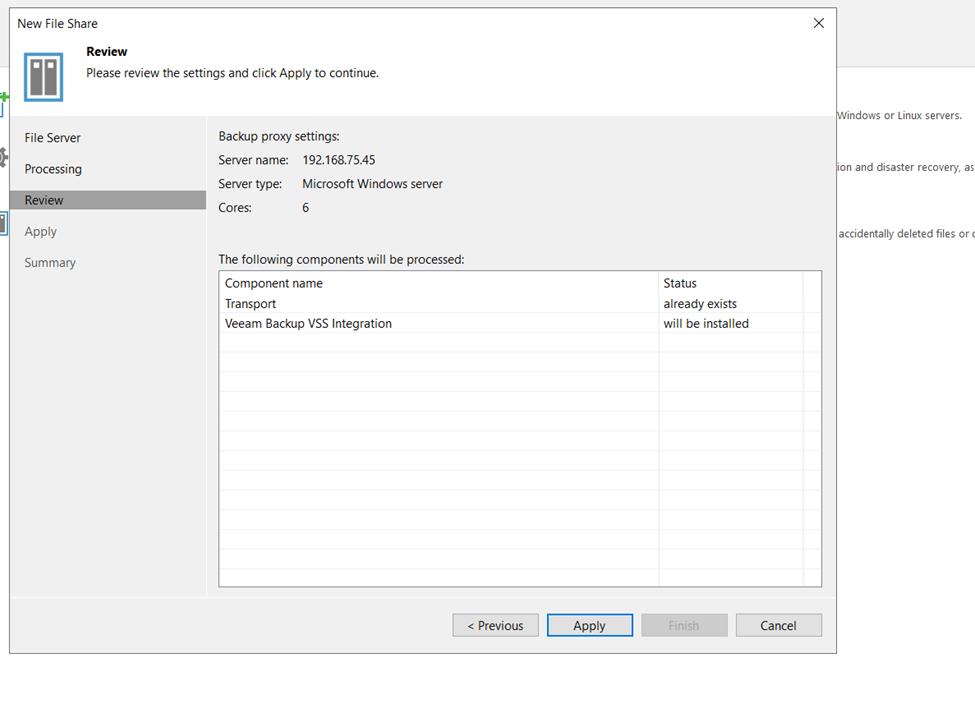
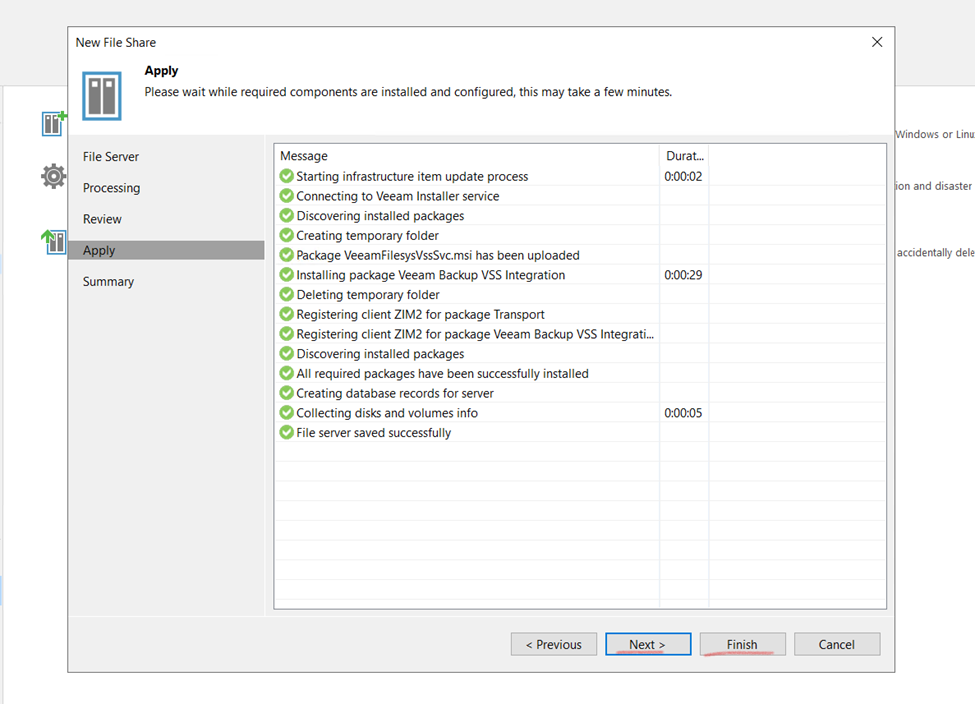
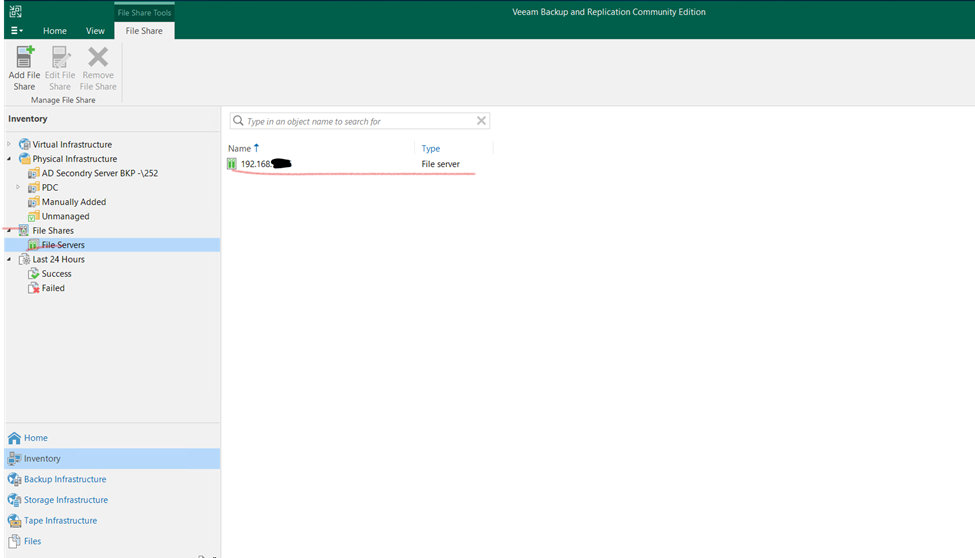
Adding Physical File Backup Server for backup.
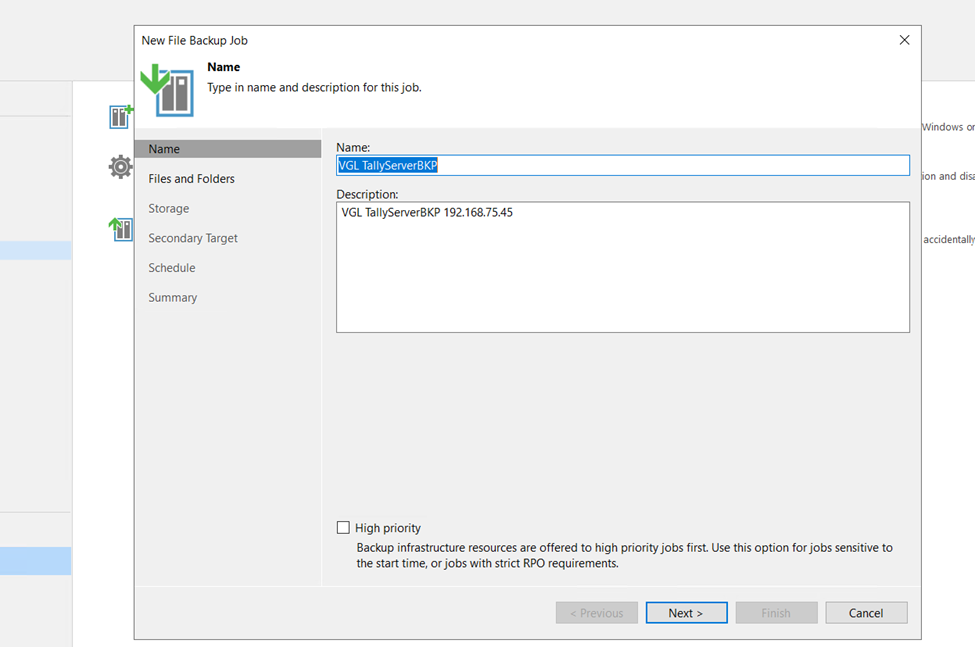
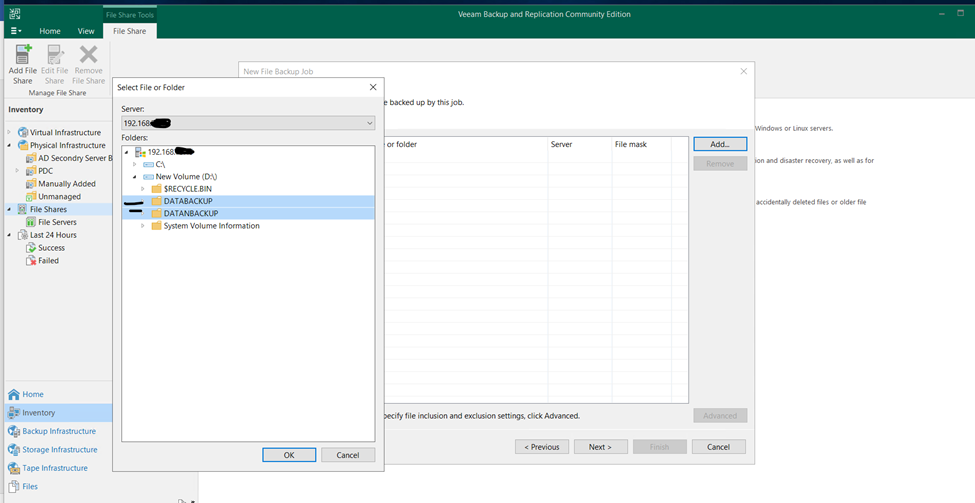
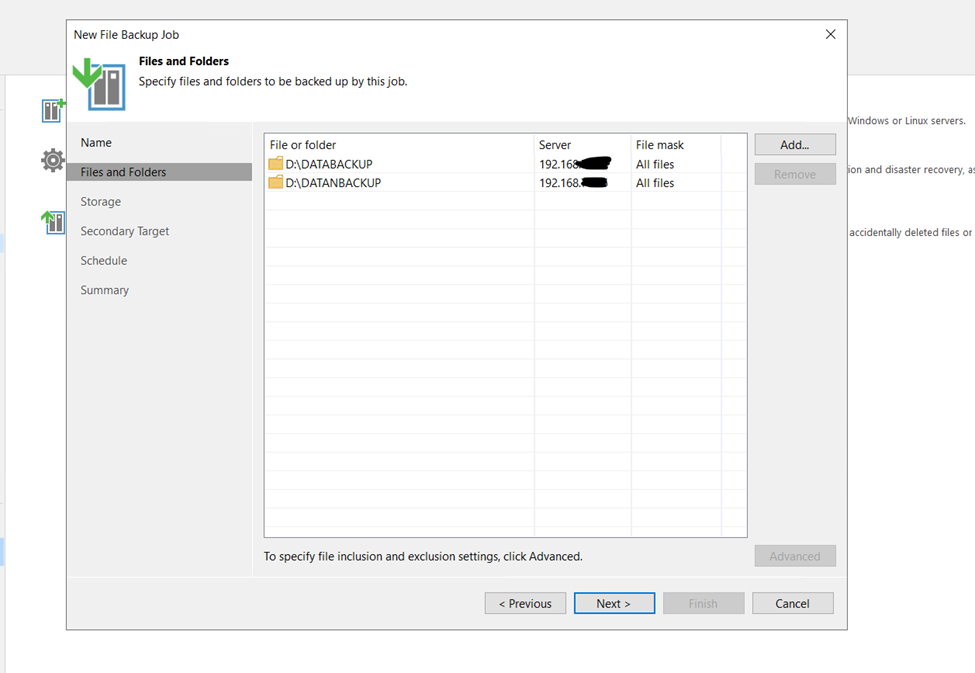
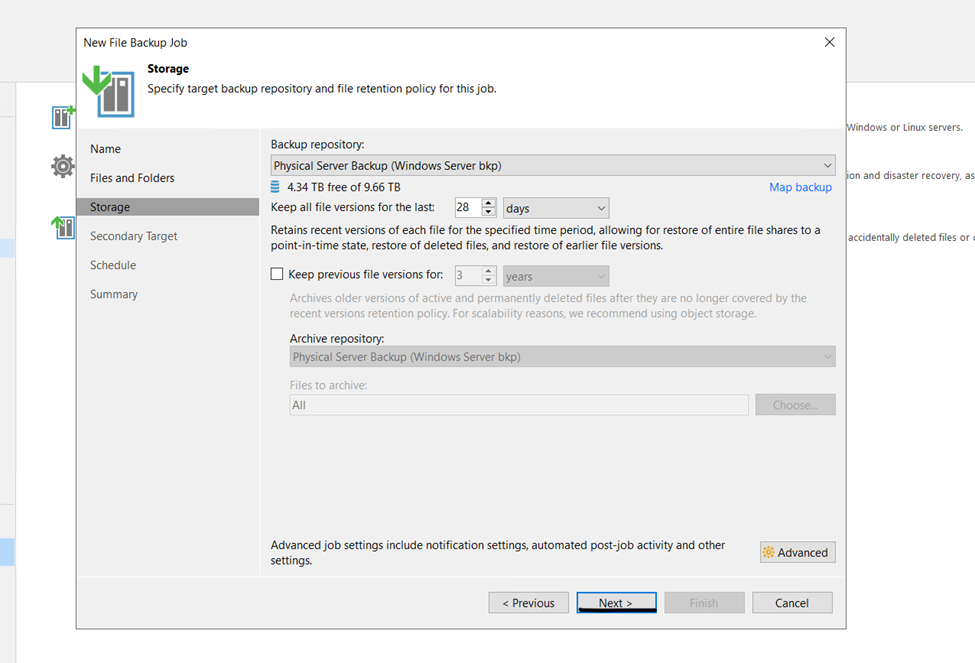
Click on Inventory the select File Shares and click to Add File Share
Here adding file Sever select that
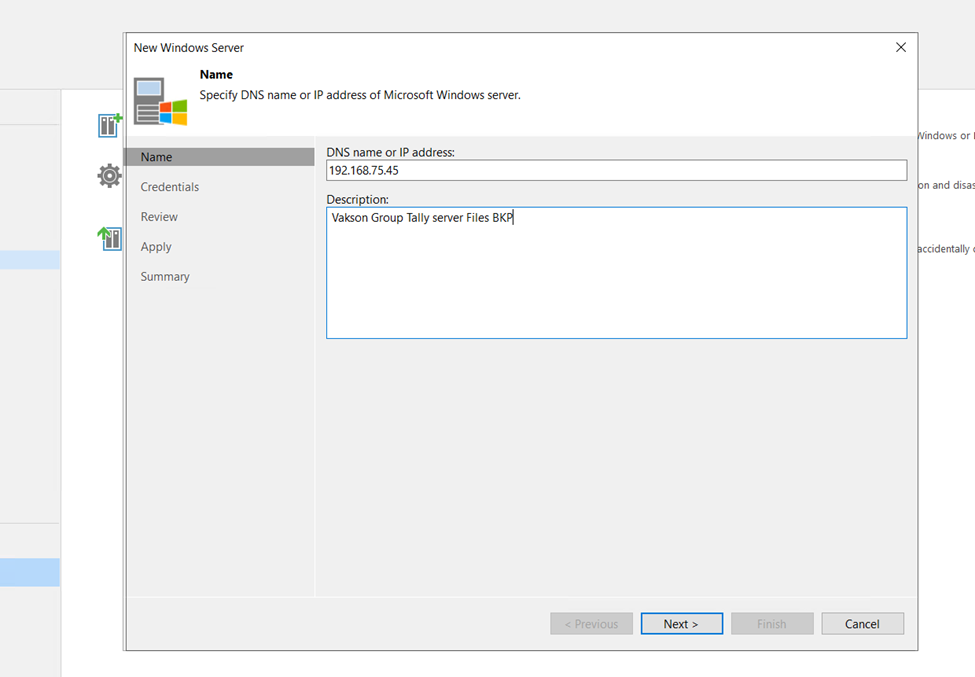
Add the file server Win or Linux
Server Identification
File Server Backup repositories is Added
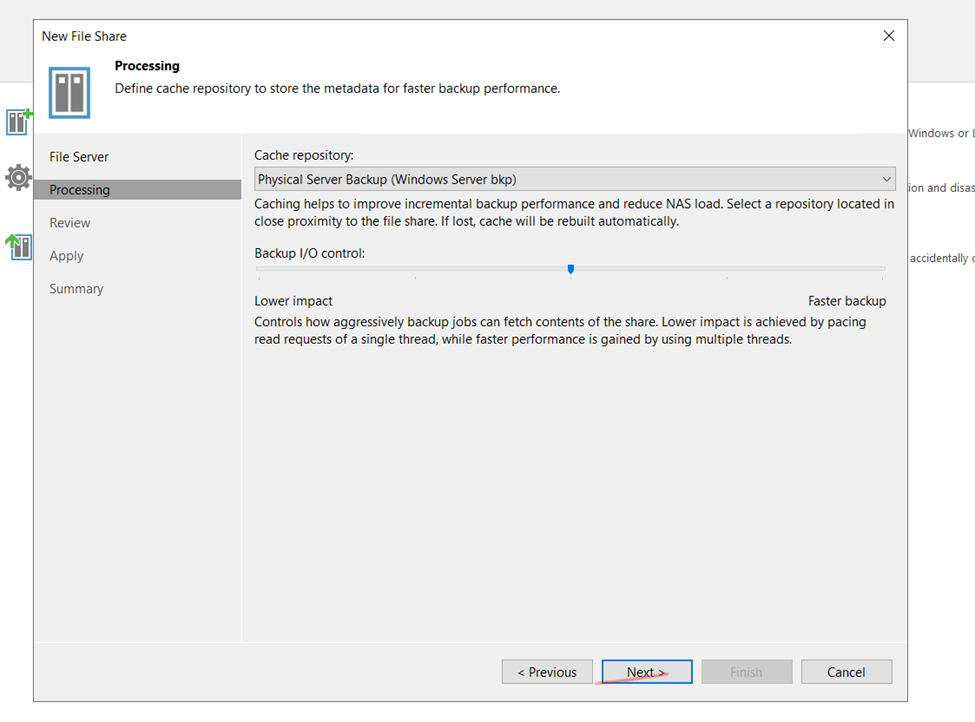
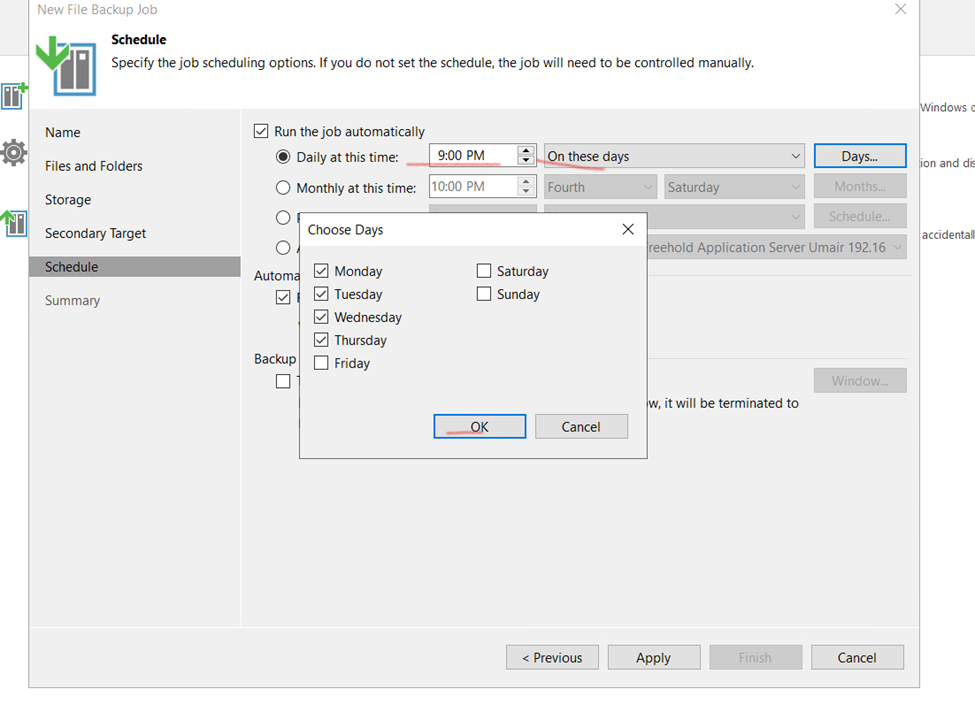
Now here creating and Scheduling File server Backup
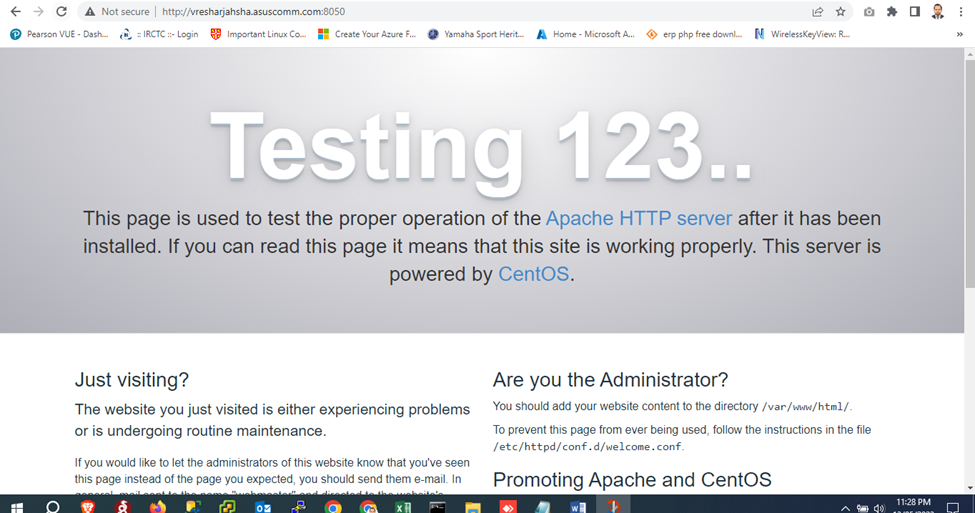
Apache is a free and open-source software that allows users to deploy their websites on the internet. It is one of the oldest and most reliable web server software maintained by the Apache Software Foundation, with the first version released in 1995.
The job of a web server is to serve websites on the internet. To achieve that goal, it acts as a middleman between the server and client machines. It pulls content from the server on each user request and delivers it to the web.
Here are some of the reasons why Apache is so popular:
It is free and open-source software.
It is very reliable and stable.
It is very scalable and can handle a large amount of traffic.
It is very extensible and can be customized to meet the needs of different websites.
If you are looking for a reliable, scalable, and extensible web server, Apache is a great choice.
How to Install Apache Server
Steps:
Update Centos/RedHAT Linux Server
sudo yum update – y
Apache Installation
[root@qp ~]# sudo yum install httpd
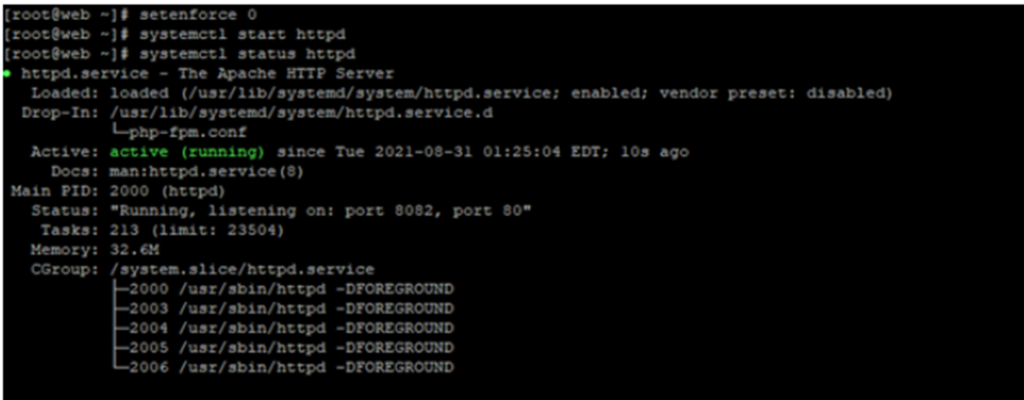
Apache Services
Activate Apache
sudo systemctl start httpd
Start/ Restart/ stop
Enable
sudo systemctl enable httpd
Start Apache Services
Systemctl start httpd.services or systemctl start httpd
Verify Apache Service
Systemctl status httpd.services systemctl status httpd
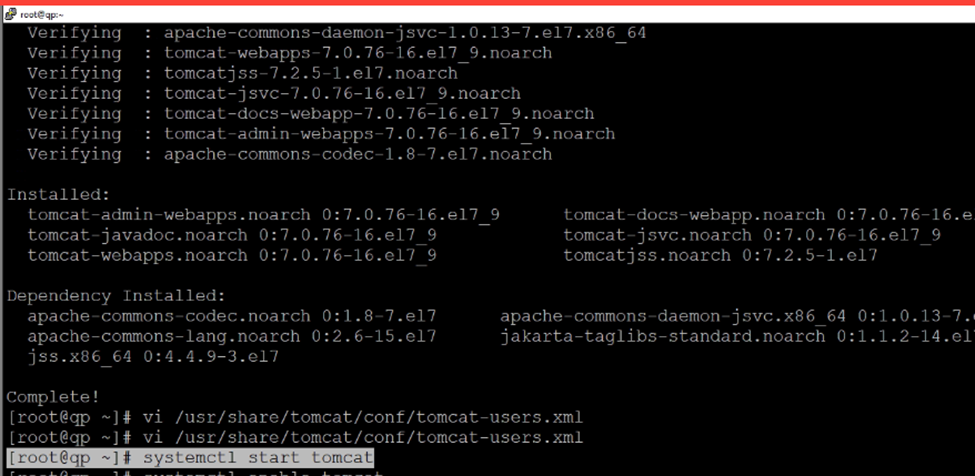
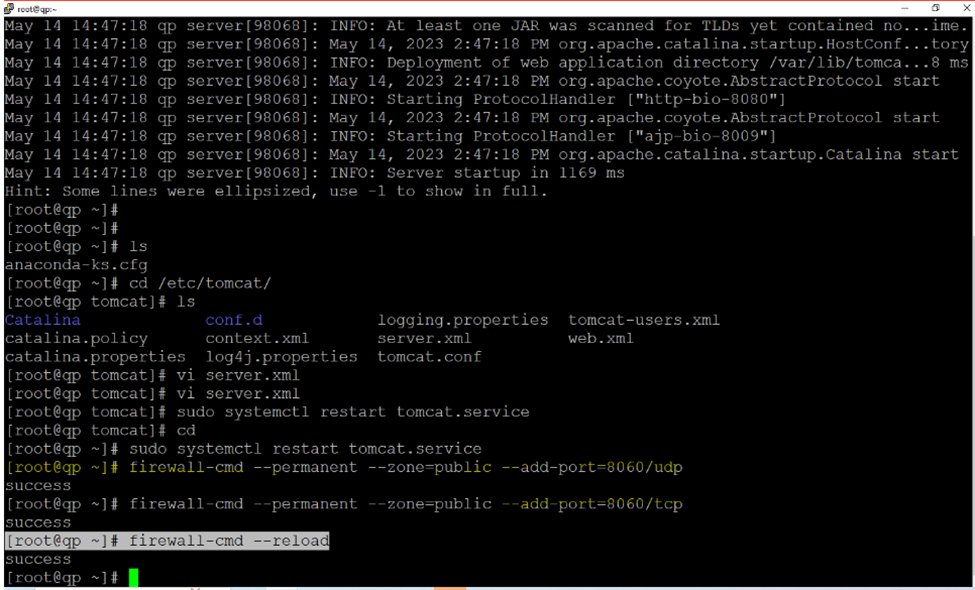
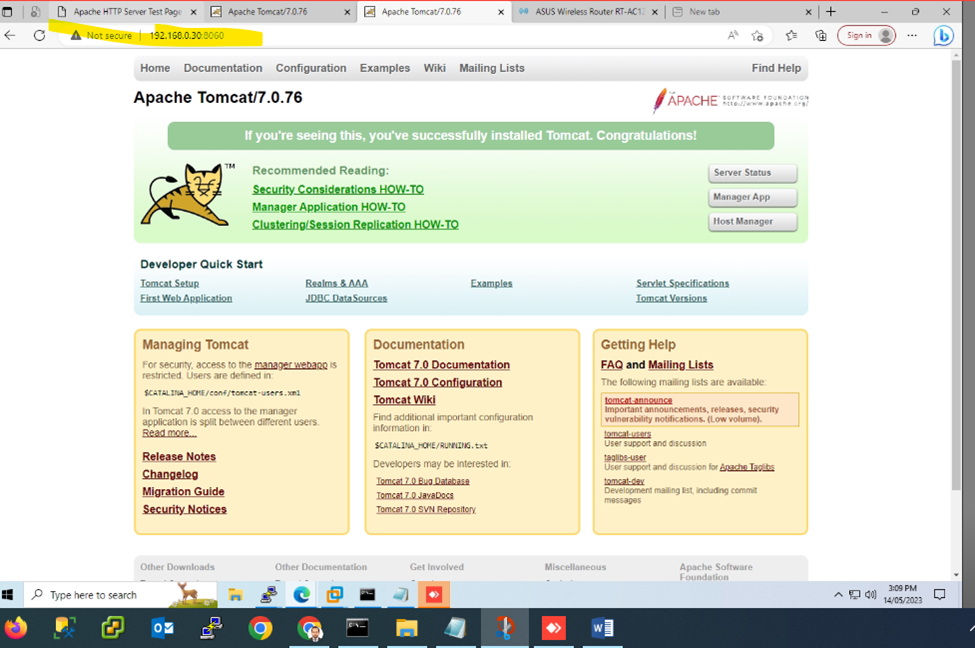
open-source Java servlet and Java Server Page container that lets developers implement an array of enterprise Java applications. Tomcat also runs an HTTP web server environment in which Java code can run.
[root@qp ~]# yum update && upgrade -y
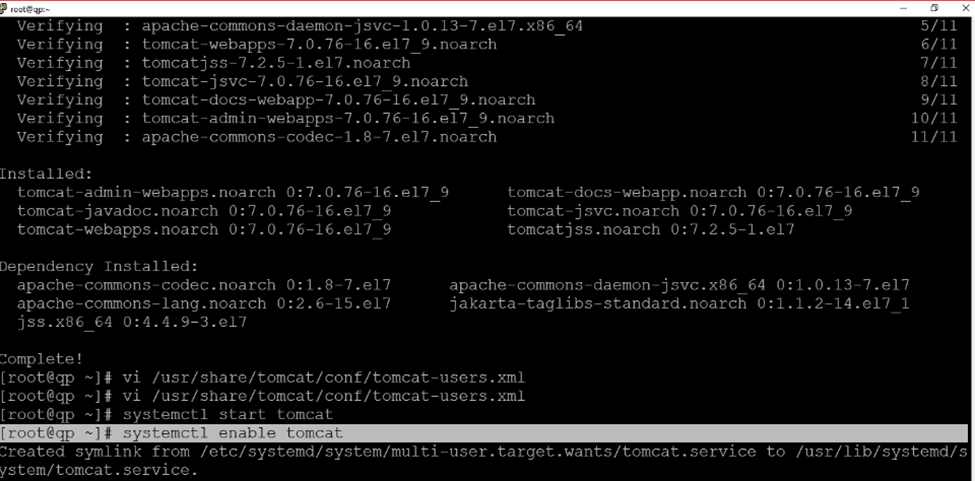
[root@qp ~]# yum install tomcat -y
now need to stop Apache Server
systemctl stop httpd or systemctl stop httpd.service
Next to edit
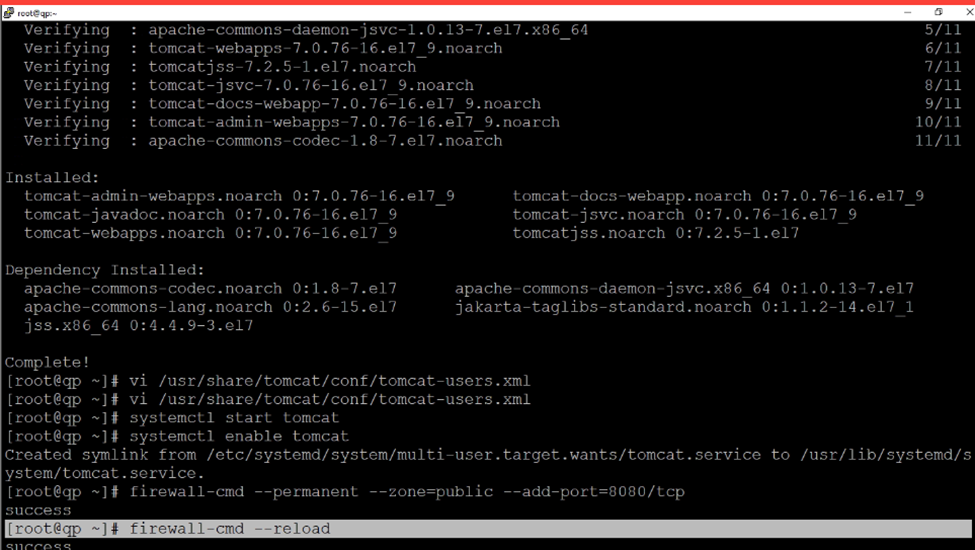
vi /usr/share/tomcat/conf/tomcat-users.xml
[root@qp ~]# vi /usr/share/tomcat/conf/tomcat.conf
At the last add these below commands java security
Backup Domain Controller or Secondary Domain Controller
///
Steps:
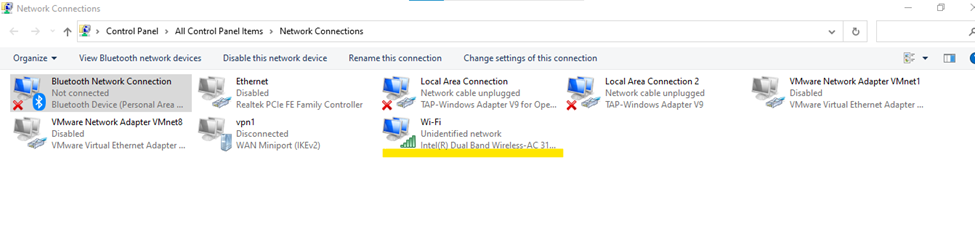
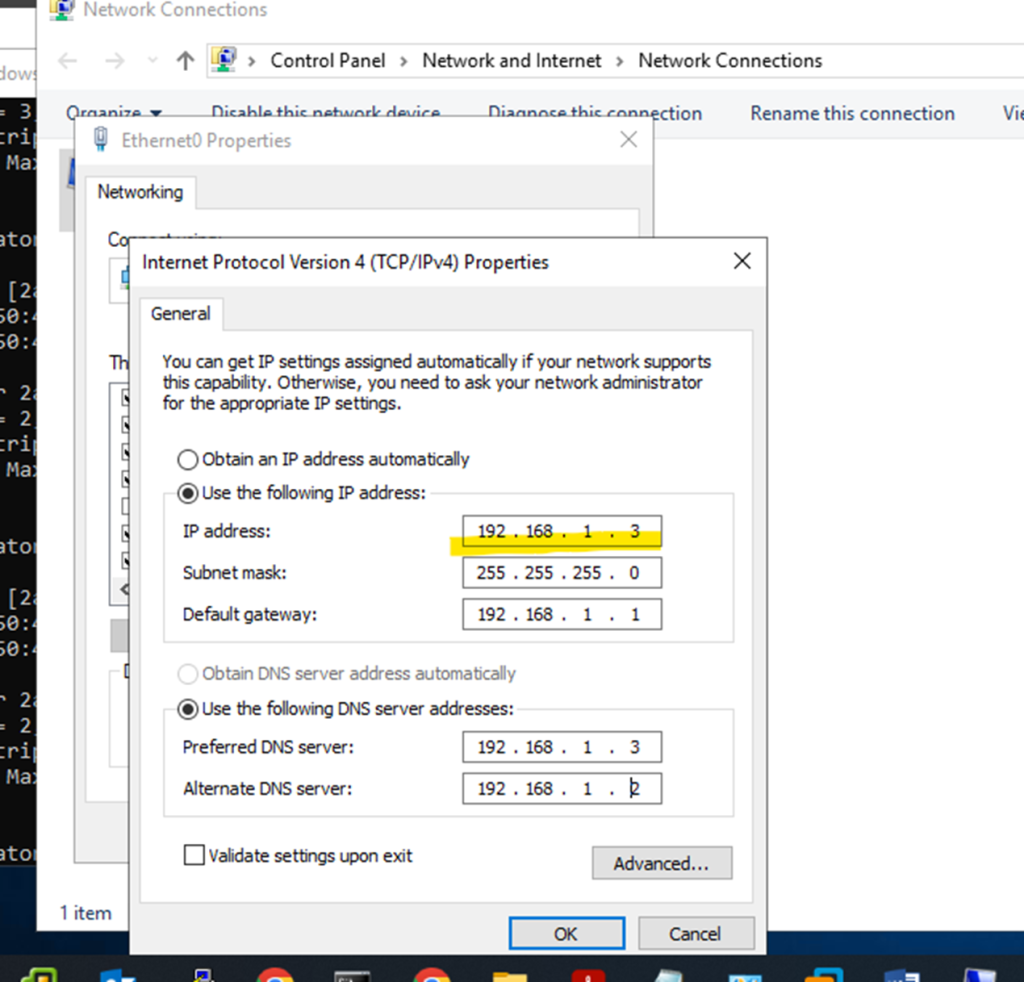
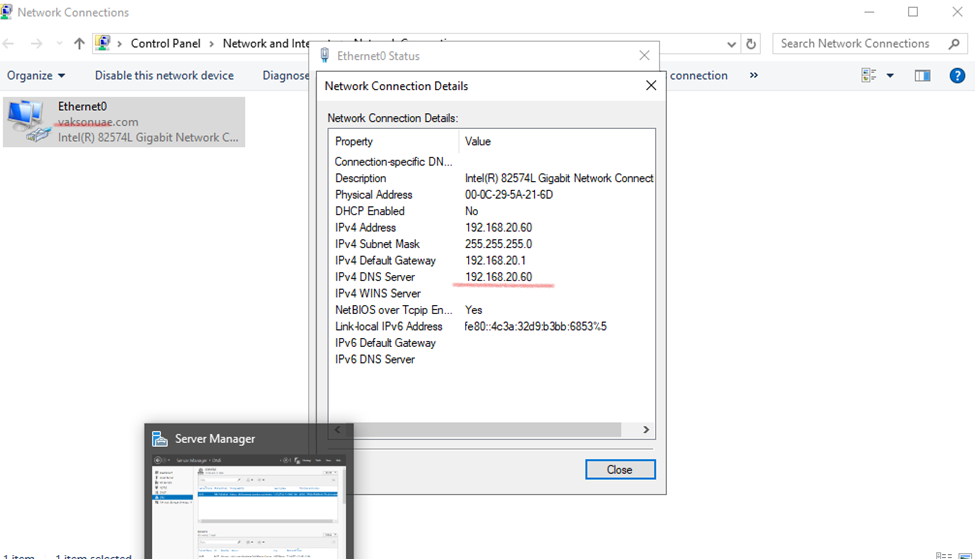
Assign Static IP address
Change name Server
Install Wins Server with Same existing Version
Join to Domain Controller
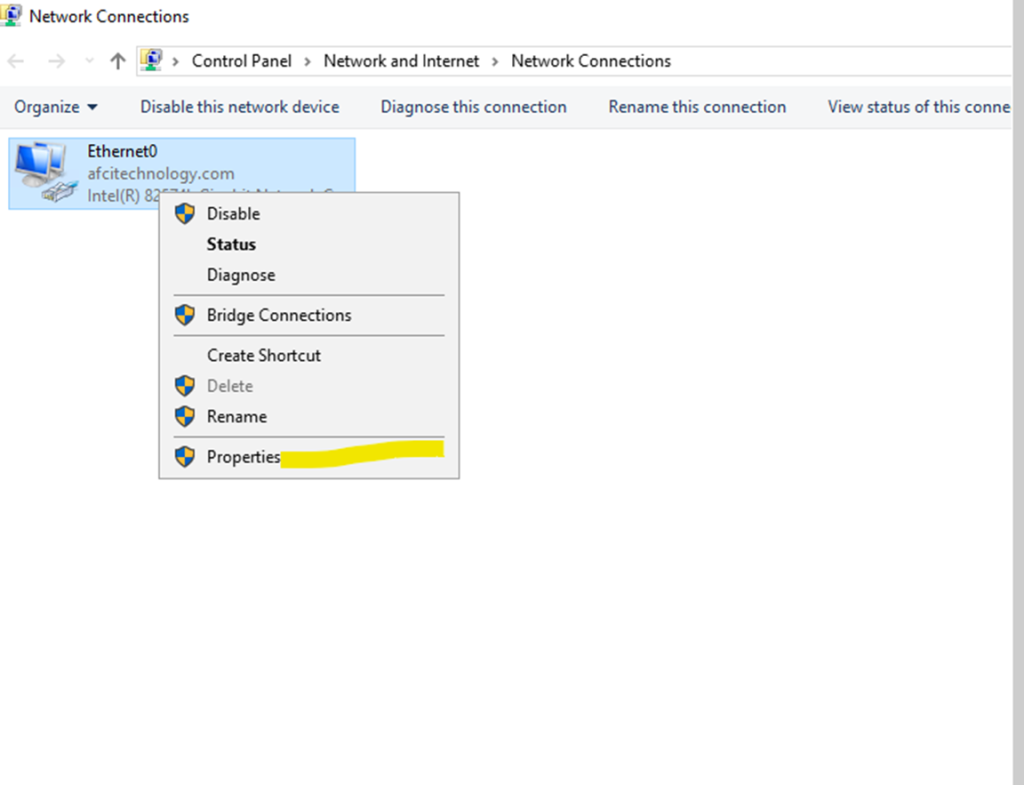
Go to Server Manager
Click to Add feature and Install
Active Directory Domain Services
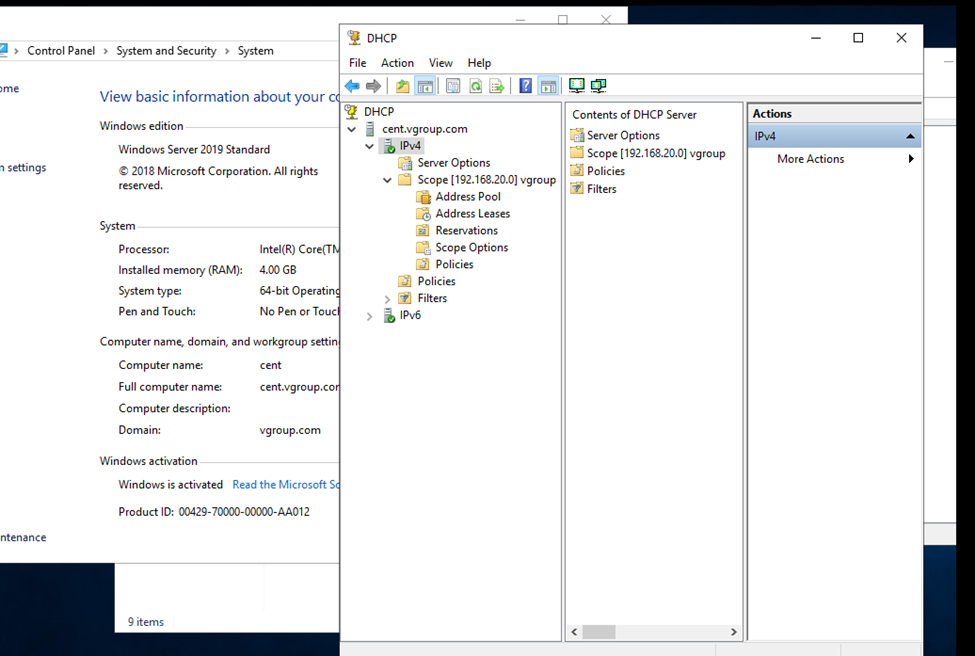
DHCP Server
And DNSServer
Required
And don’t need to uncheck any default Installation
Once Installation Done Click to Permote DC
And Select Existing DC and type administrator account name and Password
Once installation done
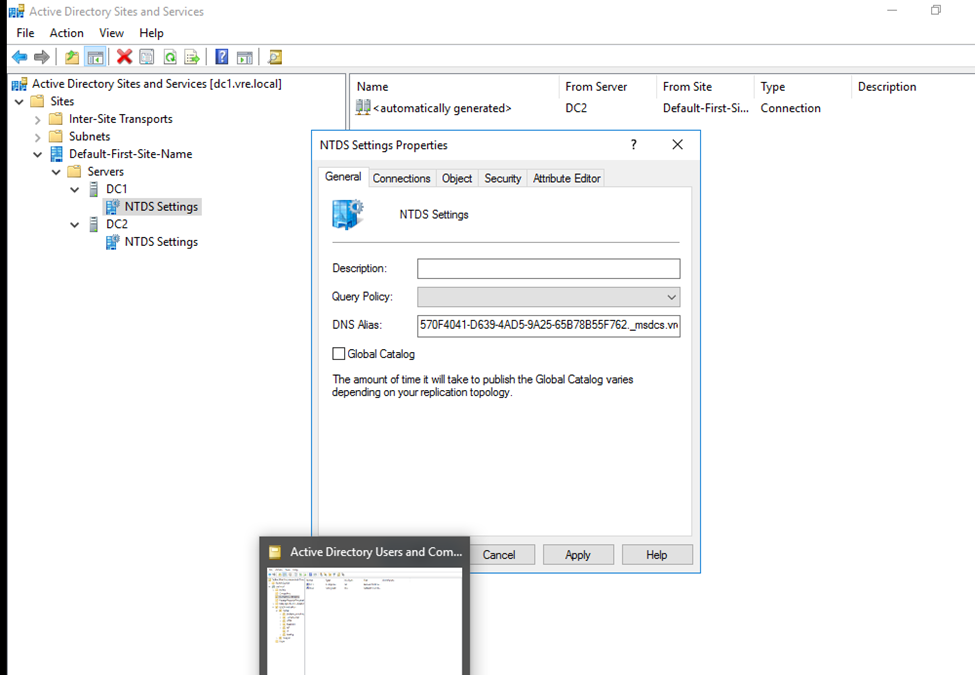
Go to Active Directory Sites and services
Click to Default first site name expand
Right Click to NTDS Setting select All Taks then Check Replication Topology
Once done click to Replicate now
You will get successfully popup message
These things have to done in both Primary and Secondary DC
Once both Primary and secondary DC replicated if we create or implemented any things even any Primary or Secondary both will get the result
NOTE: Both Server Machine IP Have to Different not Same IP.
So,
In any-case Primary DC is Down need to assign active Secondary DC with Full Privileges
Need to Seize FSMO 5 Roles from Primary DC(FSMO having 5 roles)
FSMO Categories in two shapes –- Divided into two Categories
Forest Level
—— Schema Master
—— Domain Naming Master
And
Domain Level
—— Domain Level
—— RID Master
—— PDC emulator
So,
I need to seize the FSMO 5 roles form Primary DC and assign to Secondary DC
Open – PowerShell
Type commands
First need to check the FSMO roles currently running
Netdom fsmo query
You will see 5 FSMO roles will be display
Now type
Ntdsutil
And now
Question mark
? and press enter key
Select maintenance
Once maintenance then
Again, question mars
? and hit enter
So, now
Once roles are displaying type
Type like this cmds
Seize infracture master to all 5 FSMO roles
Install wins Server Change Name and assign Static IP Address
Primary DC IP is 192.168.20.4
Changing Default PC name press okay once done Server will be reboot
now this pc is connected to the particular domain environment.
So, after joining
open Server Manager and install Active Directory
So, now select Backup server
And click next
Select
Active Directory Domain Services
DHCP Server
DNS Server
And click next
And left or make as default click to next
Now click to install these selected features and check the restart the destination if required
once Installation done click to promote Domain Controller
So, need to configure it
Now click to promote this do domain controller
Or click to popup red flag bar promote from there also..
Select existing DC
And
Change the user perform credentials enter only Primary DC Administrator username and Password
And click next
Now type restore mode password
why we need to Select DSRM?
BECAUSE if there is any issues generated to Domain Controller or Backup DC, DSRM always keeping one Server Images stored separately.
if this method required need to start Server as safe mode
Click next
after Directory Service Restore Mode set the password Click next
Select the primary domain
Click next
Here, database, log and sysvol directory structure
Complete Active directory Database store here.
NTDS.DIT DATABASE — NTDS is the Active Directory DATABASE – All user and computer Accounts and groups you can say NTDS.DIT is the Backbone of any ADDS.
Ntds.dit is the main AD database file. NTDS stands for NT Directory Services. The DIT stands for Directory Information Tree. The Ntds.dit file on a particular domain controller contains all naming contexts hosted by that domain controller, including the Configuration and Schema naming contexts. A Global Catalog server stores the partial naming context replicas in the Ntds.dit right along with the full Domain naming context for its domain. Command for checking NTDS details: ntdsutil
NTDS.DIT file represents the Active Directory Databases, which has the user, computer, and other AD objects including printer and faxes . It is located under C:windowssystem32NTDS.
LDAP (Lightweight Directory Access Protocol). in the Simple Language you can say LDAP is a medium to communicate to ADDS LDAP protocol is used for accessing directory services and provides a mechanism for applications and other systems to communicate and interact with the directory servers. It is responsible for keeping track of what is on the network and applications can use LDAP to retrieve any object and property of the Active Directory database and can even modify it. When we enumerate information from AD, LDAP is used in the backend. Not only this, LDAP also allows us to modify objects, like modifying groups members, changing attributes of an object. Many enumeration tools have used LDAP to query the information from AD- for example Powerview or Sharpound etc. Anyone who is working with active directory like administrators, red team operators, or developers writing programs to interact with AD, then a thorough understanding of LDAP is very important to fully utilize Active Directory.
LDAP or Lightweight Directory Access Protocol is one of the oldest and most popular protocols used to retrieve information from directory services, authenticate users, and build applications that don’t compare on security or speed. It’s one of the protocols to manage assets and data over a network and provides secure access to them.
LDAP is one of the core protocols for developing internet applications. The protocol was designed to access and maintain directory services over the internet.
LDAP Ports LDAP port is 389 LDAP Secure (LDAPS) port is 636
SYSVOL DIRECTORY DEFAULT: c:\windows\SYSVOL —
LOG FILE – NDTS
SYSVOL – SYSVOL Stored items suck as logon scripts and related files GPO.
SYSVOL DIRECTORY DEFAULT: c:\windows\SYSVOL —
Schema: Defines the attributes and types of objects that can be stored in the Directory.
Domain Naming: store computers and users daily operations like modification and creating directory and deleting directory or folder. domain naming is basically monitoring daily activities.
Click next
click to install
Once installation done server will be logout
Once installation done
Two Domain Controller will appearing (Additional DC- BDC)
Now go to active Directory Sites and services
Need to apply replication in both server
First Applying in Primary Server — Central —192.168.20.4
So, here primary server replicates to secondary server.
REPLICATION: if we done the replication between servers, sometimes replicated servers will be implemented if any user or any changes appear between replicated servers.
Now..
Need to apply replication job to Secondary server
Successfully replicates
Ntds: is the main AD database file. NTDS stands for NT Directory Services. The DIT stands for Directory Information Tree.
NTDS: it’s Control complete process of DC/ADDS and Secondary DC and Replication method. an easy language you can say NT Directory Service is backbone of ADDS and any process and changes happen in DC Server having the responsibility to manages
Suppose, Creating new OU(Organizational Unit) to Secondary (Backup DC) Server
Have created new OU in Secondary DC
So, new OU Created to my Primary Server,
after replication between the Primary DC and Secondary DC: any OU ,users or any policies created in Primary or Secondary DC it will reflect in both Server
Created OU Structure and user to Backup DC – Secondary DC
So, it also replicating in Primary DC Server
If there are any problems on Primary server how to retain Secondary Backup Server
Flexible Single Master Operation (also known as FSMO or FSMO Roles).
Primary Server FSMO Roles
Netdom query fsmo
Secondary server will also getting same roles but secondary server not having complete authority like Primary DC
If Primary Server having issues need to seize the fsmo roles after that Backup DC will retain complete authority
So, here I used to power off Primary Server
Primary DC is not active (Server Down)
Now type in PowerShell
But still, I will get all 5 FSMO roles
In secondary server I am getting all 5 Roles
Type
In Backup DC
Ntdsutil
PS C:\Users\administrator.VRE> ntdsutil
Just type only roles and press enter
Type connections
Now need to connect to in backup Domain Controller like—
Connect to server bdc.vre.local
Now quit from connection press type q and enter
Here we need to seize all fsmo roles from primary server
Primary server is not running but fsmo roles with primary server need to seize the roles and allocate to secondary server
netdom query fsmo
fsmo maintenance: Seize infrastructure master
And press
Yes
fsmo maintenance: Seize naming master
fsmo maintenance: Seize PDC
Seize RID master
Seize schema master
Now type quit
And quite from fsmo maintenance
So, after seize all 5 roles from Primary DC and assign to Secondary dc
If you can check after seize all roles
Now Backup domain having all fsmo roles
netdom query fsmo
Go to Active Directory users and computers
Right click on domain and click on operation masters
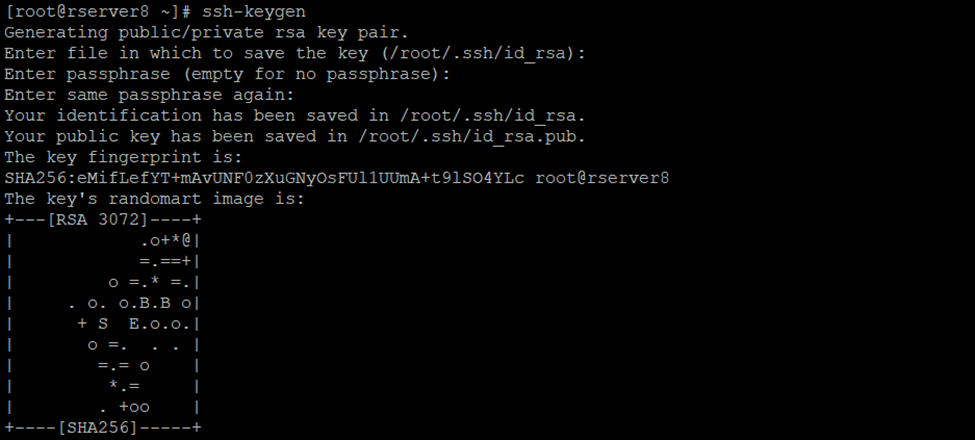
So, authorized keys are generated go to ~/.ssh/ directory or cd .ssh/
2 keys had generated
Id_rsa and id_rsa.pub
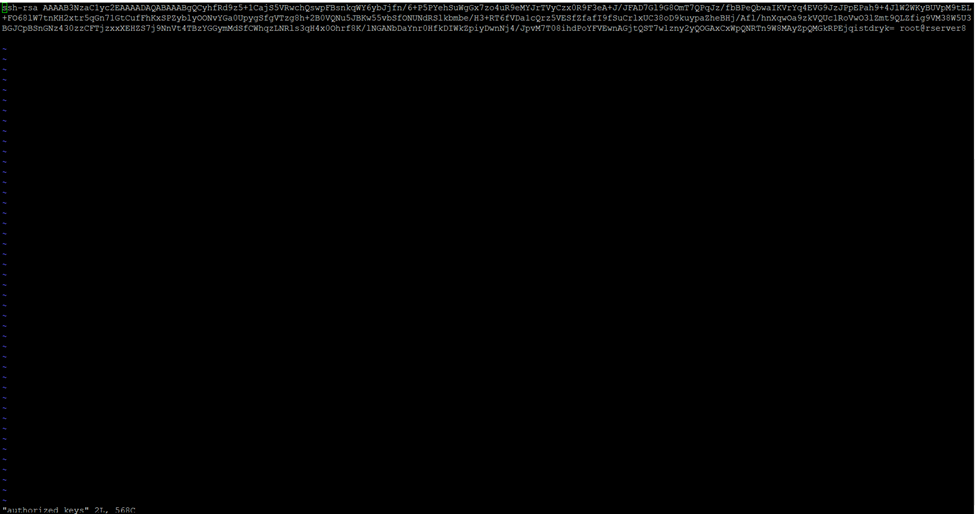
Using cat cmd display id_rsa.pub keys
[root@rserver8 .ssh]# cat id_rsa.pub
Copy this key
Create new authorized_keys file
So, using vi or vim cmd we can create
[root@rserver8 .ssh]# vi authorized_keys
Paste it here id_rsa.pub keys which you have copied using cat id_rsa.pub
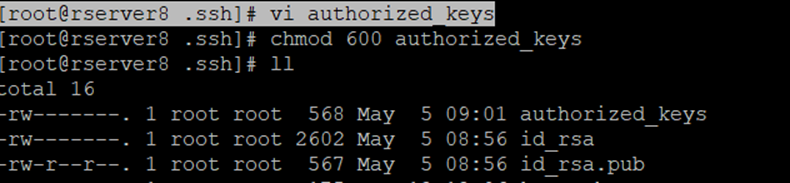
Chmod 600 sets permissions so that, user / owner can read, can write and can’t execute. Group can’t read, can’t write and can’t execute. others can’t read, can’t write and can’t
So, I had created the authorized_keys now assign the permission to this particular user
So in my case root is the owner you can create user and assign the privileges
[root@rserver8 .ssh]# chmod 600 authorized_keys
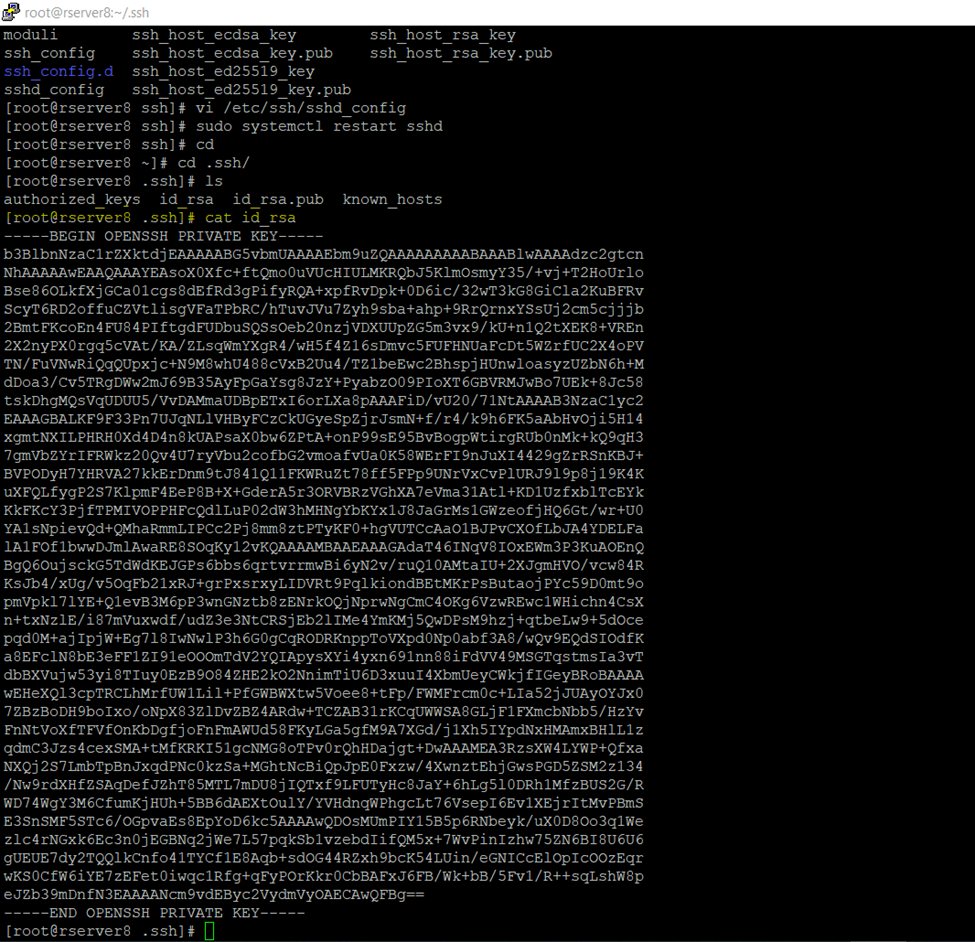
So, now need to copy private key
Again, go to .ssh folder
[root@rserver8 ~]# cd .ssh/
[root@rserver8 .ssh]# cat id_rsa
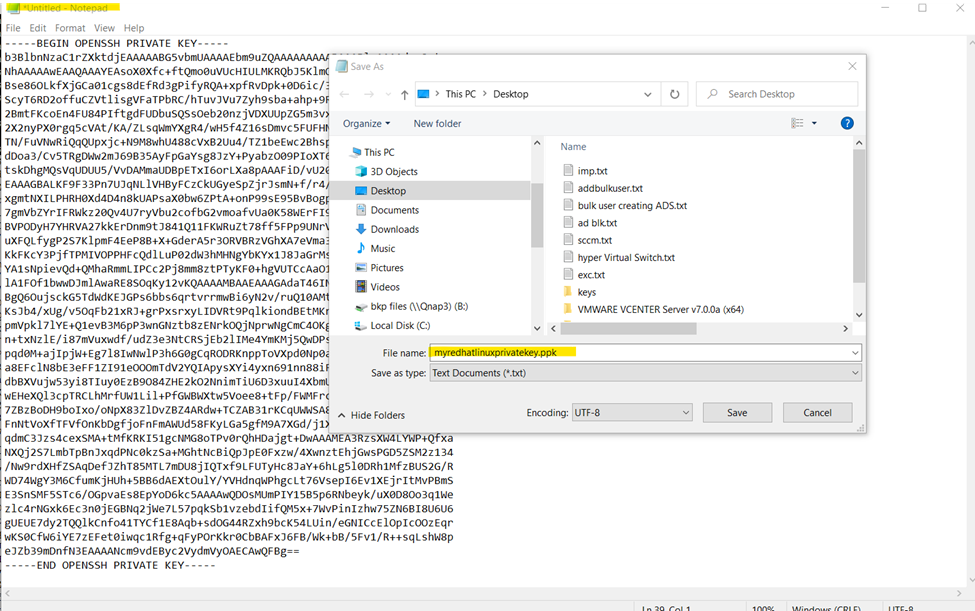
Copy this and paste it to any text editor
And save it to .ppk format
PuTTY Private Key
…
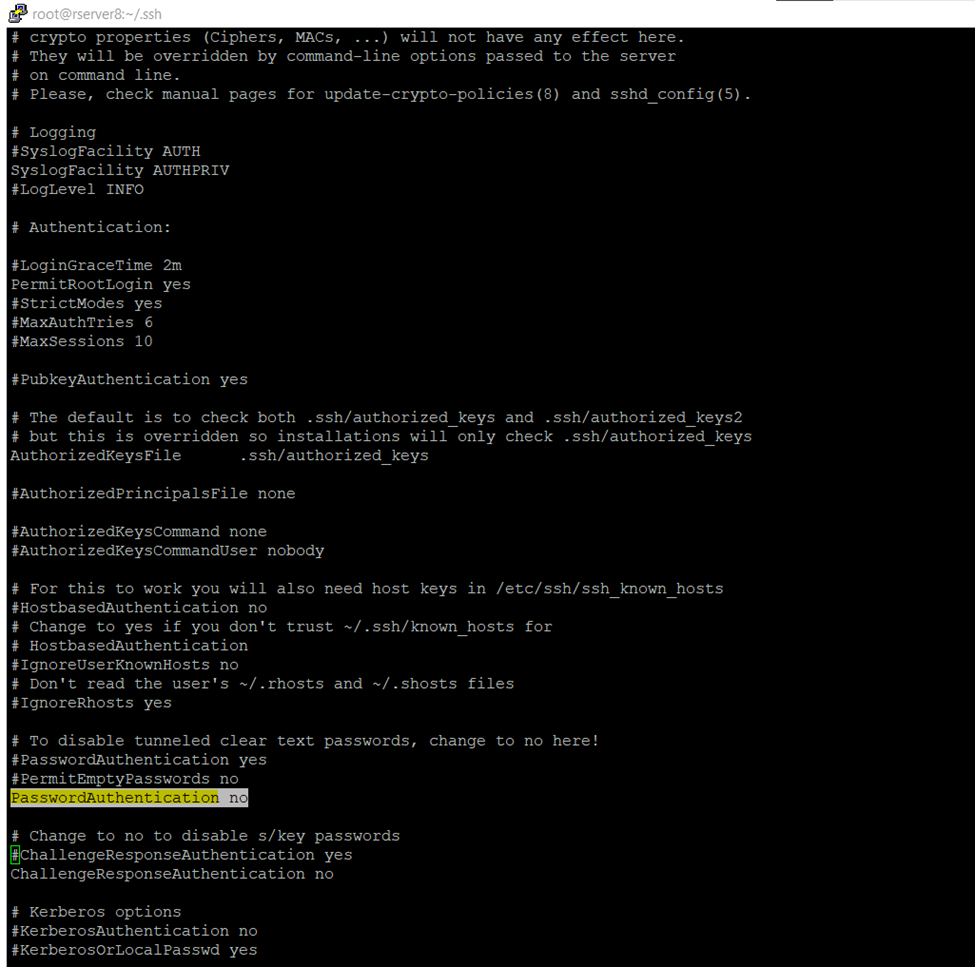
Now to to ssh_config and disable password authentication login
And if you are using any user you can also disable root login
[root@rserver8 .ssh]# vi /etc/ssh/sshd_config
So, once authentication done restart the sshd services (Secure Shell or Secure Socket Shell).
[root@rserver8 .ssh]# sudo systemctl restart sshd
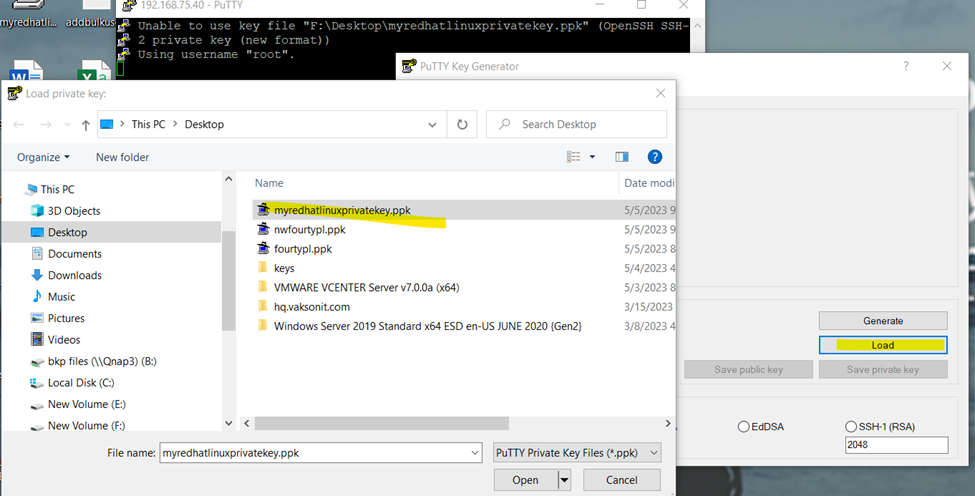
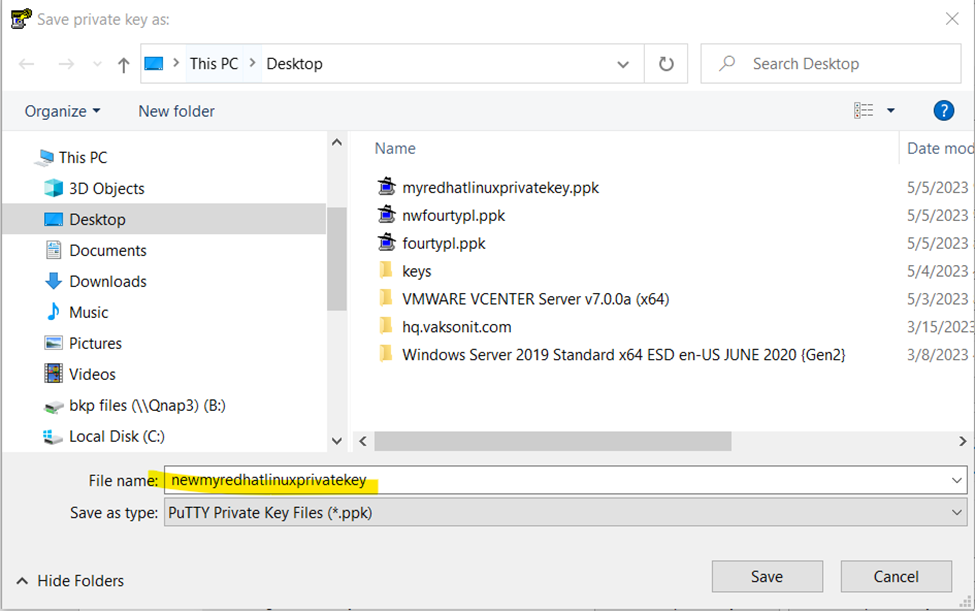
I am saving private key in notepad text editor .ppk format
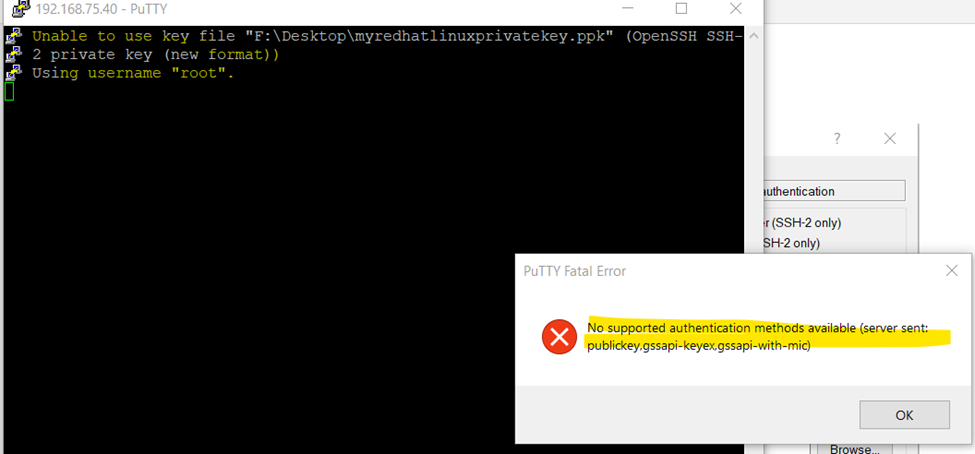
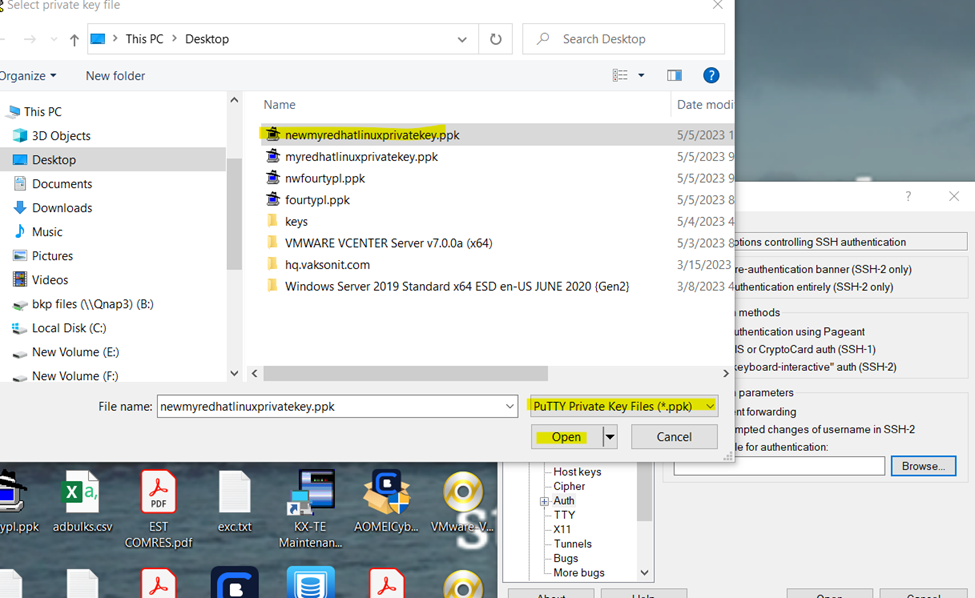
So here we need to convert in putty format if we don’t do it, we will get the error.
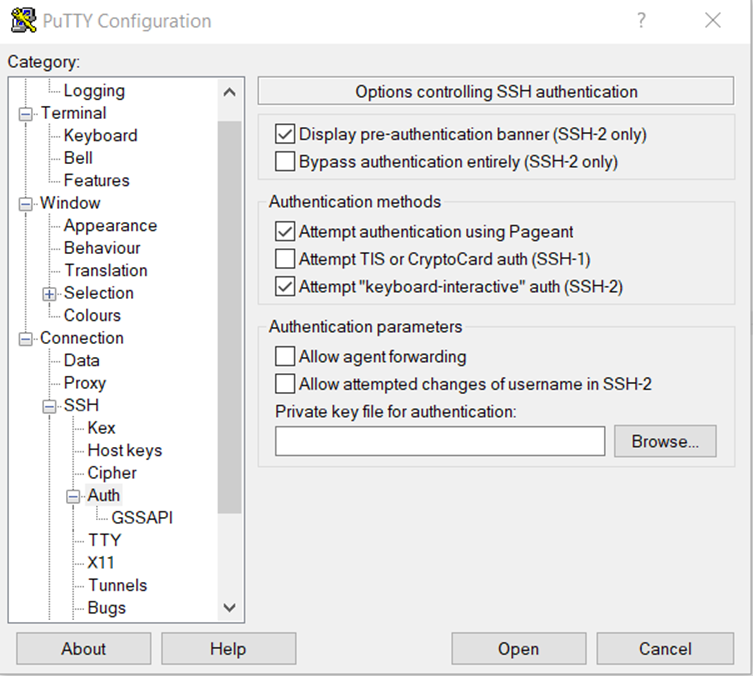
Go to ssh tab and browse the .ppk save private here we will get error because we are not using putty format
If you can check getting the format error
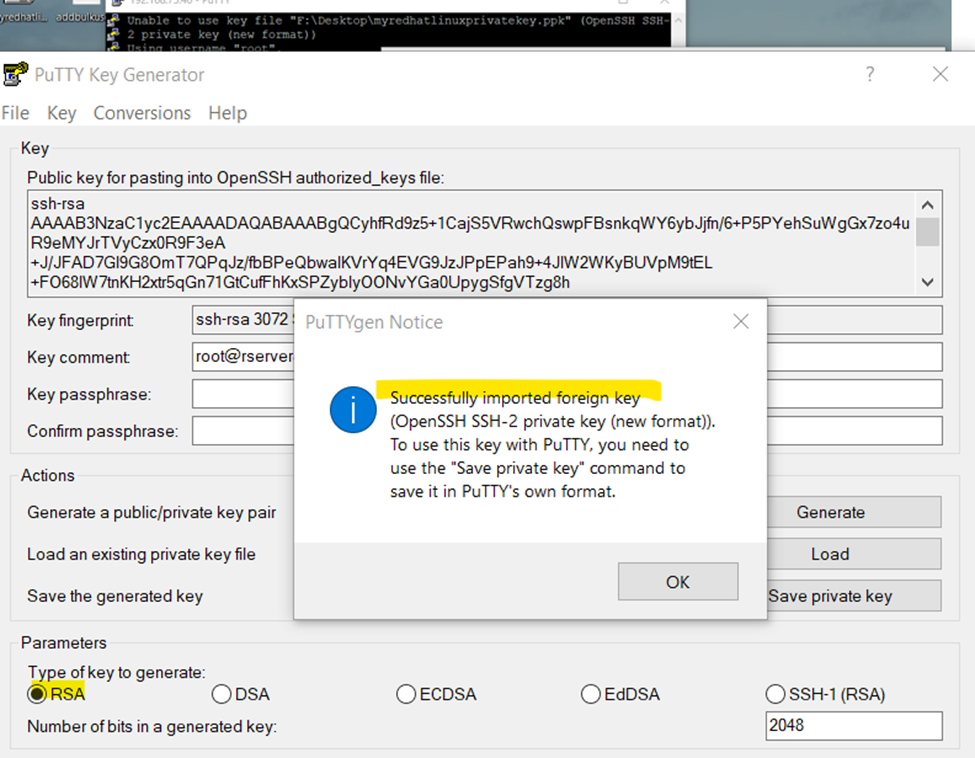
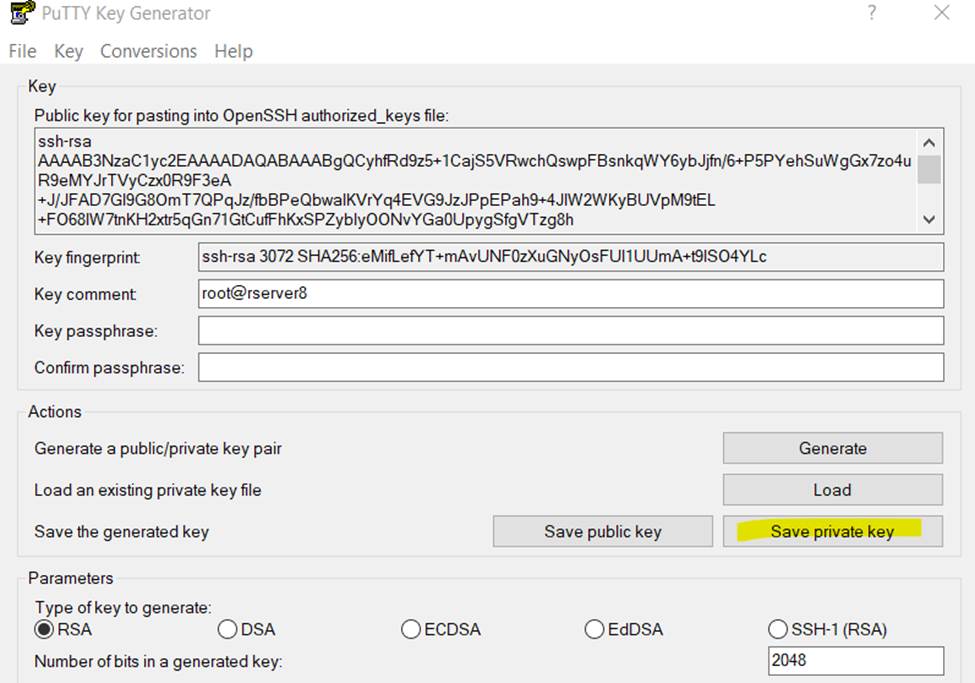
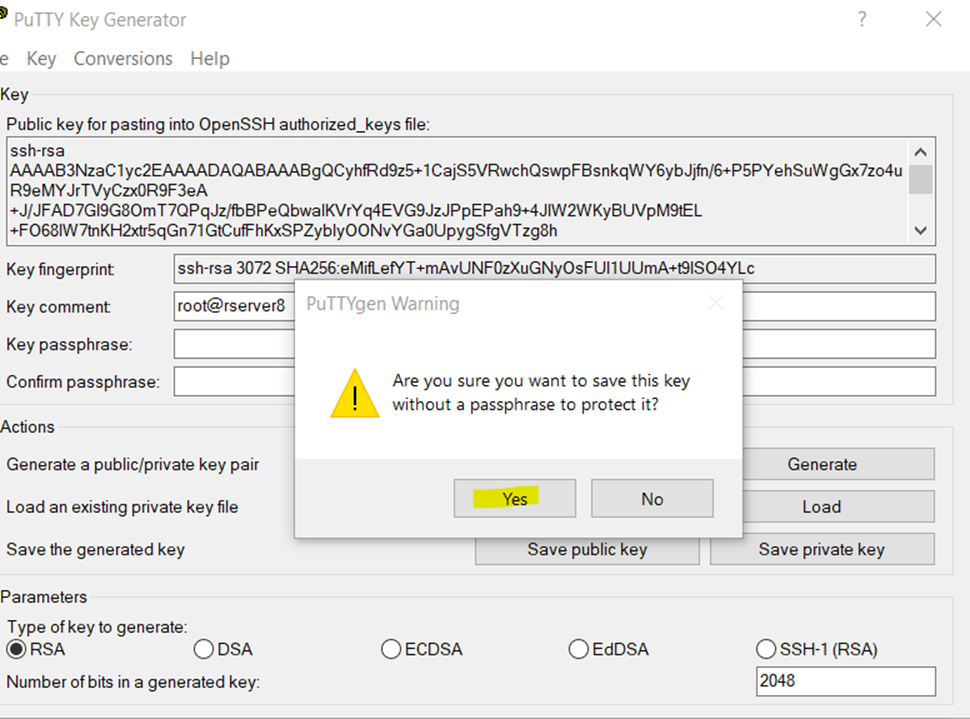
Now open the putty generator
Once file .ppk is loaded save it to same format with new or existing name
So. successfully configured password less authentication Linux server.
chmod 777 foldername will give read, write, and execute permissions for everyone.
chmod 700 foldername will give read, write, and execute permissions for the user only.
chmod 327 foldername will give write and execute (3) permission for the user, w (2) for the group, and read, write, and execute for the users.
777
anyone can do anything (read, write, or execute)
755
you can do anything; others can only read and execute
711
you can do anything; others can only execute
644
you can read and write; others can only read
Chmod 600 sets permissions so that, user / owner can read, can write and can’t execute. Group can’t read, can’t write and can’t execute. others can’t read, can’t write and can’t
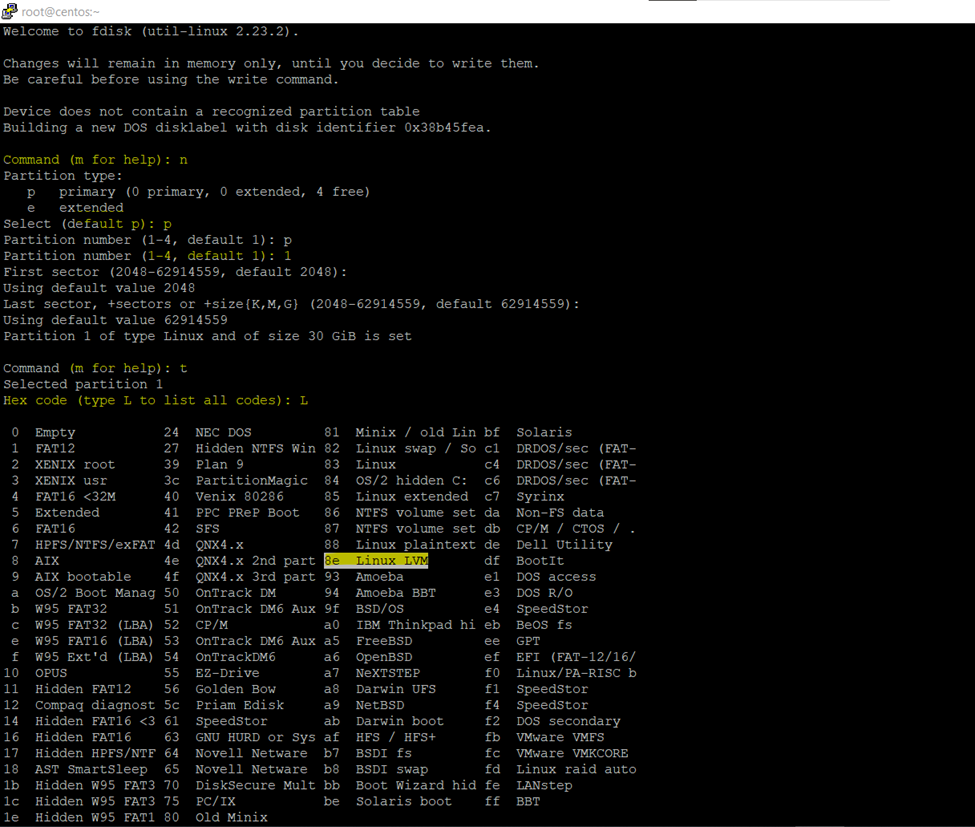
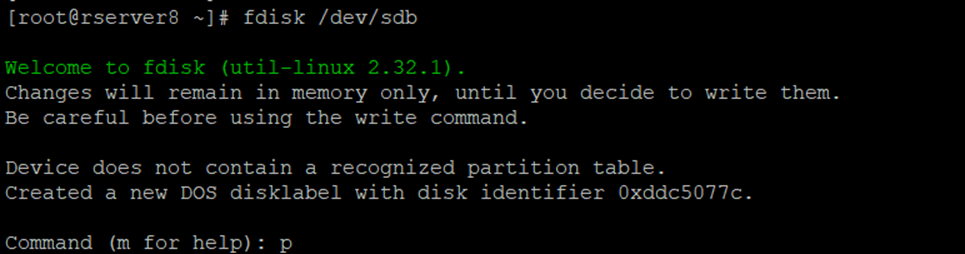
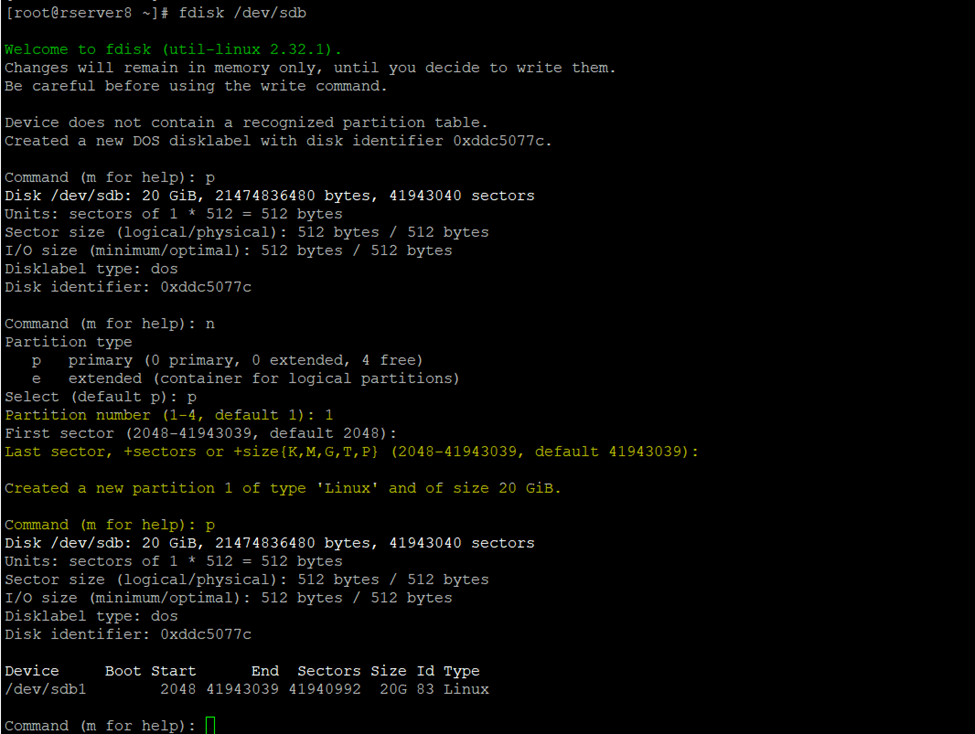
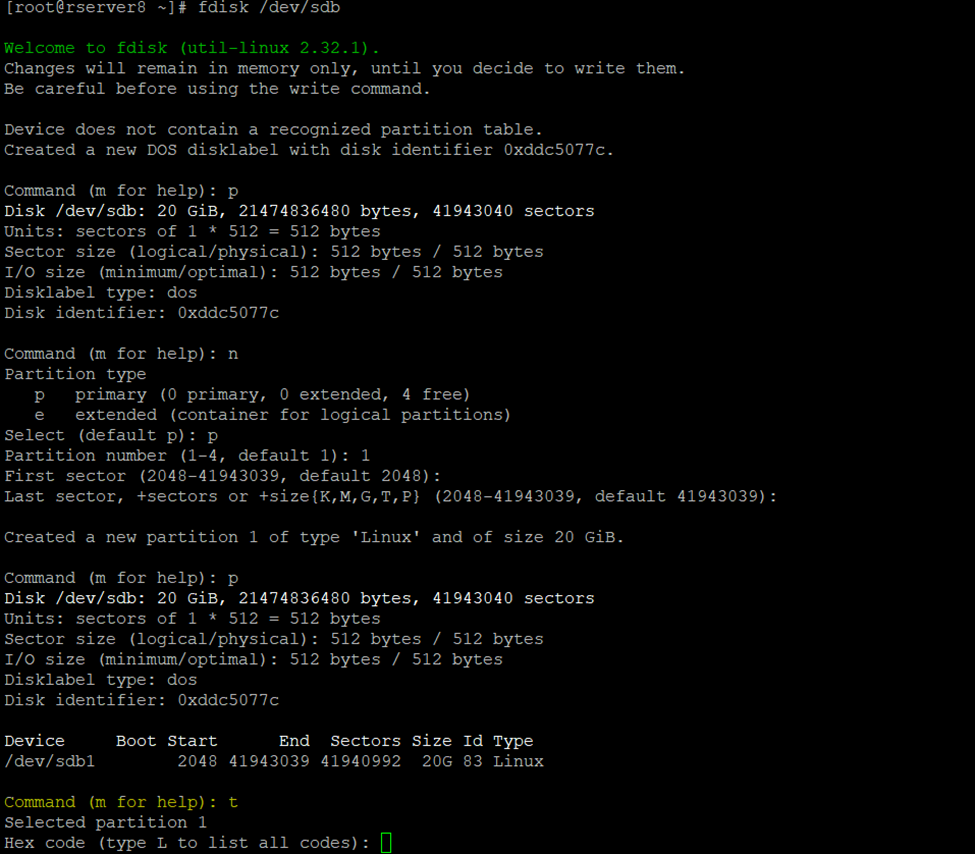
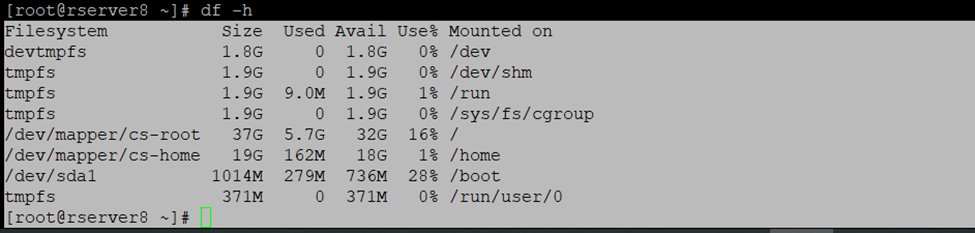
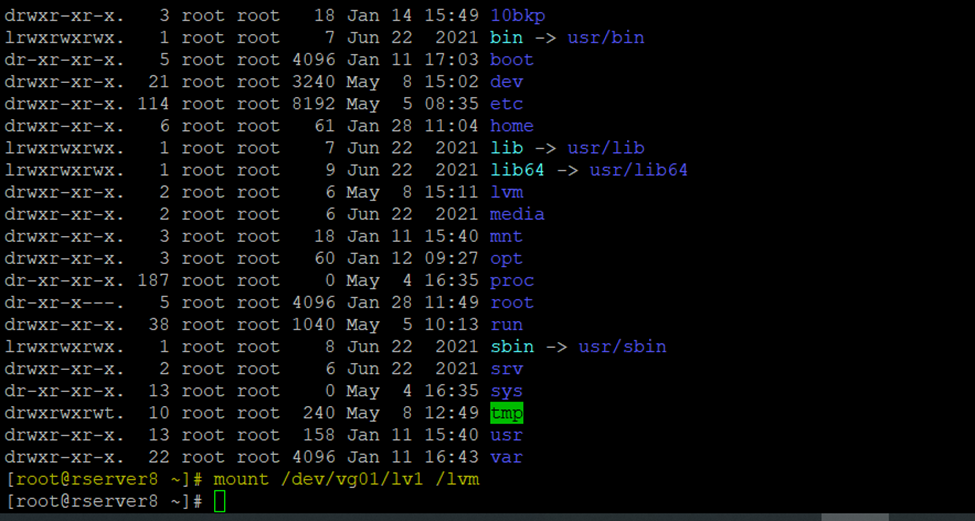
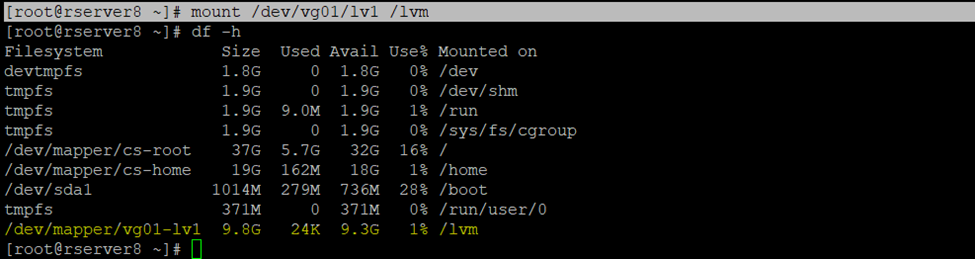
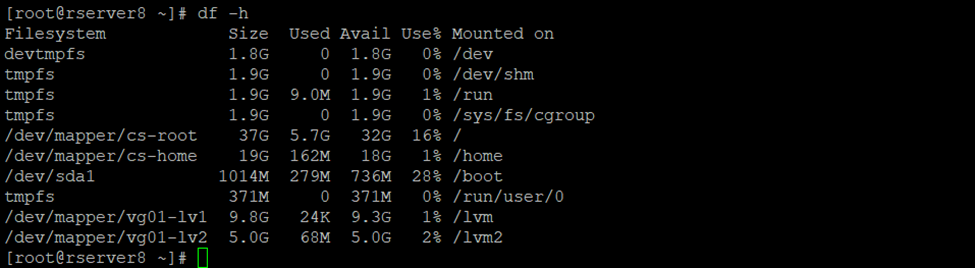
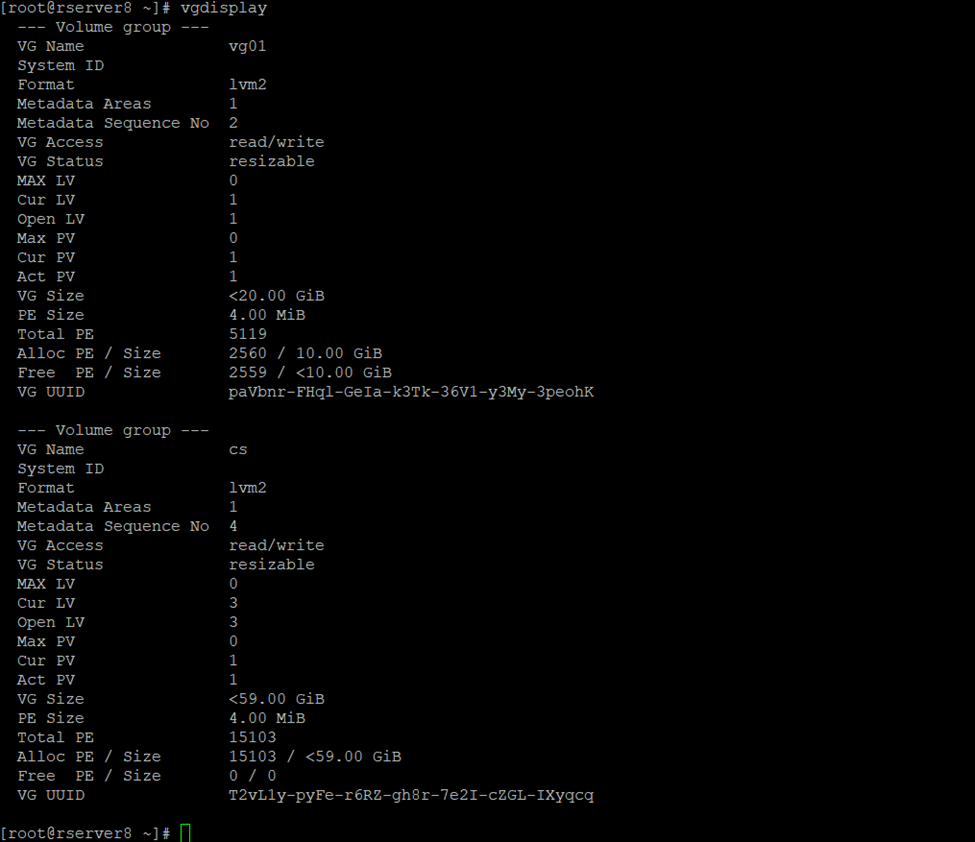
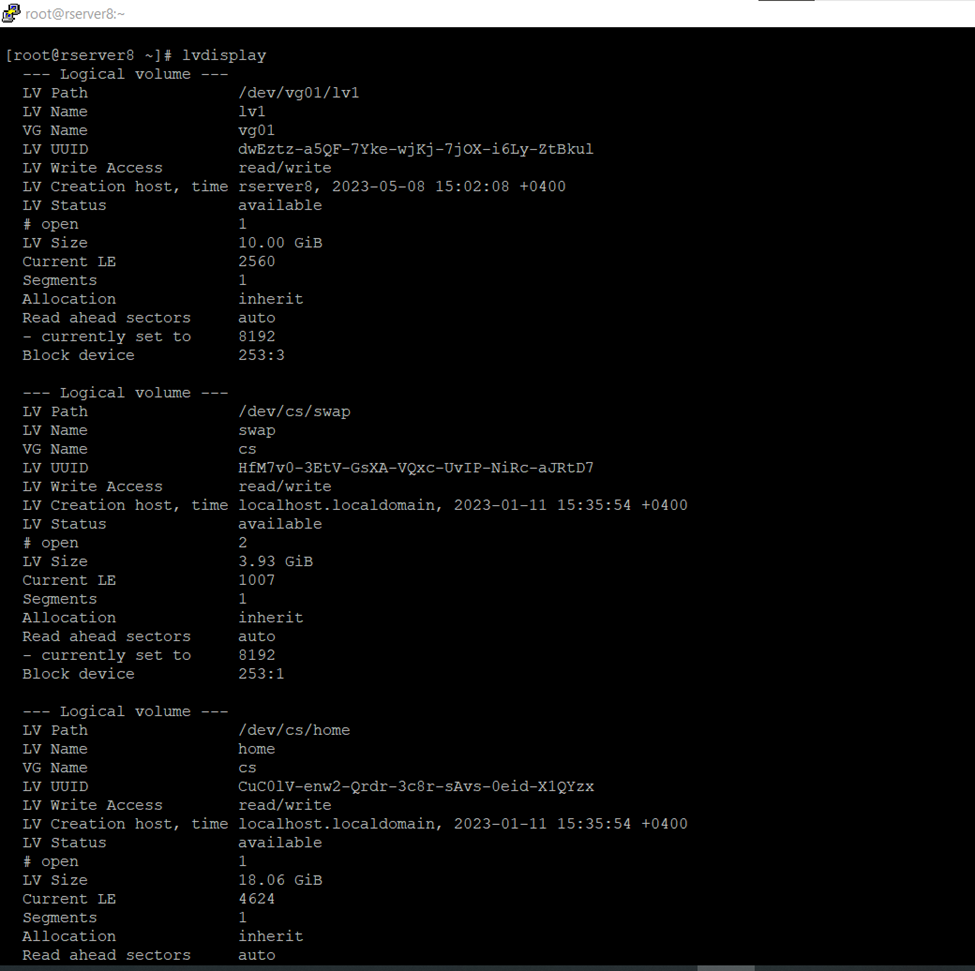
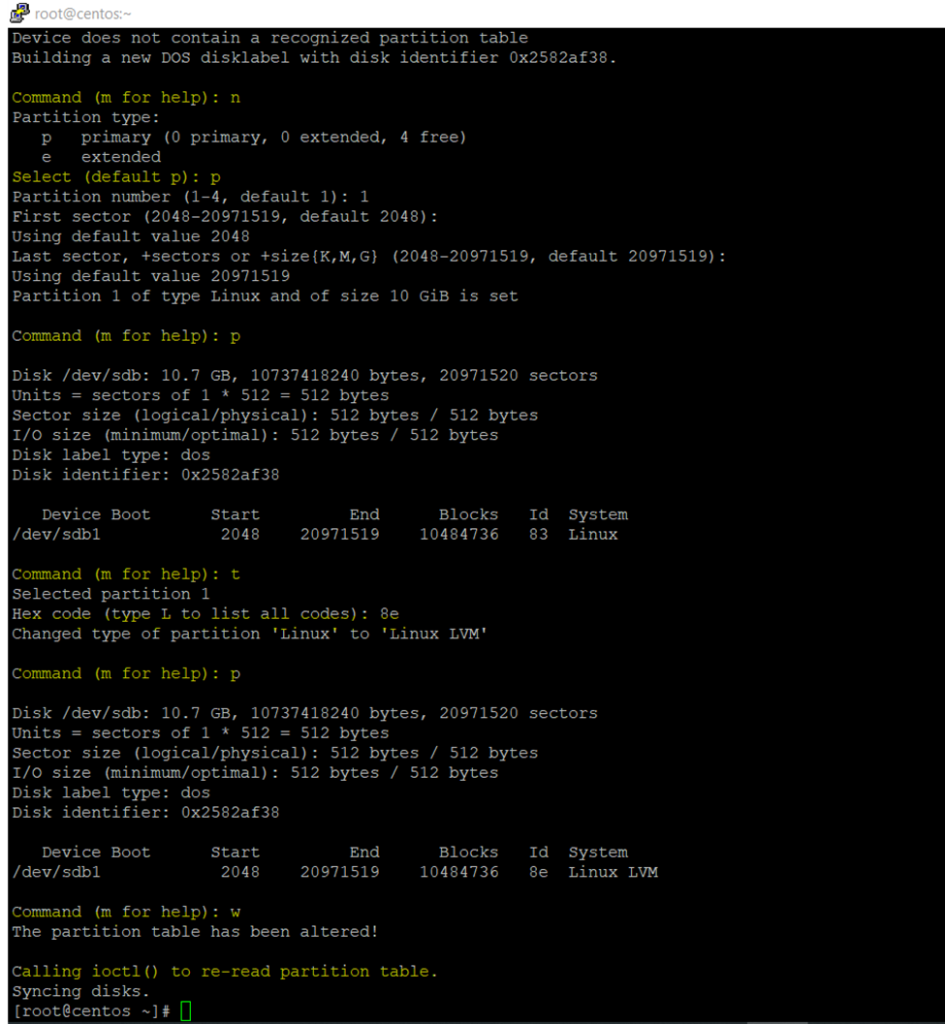
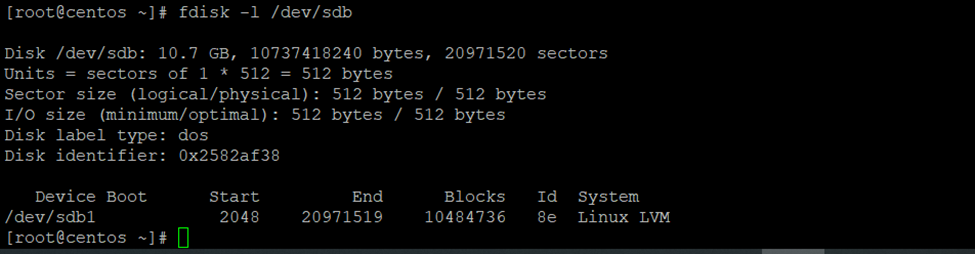
Logical Volume Manager (LVM) is a Linux mechanism for dynamically managing disks and disk partitions.
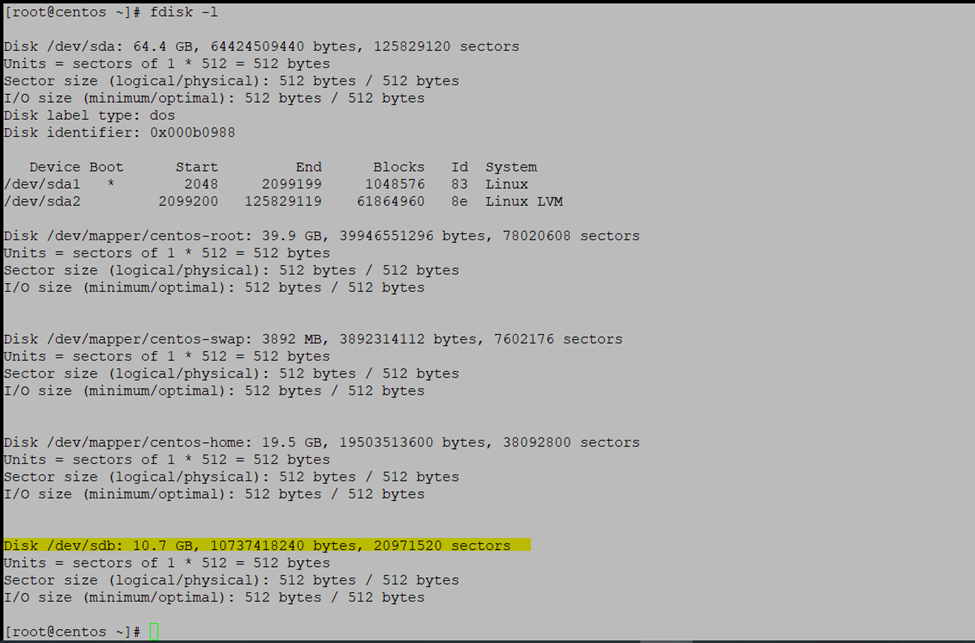
How to Configure LUN or Datastore to exsi host
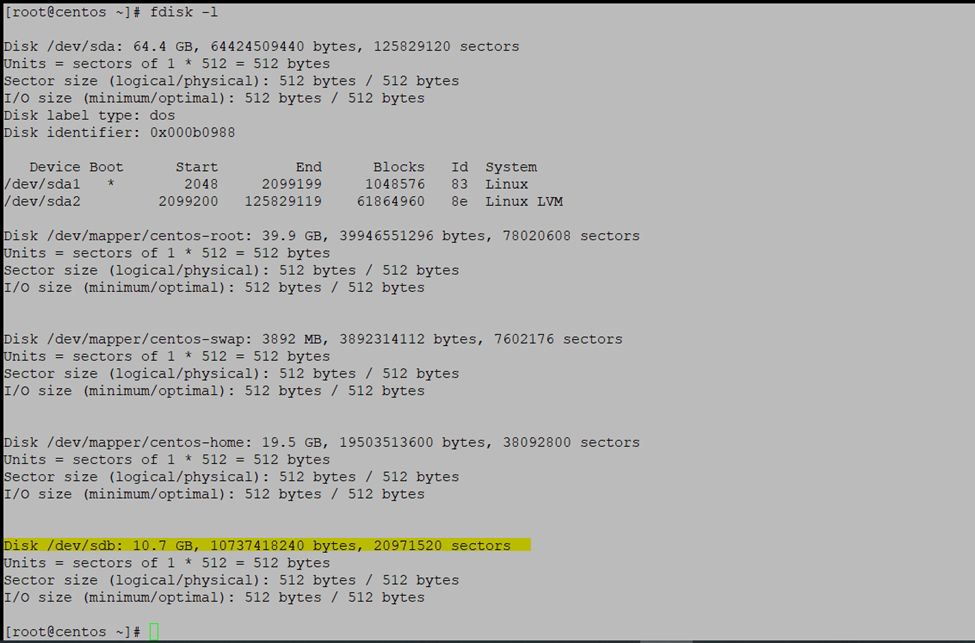
Check Disks
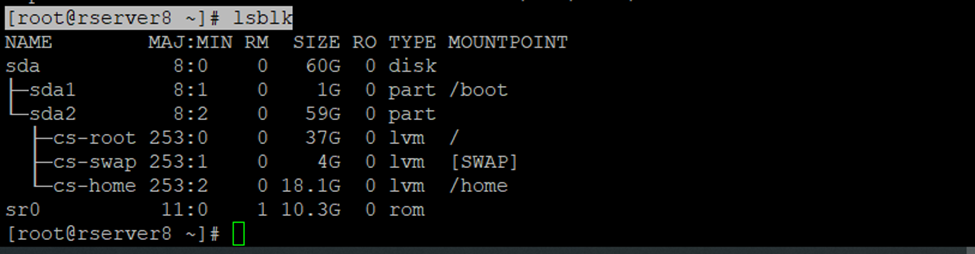
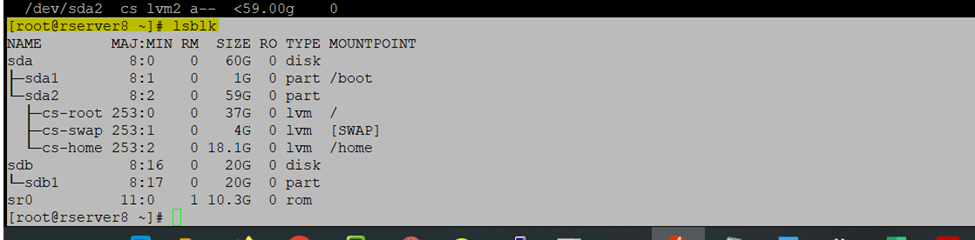
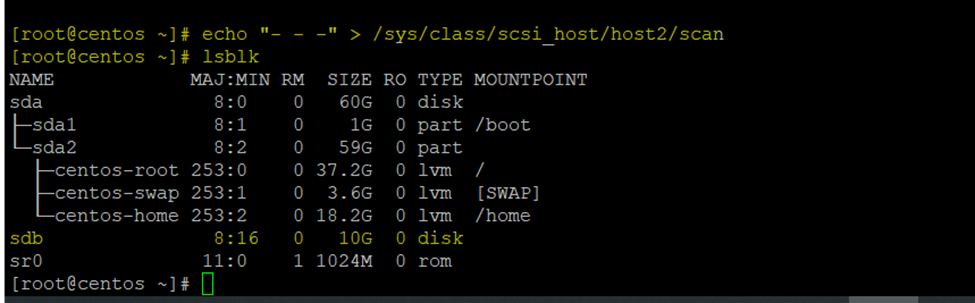
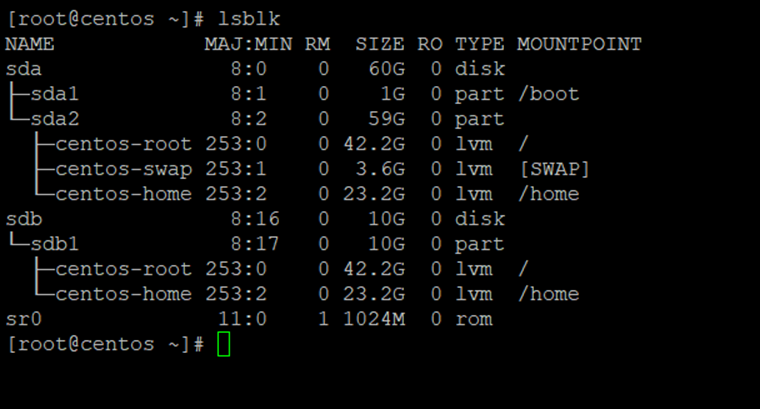
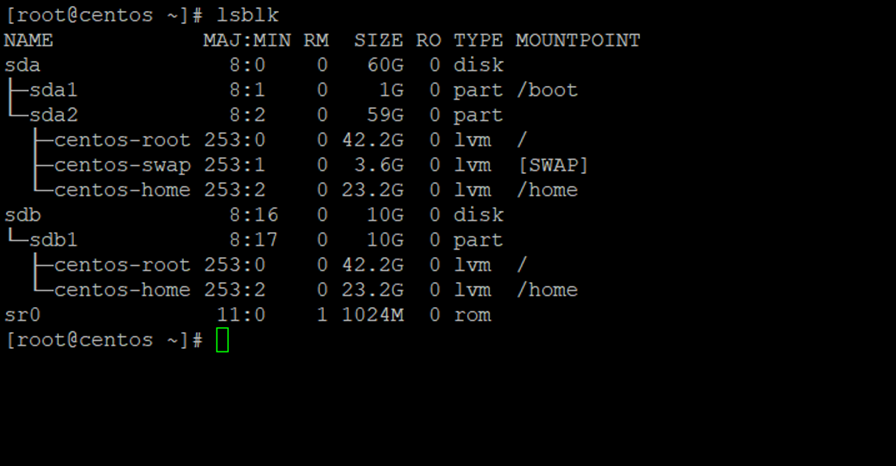
lsblk - list block devices
Check the Disk
[root@rserver8 ~]# lsblk
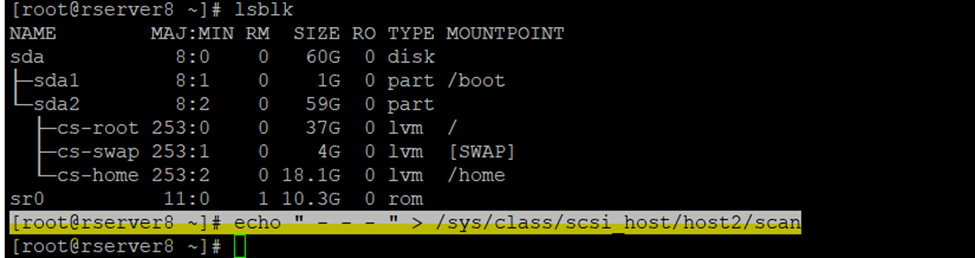
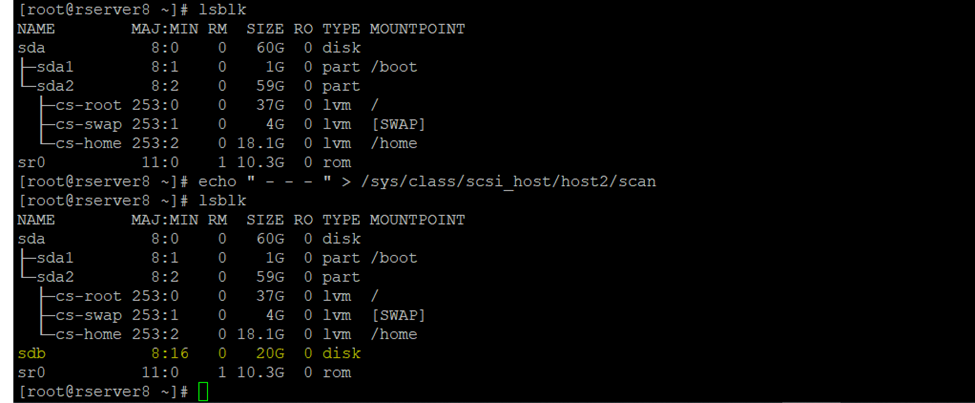
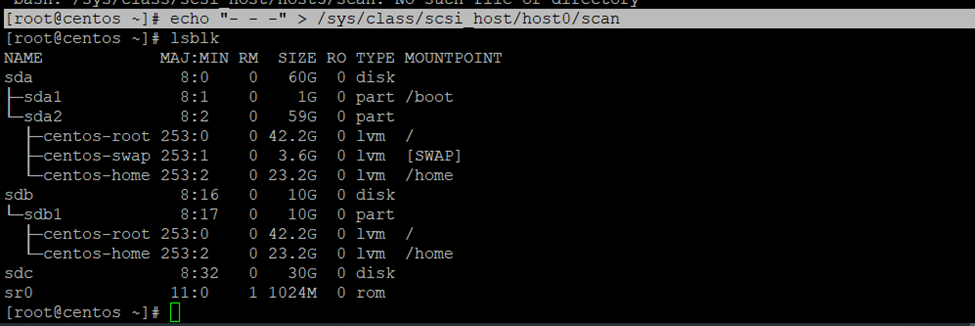
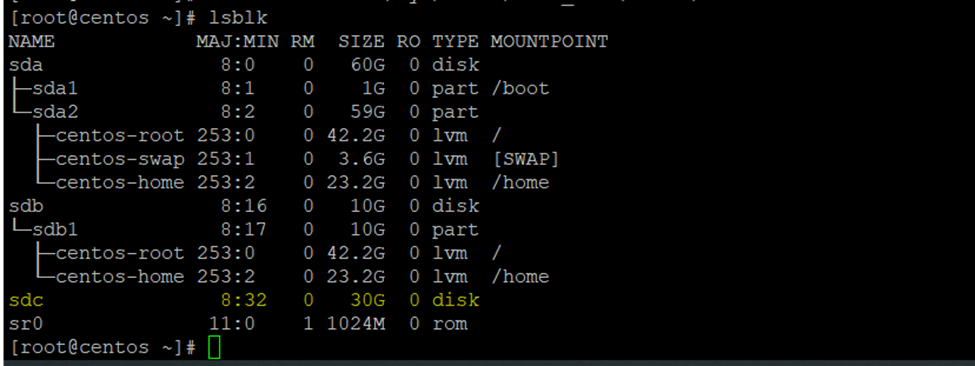
Need to Scan disk drive to add new storage in RedHAT/Centos Linux.
Echo “ – – – “ > /sys/class/scsi_host/host2/scan
(scan the channel)
(scan the scsi target)
(scan the LUN)
Here I have mention host 2 because I am having only 1 datastore activated currently so now I am adding 2nd datastore so, have selected host2 if I am having already two disk then need to target on host3
So, authorized keys are generated go to ~/.ssh/ directory or cd .ssh/
2 keys had generated
Id_rsa and id_rsa.pub
Using cat cmd display id_rsa.pub keys
[root@rserver8 .ssh]# cat id_rsa.pub
Copy this key
Create new authorized_keys file
So, using vi or vim cmd we can create
[root@rserver8 .ssh]# vi authorized_keys
Paste it here id_rsa.pub keys which you have copied using cat id_rsa.pub
Chmod 600 sets permissions so that, user / owner can read, can write and can’t execute. Group can’t read, can’t write and can’t execute. others can’t read, can’t write and can’t
So, I had created the authorized_keys now assign the permission to this particular user
So in my case root is the owner you can create user and assign the privileges
[root@rserver8 .ssh]# chmod 600 authorized_keys
So, now need to copy private key
Again, go to .ssh folder
[root@rserver8 ~]# cd .ssh/
[root@rserver8 .ssh]# cat id_rsa
Copy this and paste it to any text editor
And save it to .ppk format
PuTTY Private Key
…
Now to to ssh_config and disable password authentication login
And if you are using any user you can also disable root login
[root@rserver8 .ssh]# vi /etc/ssh/sshd_config
password authentication change it make it no.
So, once authentication done restart the sshd services (Secure Shell or Secure Socket Shell).
[root@rserver8 .ssh]# sudo systemctl restart sshd
I am saving private key in notepad text editor .ppk format
So here we need to convert in putty format if we don’t do it, we will get the error.
Go to ssh tab and browse the .ppk save private here we will get error because we are not using putty format
If you can check getting the format error
Now open the putty generator
Once file .ppk is loaded save it to same format with new or existing name
Microsoft Windows Server offers the possibility to perform a ‘Full’ backup or a ‘System State’ backup. A Full backup makes a copy of the system drives of a physical or a virtual machine, including applications, operating systems, and even the System State. This backup can be used for bare metal recovery—this allows you to easily reinstall the operating system and use the backup to recover.
System State backup
System State backup on the other hand creates a backup file for critical system-related components. This backup file can be used to recover critical system components in case of a crash. Active Directory is backed up as part of the System State on a domain controller
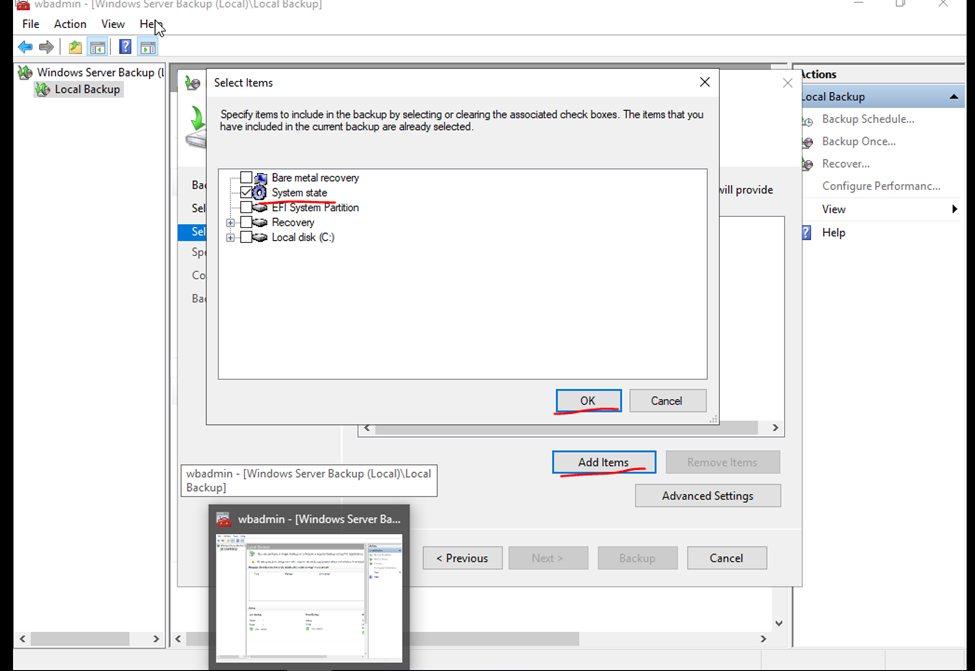
The System State includes the following list plus some additional items depending on the roles that are installed:
Domain controller: Active Directory DC database files (NTDS.DIT), boot files & system protected files, COM+ class registration database, registry, system volume (SYSVOL)
Domain member: Boot files, COM+ class registration database, registry
A machine running cluster services: Additionally backs up cluster server metadata
A machine running certificate services: Additionally backs up certificate data
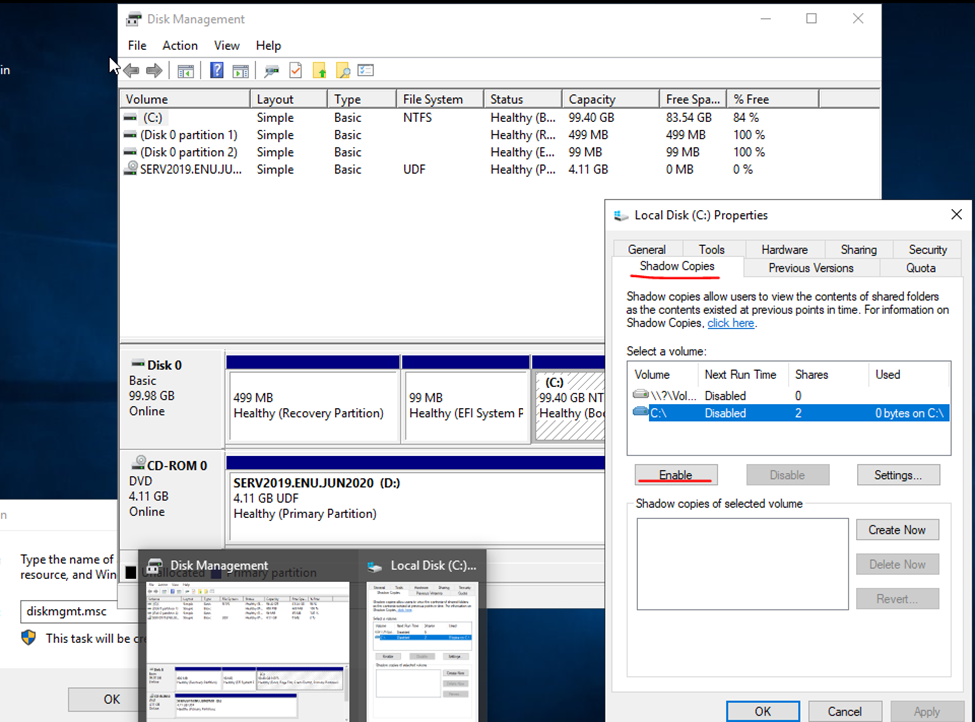
Configure the Volume Shadow Copy Service (VSS)
It is important to ensure that the AD database is backed up in a way that preserves database consistency. One way to preserve consistency is to back up the AD database when the server is in a powered-off state. However, backing up the Active Directory server in a powered-off state may not be a good idea if the server is operating in 24/7 mode.
For this reason, Microsoft recommends the use of Volume Shadow Copy Service (VSS) to back up a server running Active Directory. VSS is a technology included in Microsoft Windows that can create backup copies or snapshots of computer files or volumes, even when they are in use. VSS writers create a snapshot that freezes the System State until the backup is complete to prevent modifying active files used by Active Directory during a backup process. In this way, it is possible to back up a running server without affecting its performance.
VSS
Go to properties click on shadow and enable it
Click yes and okay
Go to setting and select no limit and press ok.
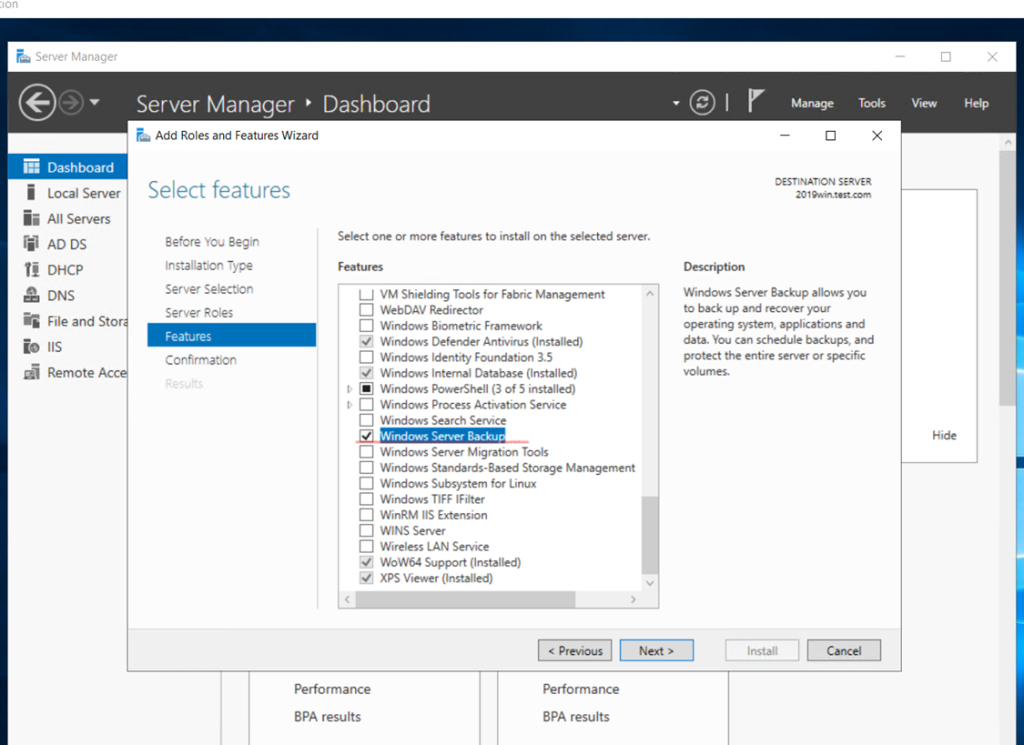
Install the Windows Server backup feature
Click to server manager and select the option once features option display select windows server backup
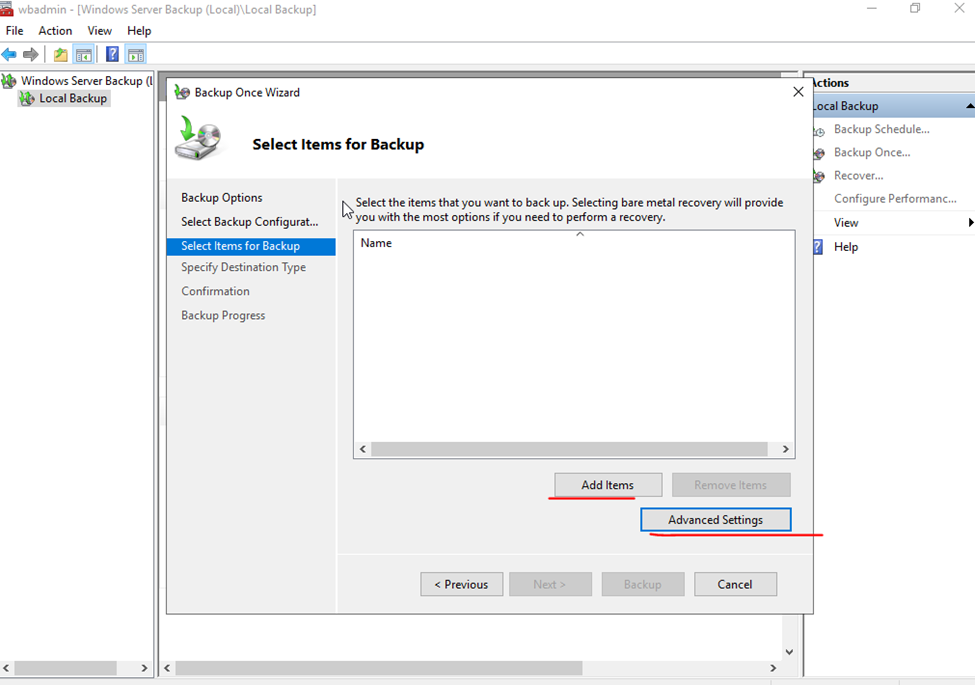
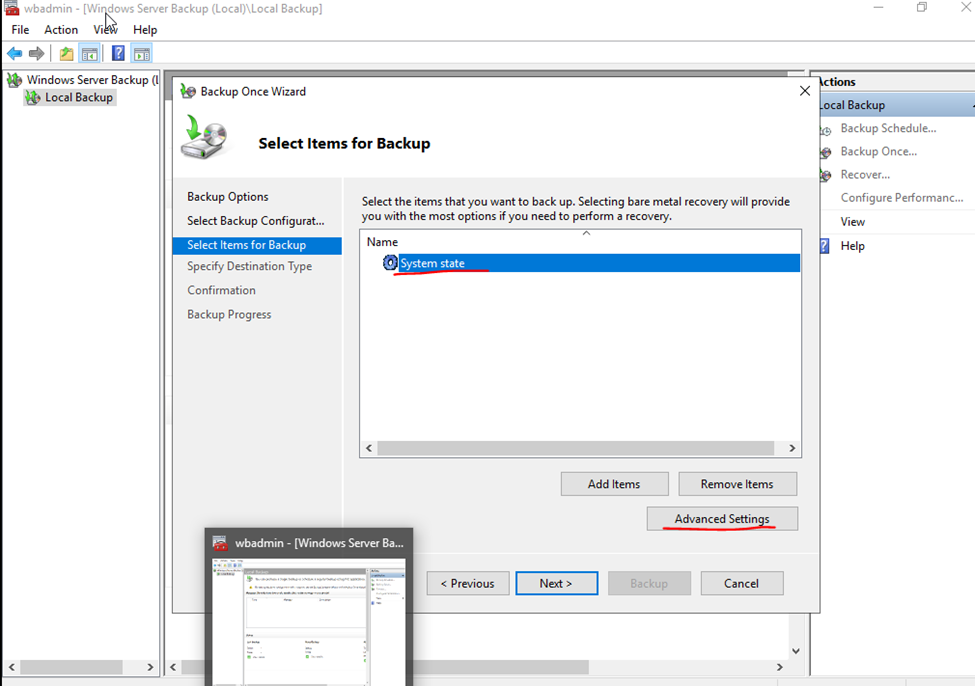
Once the server backup opens, click on Backup Once
Select Backup Destination screen you can choose the actual partition where you want to store the backup. Once you are done, click Next to proceed to the next
Restore
Boot in DSRM
Start the restore process by booting your server in Directory Services Restore Mode (DSRM). To do this,
Reboot the server.
In the boot menu, press F8 for advanced options.
Scroll down and select the Directory Services Restore Mode.
Press Enter, and this will reboot the computer in a safe mode. It won’t start the directory services.
The other option is, run msconfig and select Safe Boot > Active directory repair in the boot tab. Finally, restart your server, and it will start in the DSRM mode.
Run your DC in Safe mode
Type win+r and msconfig
Click to boot option
Running server in safe mode and AD Repair mode
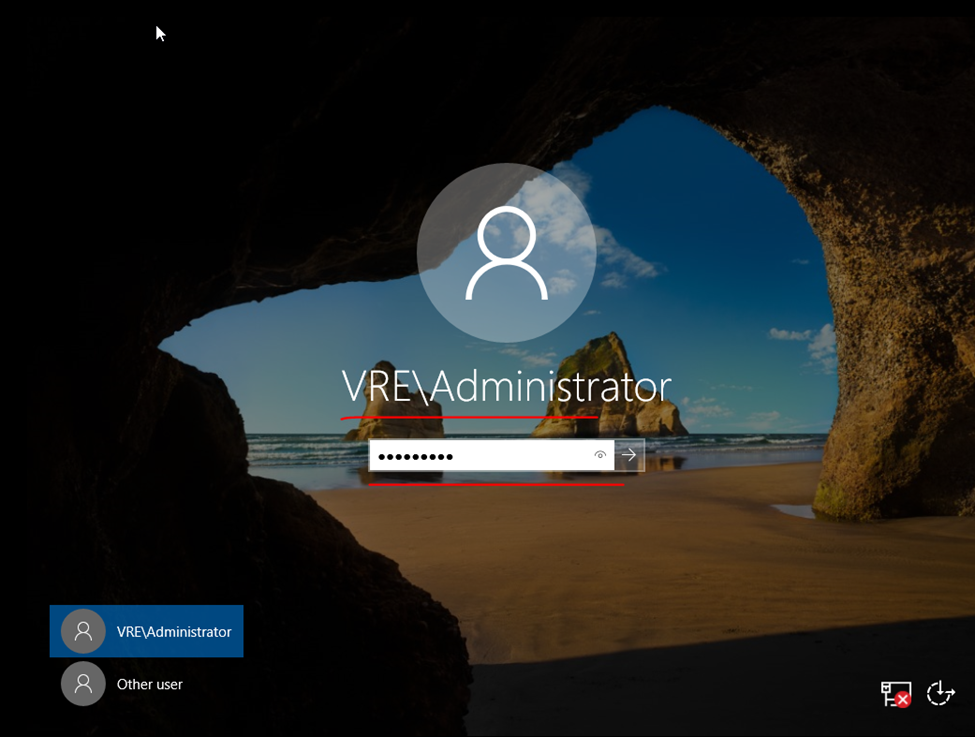
if cannot login in safe mode try with .\administrator whatever Server admin username
Log into the server with the local administrator account. The domain services will not be available so the local account will be the only account available.
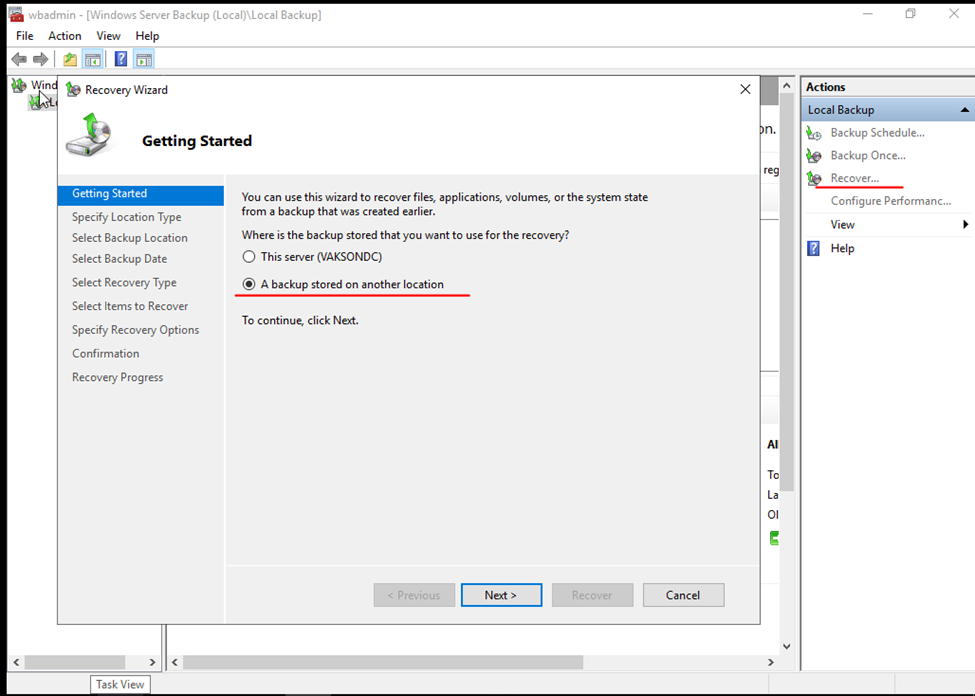
Open Windows Server Backup.
Select Recover.
Select This Server for where the backup is stored.
Select the backup you want to restore then click next.
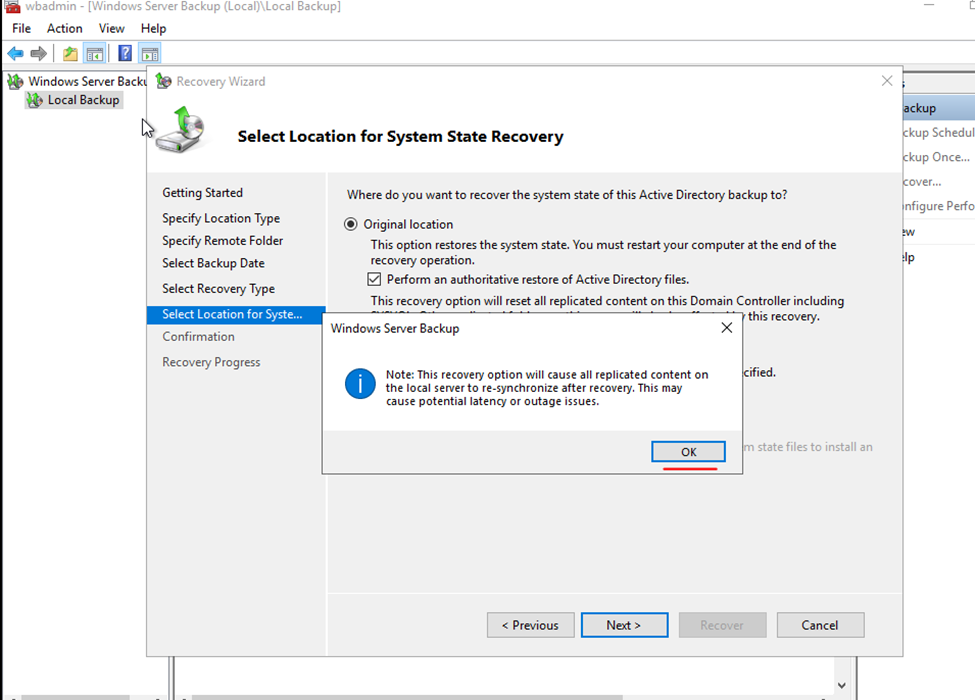
Select “System state” and click next.
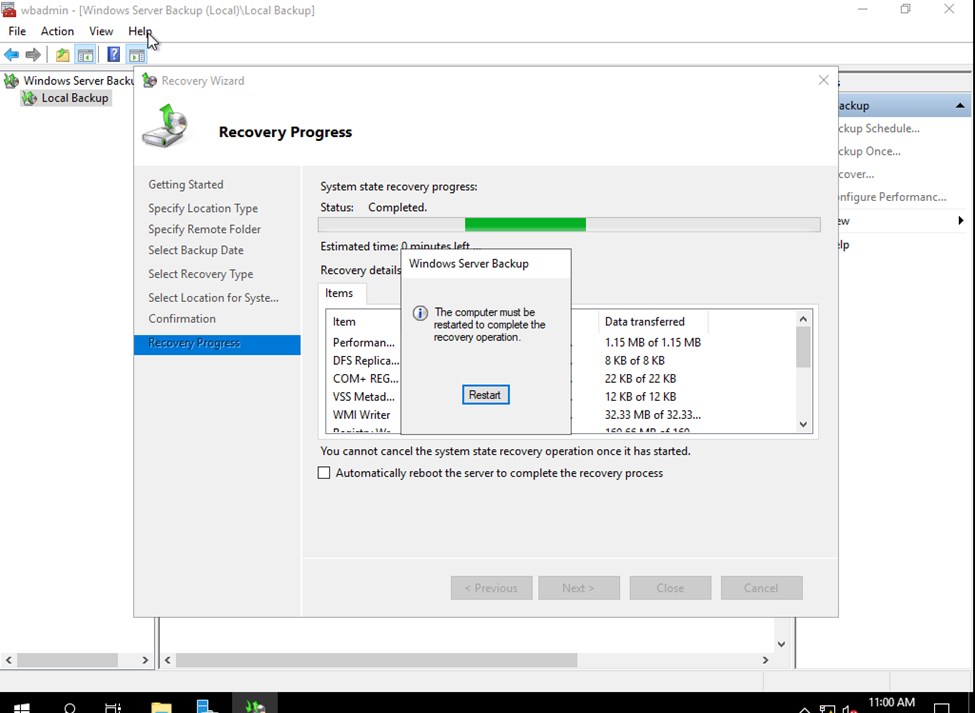
Select Original Location You need to consider if an authoritative restore of Active Directory is needed. If you have other sites that contain healthy domain controllers then you may not need an authoritative restore. In this example, I have one site so I want to reset all replicated content.
When the restore is complete, reboot and log into the server as normal. You should get a command line showing that the restore was completed. Mine says it was completed with errors but everything seems to be working fine now
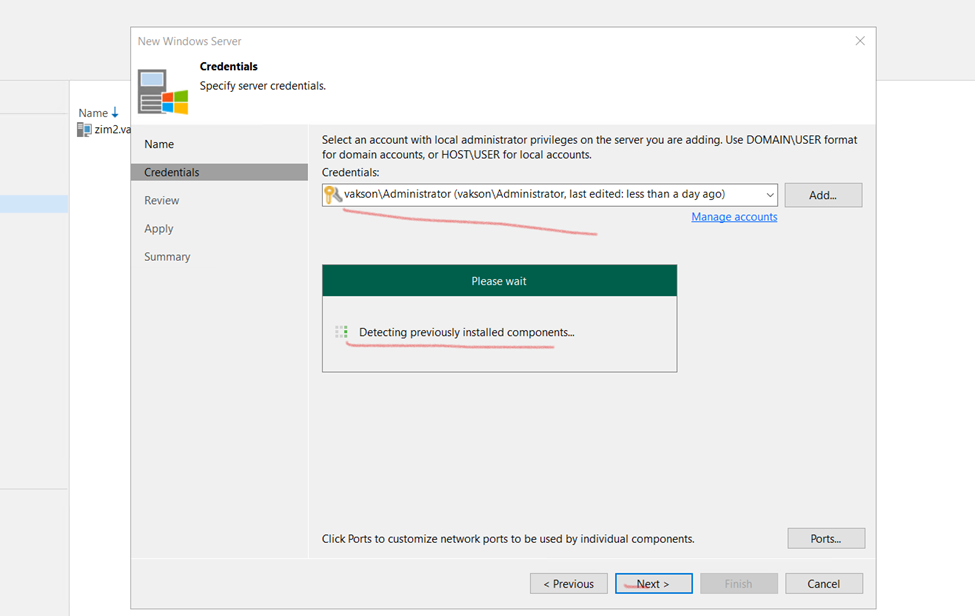
Add Windows server 2019 to the existing domain as member
Log in to the Server 2019 as a member of local administrators group and join your server to domain. After restart, log in to the server as Enterprise Administrator.
Here I am Having 2016 DC Server.
FSMO COUNTROLS Authority
netdom query fsmo
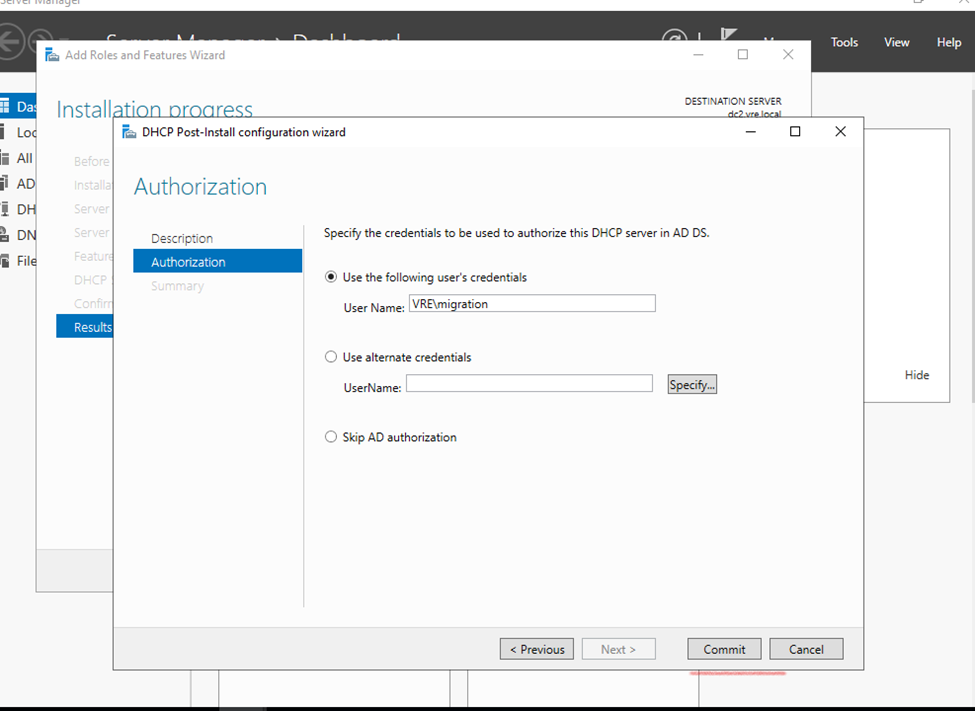
Migration user domain authorization — no need to create another user– use administrator
so, here i have created a user migration with enough authority
D:
Cd support
Cd adprep
dir
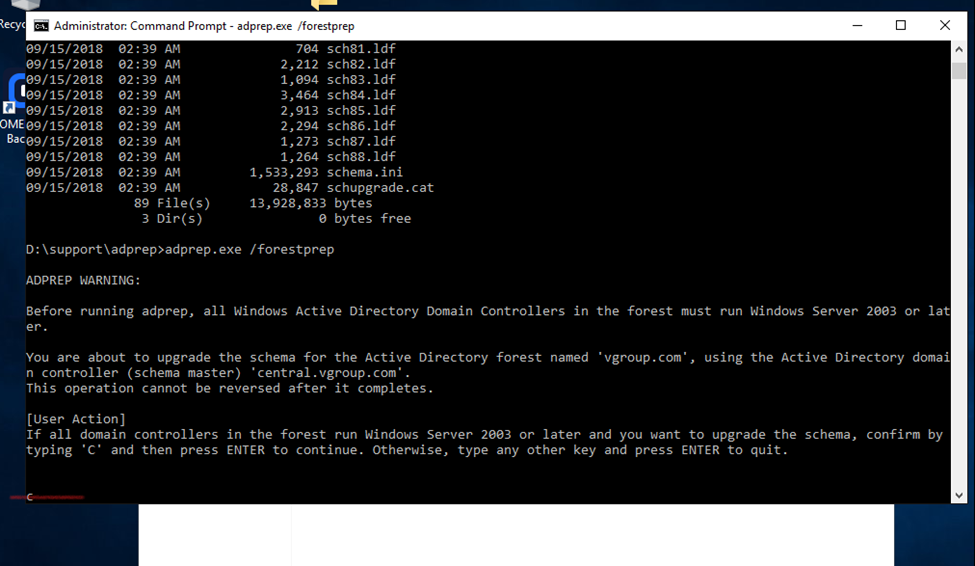
Adprep.exe /forestprep
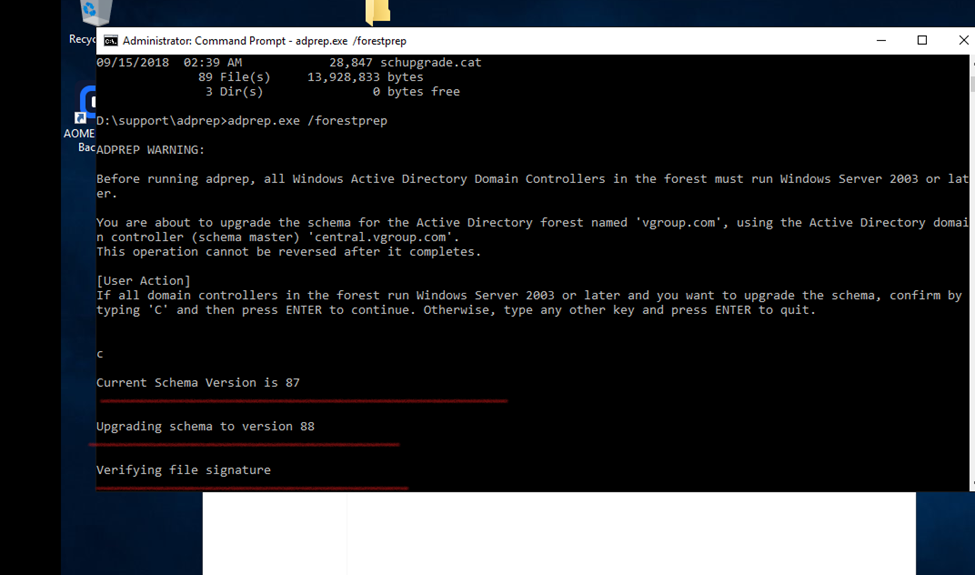
And type c
(c for continue)
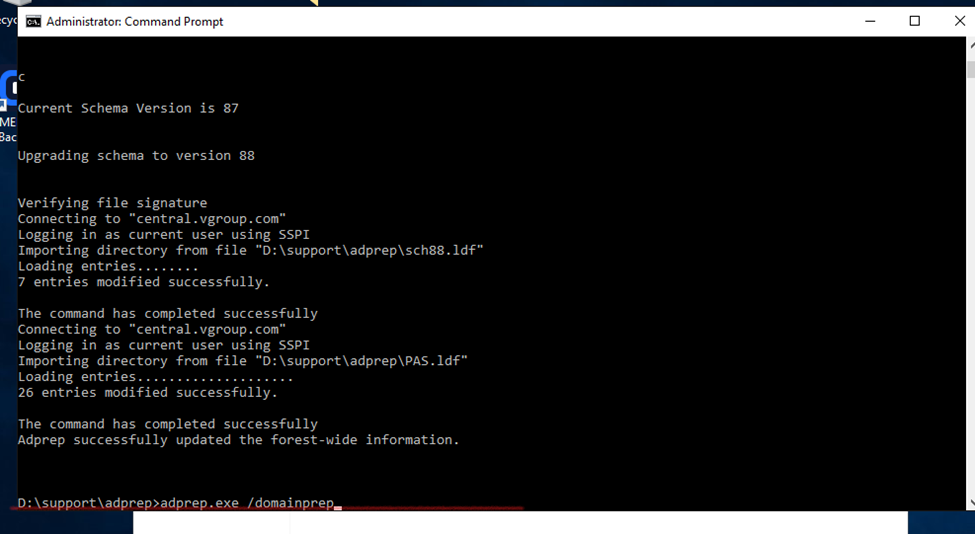
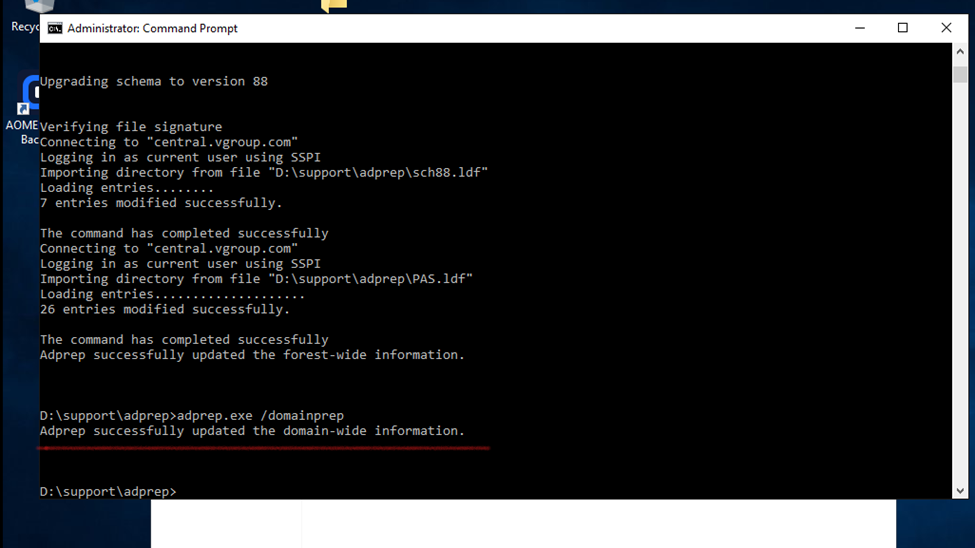
adprep.exe /domainprep
Set up a new server using Windows Server 2019
The first step is to install Windows Server 2019 on a new physical device or virtual machine. If you are more technically experienced with Windows Server, you could choose to install Server Core and then perform the necessary steps using PowerShell or by remotely connecting to the new server using Server Manager or Windows Admin Center. Otherwise, install Windows Server with the Desktop Experience role enabled.
Install the Active Directory Domain Services role
Wait for the server to reboot and then sign in with a domain admin account. You can then install the Active Directory Domain Services (AD DS) server role using Server Manager and the Add Roles and Features wizard in the Manage menu. You can also use the following PowerShell command:
When the AD DS server role has been installed, you’ll get a notification in Server Manager prompting you to promote the server to a domain controller. Clicking the yellow exclamation mark icon will launch the AD DS configuration wizard. You should choose to ‘Add a domain controller to an existing domain’ and follow through the on-screen instructions. And providing that you are signed in with a domain admin account, adprep will automatically prepare your existing domain.
So, after installation of 2019 server need to install Active directory click to join existing domain.
Windows Upgradation (Windows server Migration 2016 to 2019)
How to Upgrade Windows Server 2016 to 2019 Step by Step
If you are still running Windows Server, you should upgrade to Windows Server 2019 since Windows Server 2016 will end the support.
Instructions
To upgrade Windows Server 2016 to Windows Server 2019, do the following:
Log in as an administrator on the server you want to upgrade.
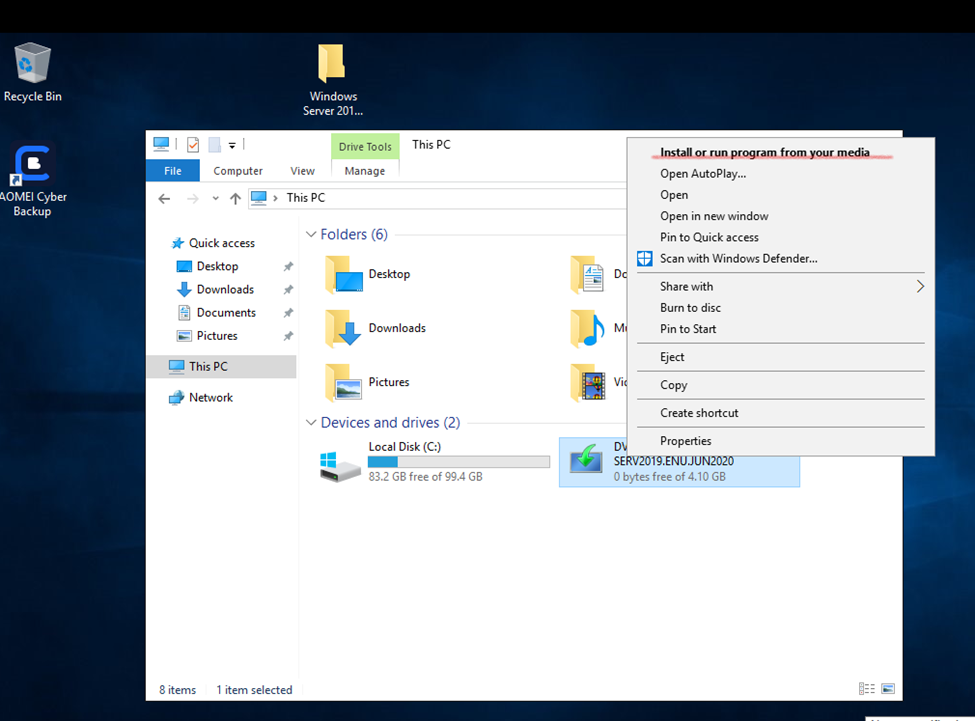
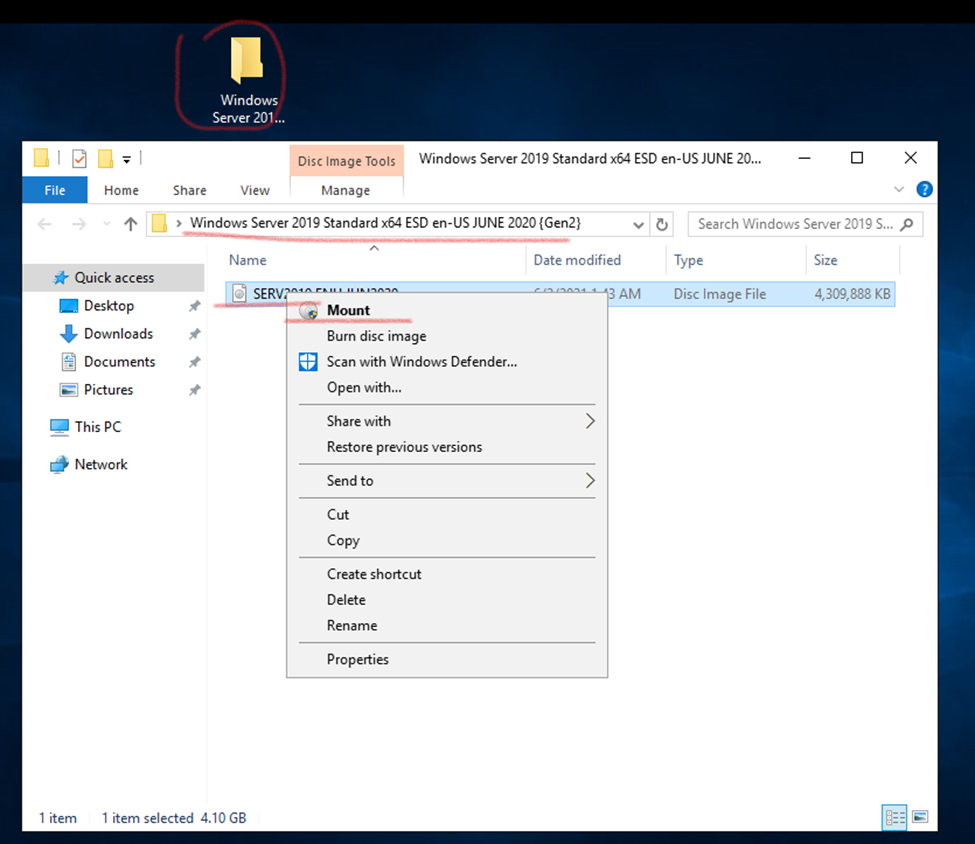
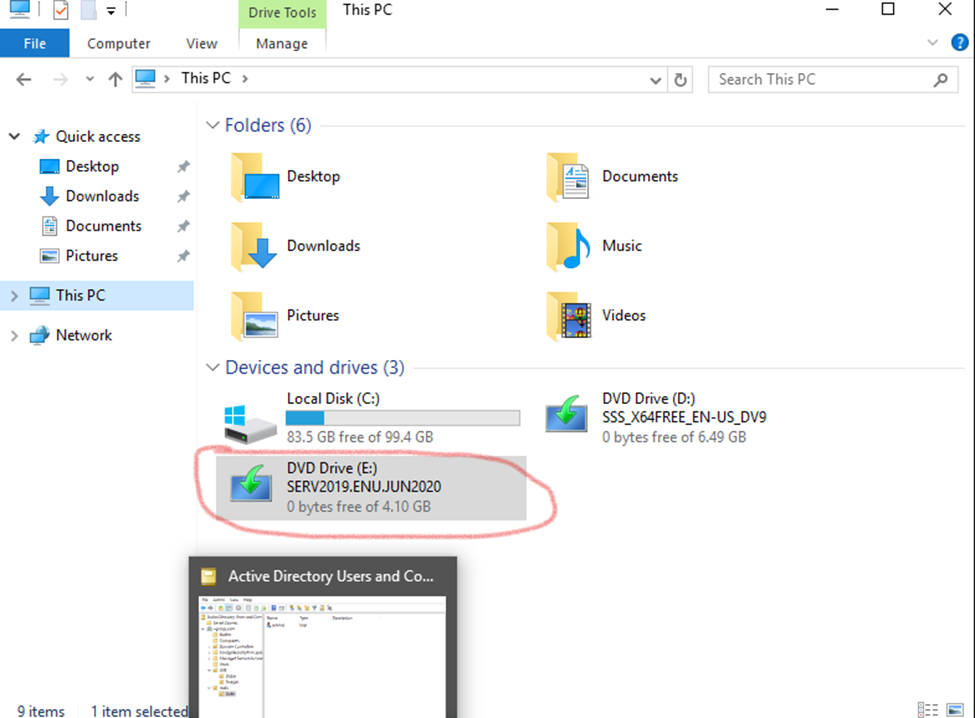
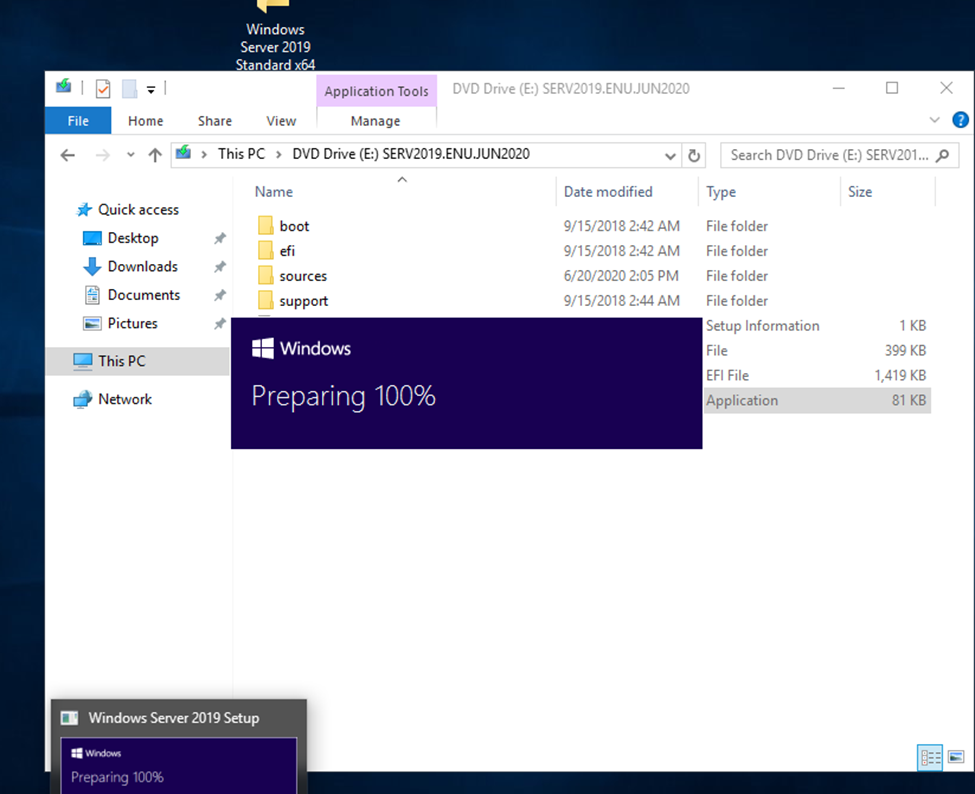
Insert the Windows Server 2019 DVD or mount the installation ISO.
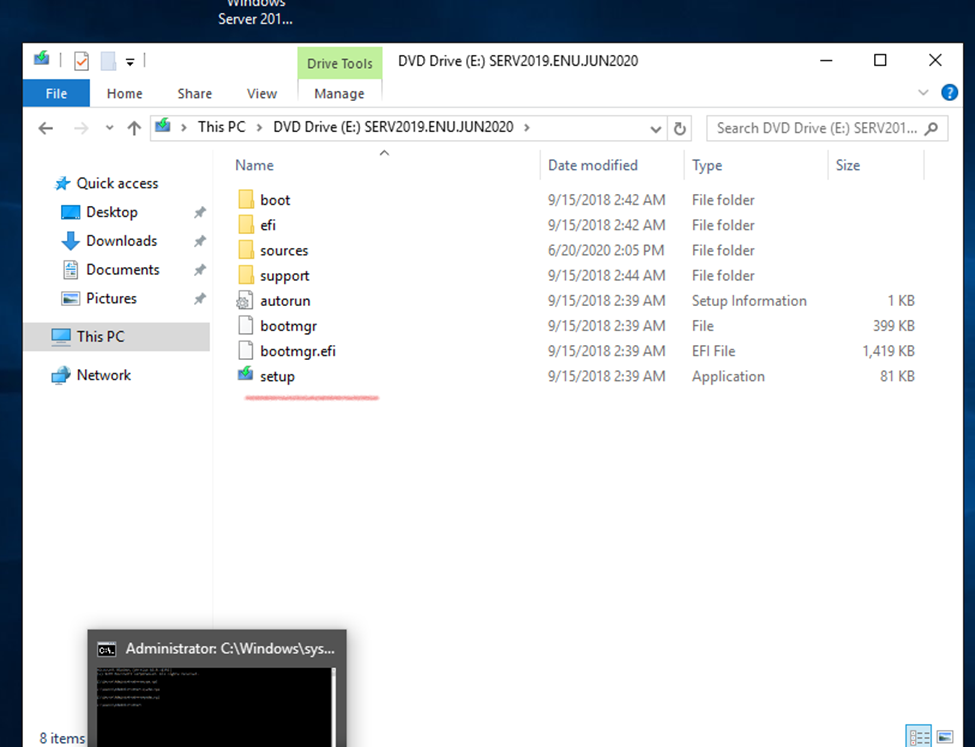
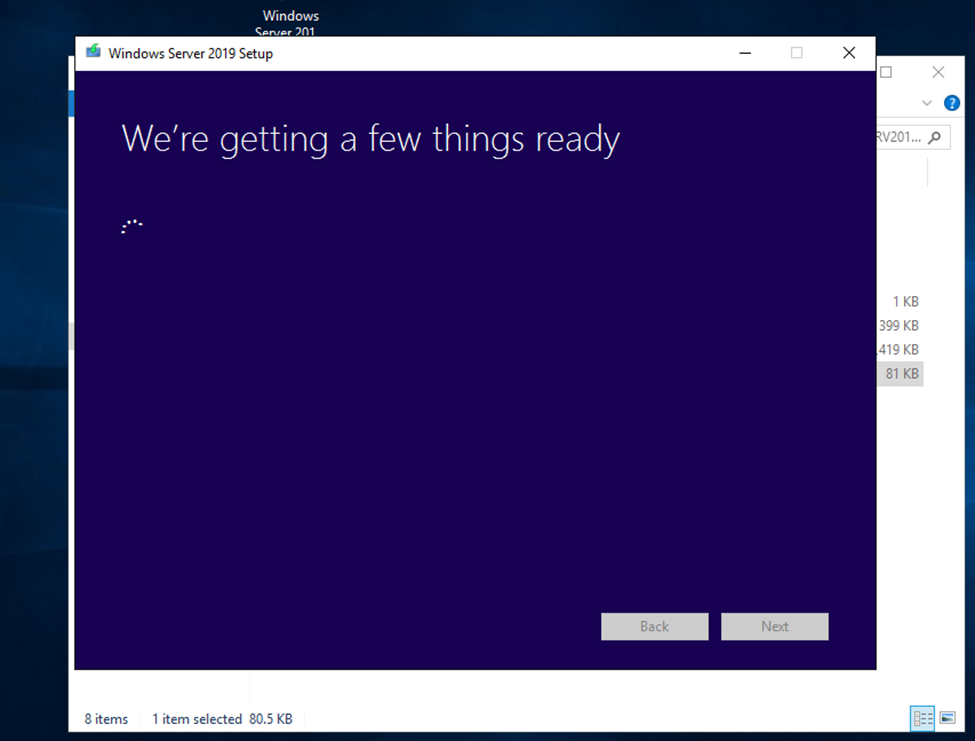
Browse to the root of the installation media and double-click setup.exe. The Windows Server 2019 Setup window appears.
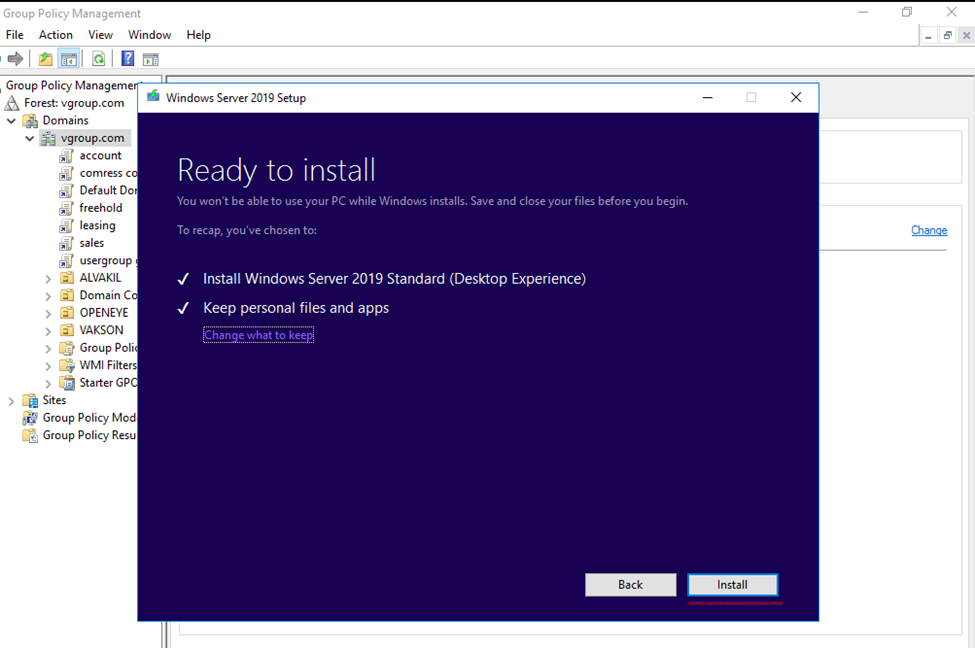
Follow the steps in the wizard according to the guidance in the Before You Begin section above. Note the following:
If you are upgrading from a DVD, you may be prompted to boot from DVD. You can let the request time out and the upgrade will continue.
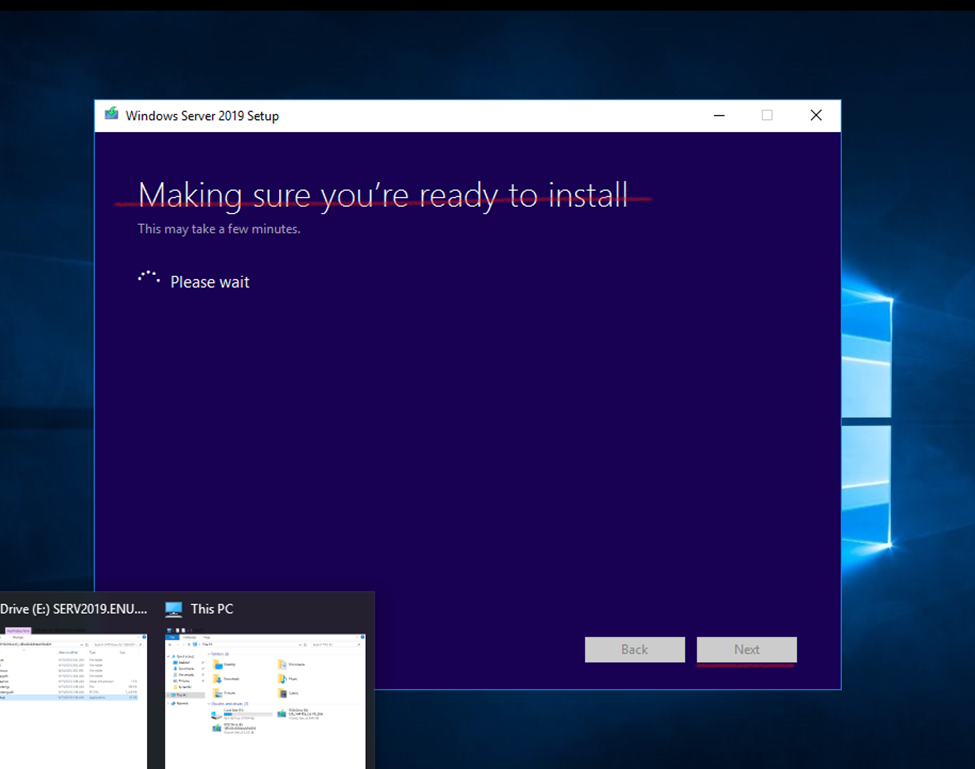
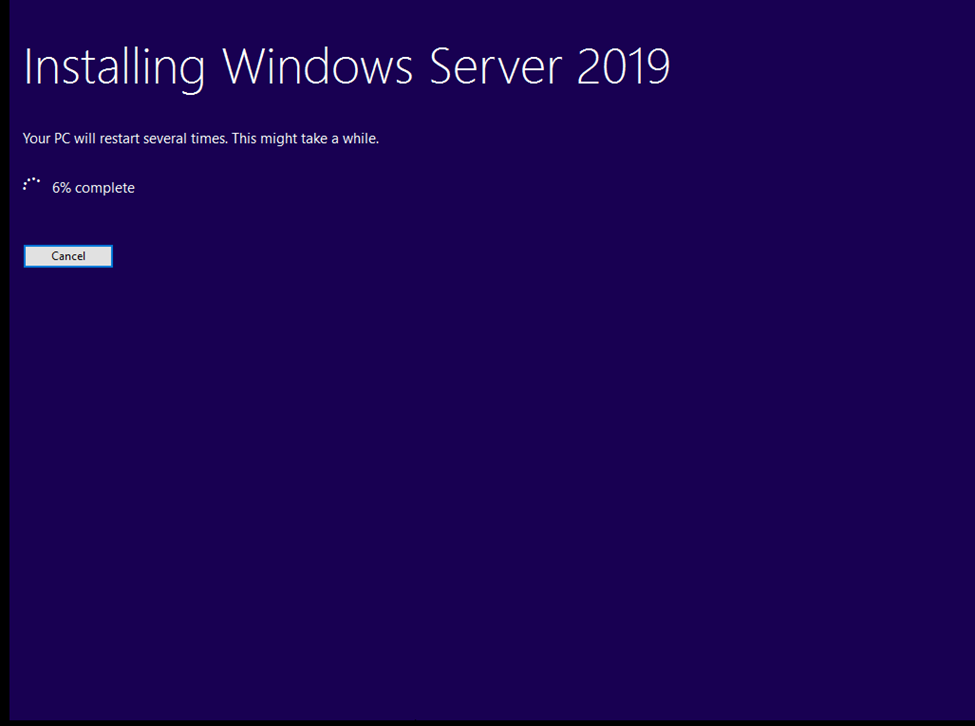
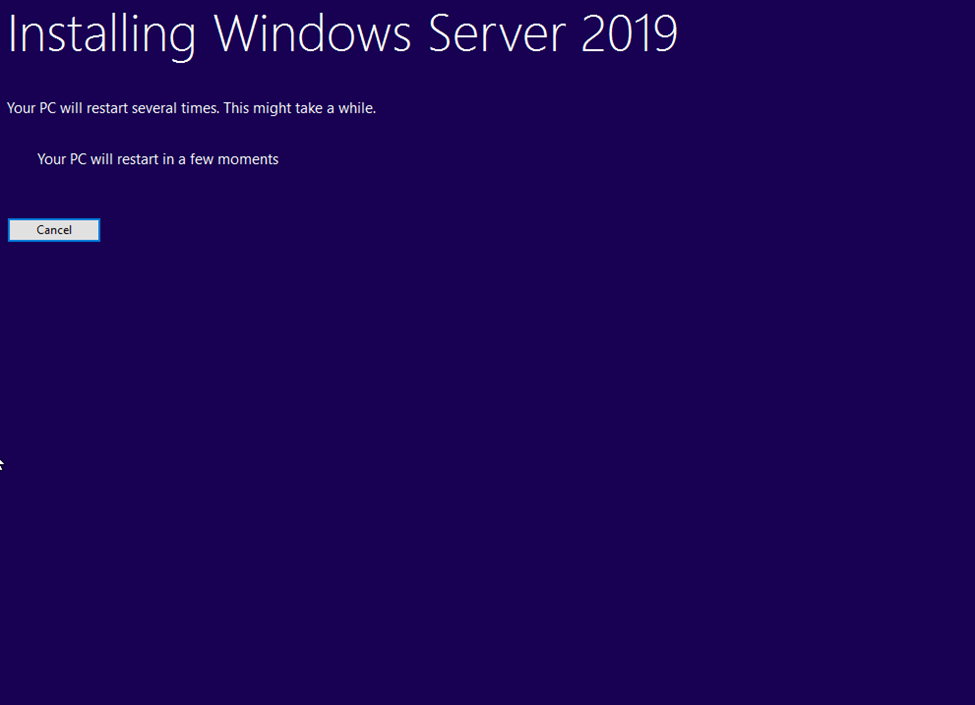
When the upgrade is almost finished, a screen will indicate that settings are being finalized. When the upgrade is finished, you will be presented with the Windows Server 2019 login screen.
According to Microsoft, Windows Server 2016 will continue to update until Jan 12, 2027. And the end of life for Windows server 2019 is Jan 9, 2029. Windows Server 2022 has released in Sep 2021.
Even though Windows Server 2016 still acts as the main workhorse on many companies, we recommend upgrading to the latest version due to the new security function and better performance.
Before starting upgradation server first take complete server backup
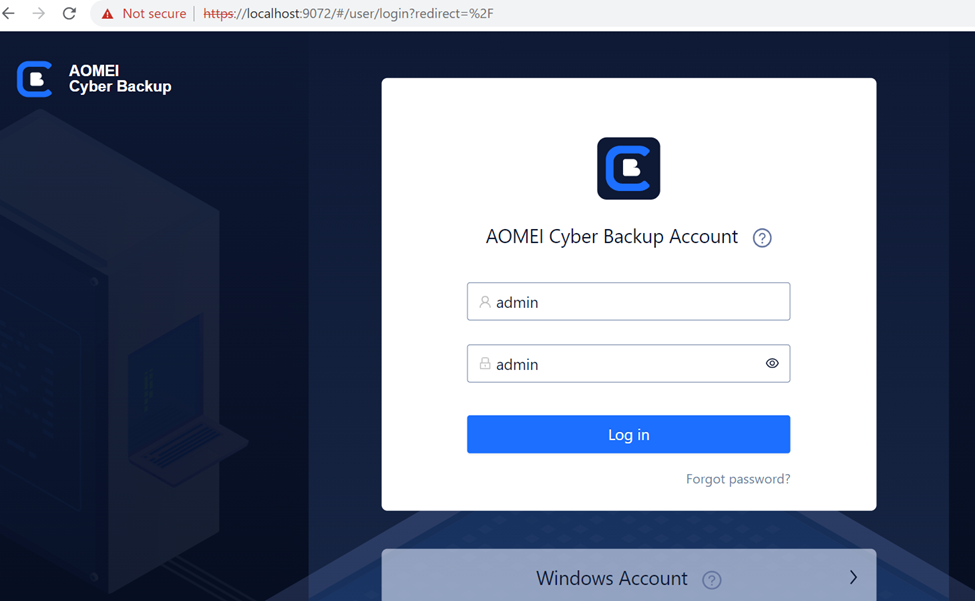
So, here I am using AOMEI Software t take the complete backup
Default password:
Currently my DC is running on WINS 2016 SERVER
Adds
DOMAIN
GO TO Attached windows server 2019 Directory
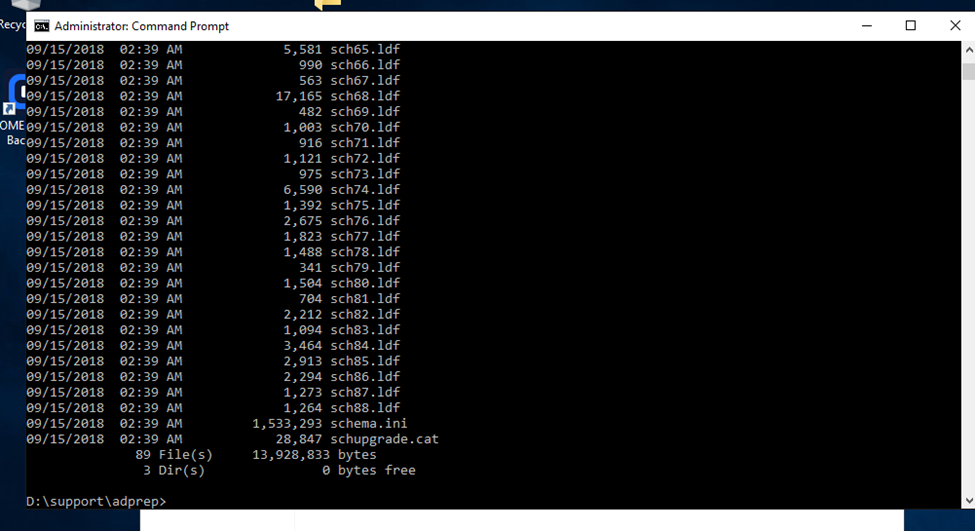
2016 server having 87 schema level and 2019 having 89 so need to upgrade my schema before upgrading
Cd support
Cd adprep
dir
Adprep.exe /forestprep
And type c
(c for continue)
adprep.exe /domainprep
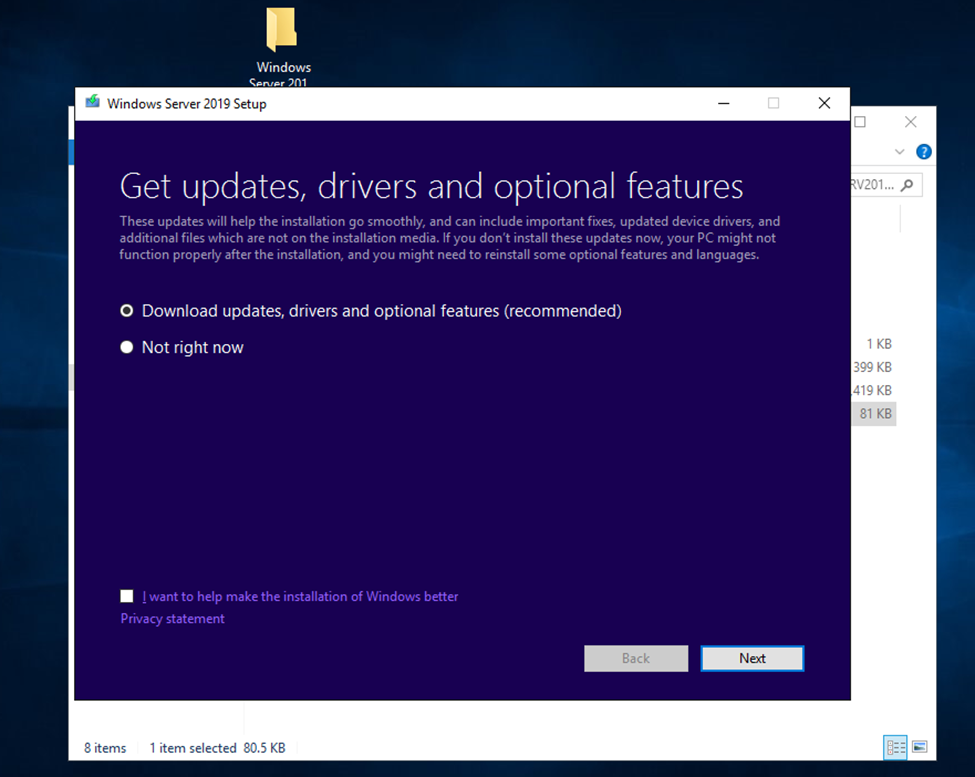
Don’t download and update while upgradation click on not right now.
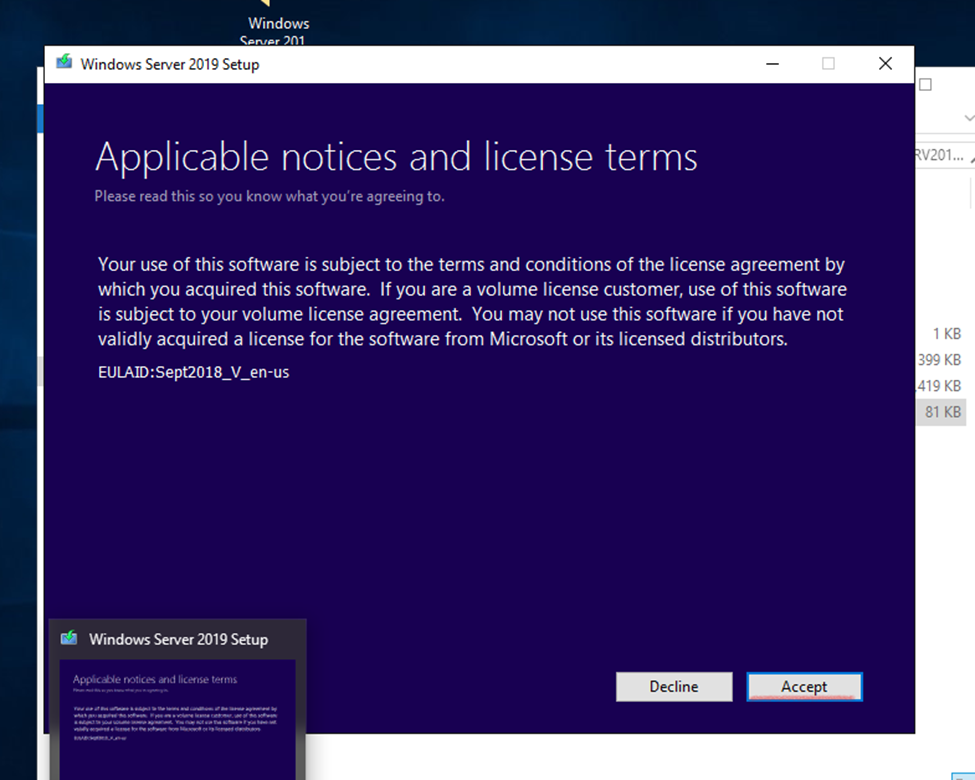
Click and accept.
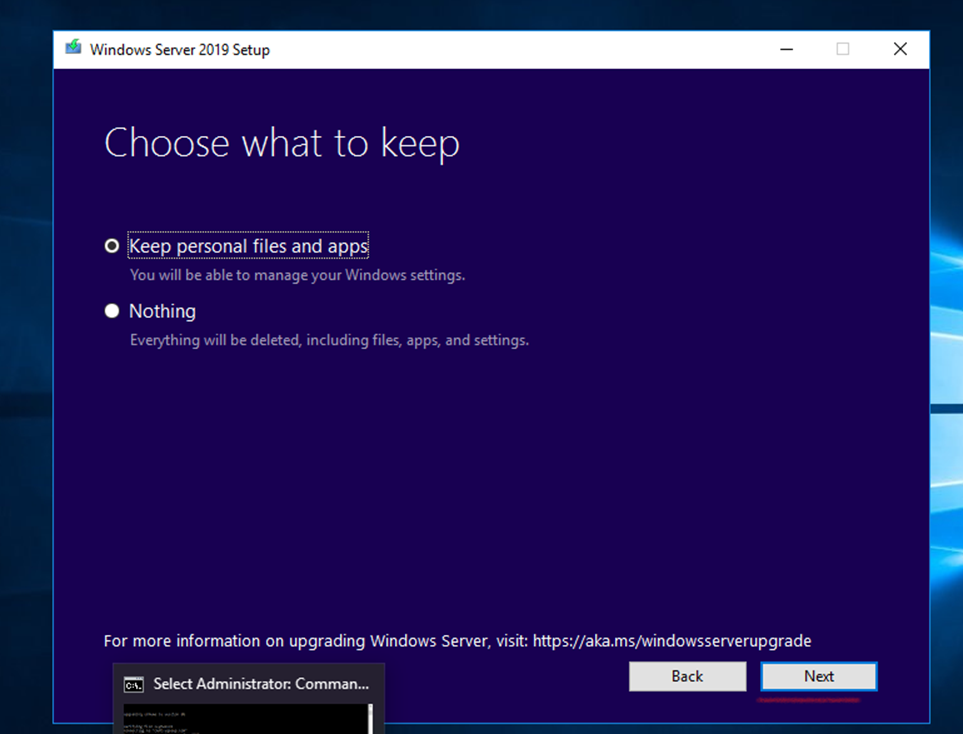
choose Keep personal files and apps – to keep data.
Nothing -will cause all data to be deleted, including files, apps, and settings.
Next
Select the wanted Windows Server 2019 image and then choose Next
After the upgrade is completed, verify that the upgrade to Windows Server 2019 was successful by going the the System Properties.
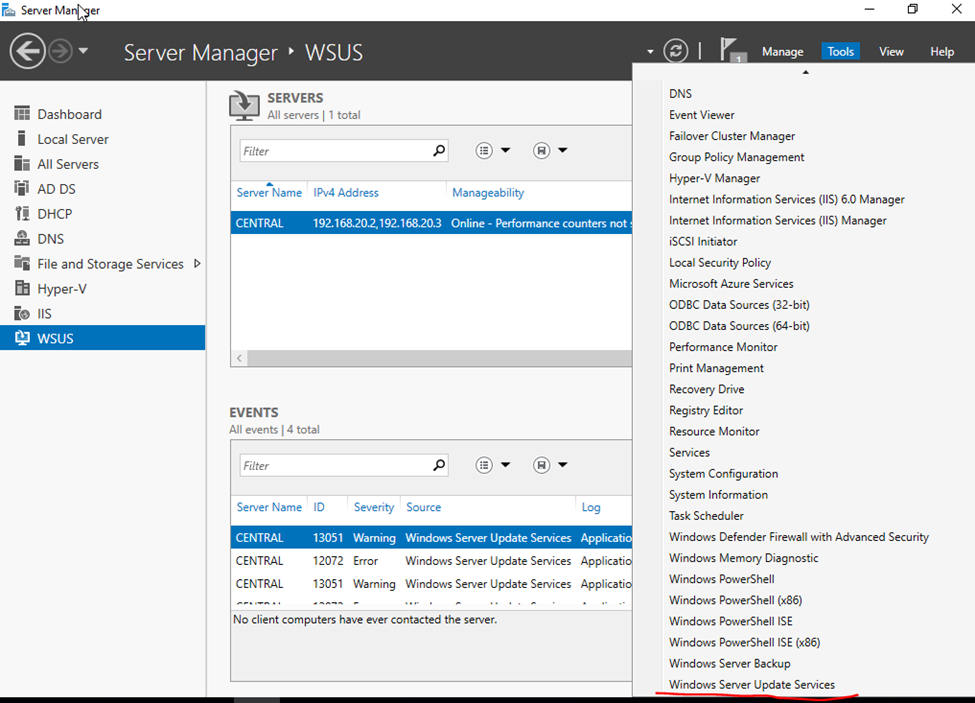
Install and configure Windows Server Update Services (WSUS)
WSUS- Windows Server Update Services
Windows updates are released to fix bugs, fix security issues in OS and to add new features to operating system. The Windows Updates rely on Windows Update service which is set to start automatically by default.
install and configure WSUS (Windows Server Update Services) on Windows Server 2019.
Benefits of WSUS – Windows Update service downloads and installs recommended and important updates automatically.
Categories of updates:
Critical Updates
Security Updates
Drivers
Update Rollups
Service Packs
Tools
Feature Packs
Updates
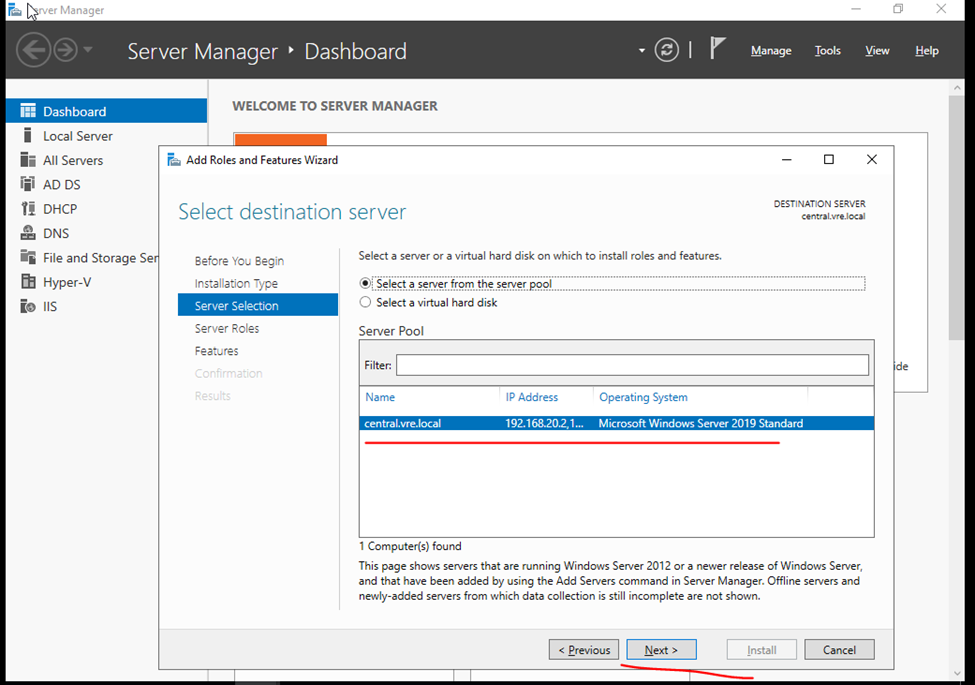
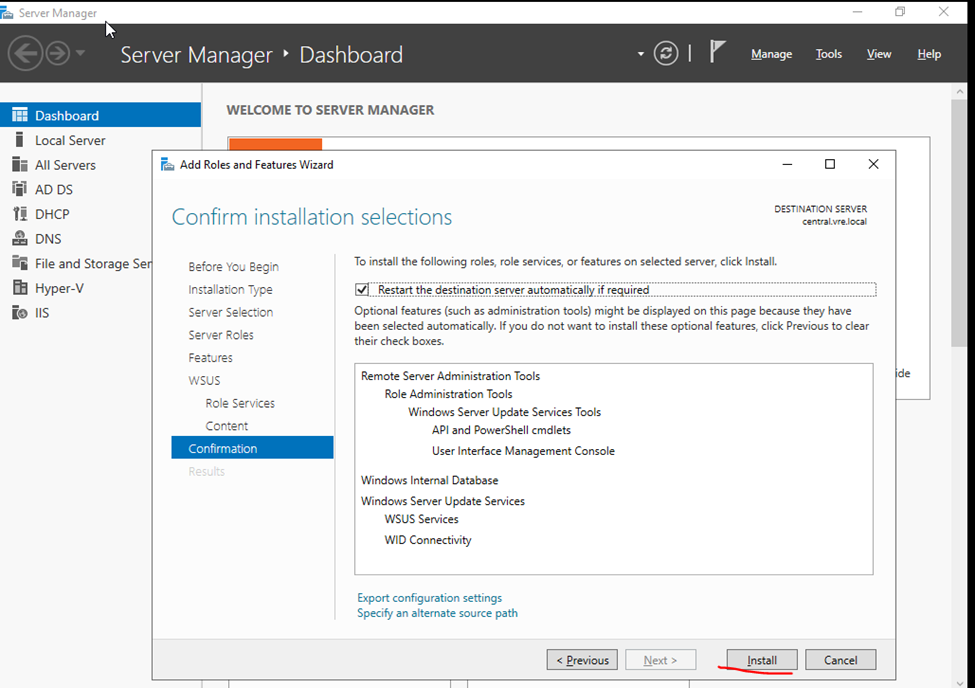
Server Manager- Add Roles and Features
Select Role Based and features based installation
On the Server Selection page, verify the server name and click Next.
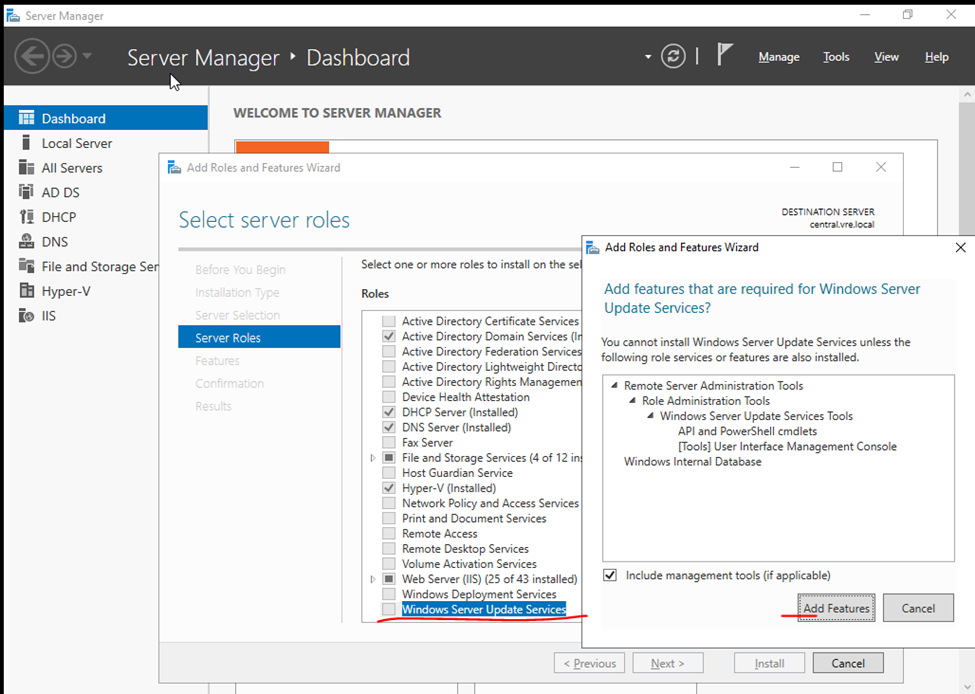
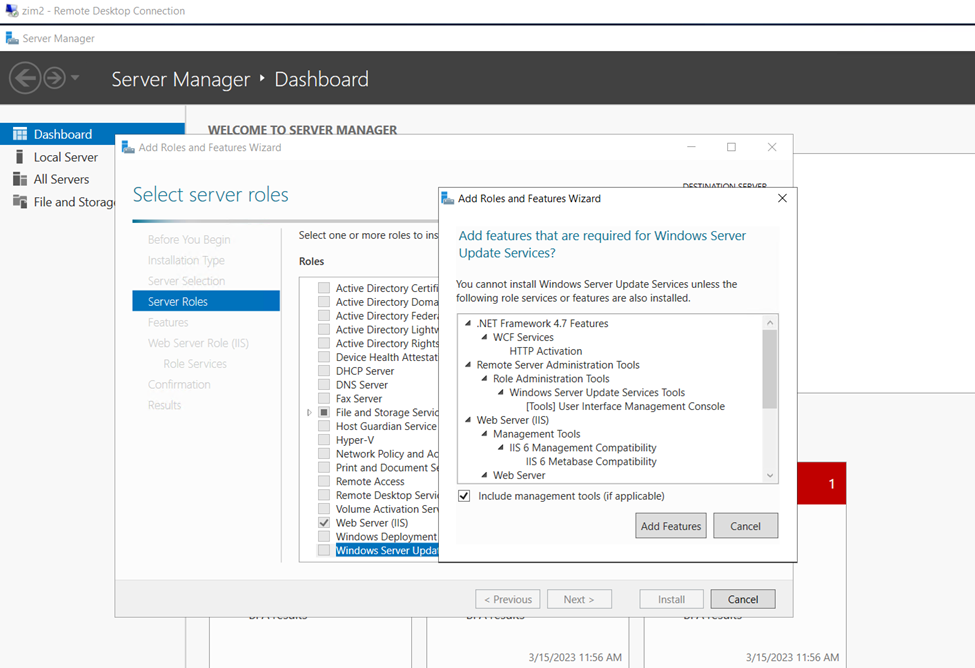
Server Roles – Windows Server Update Services
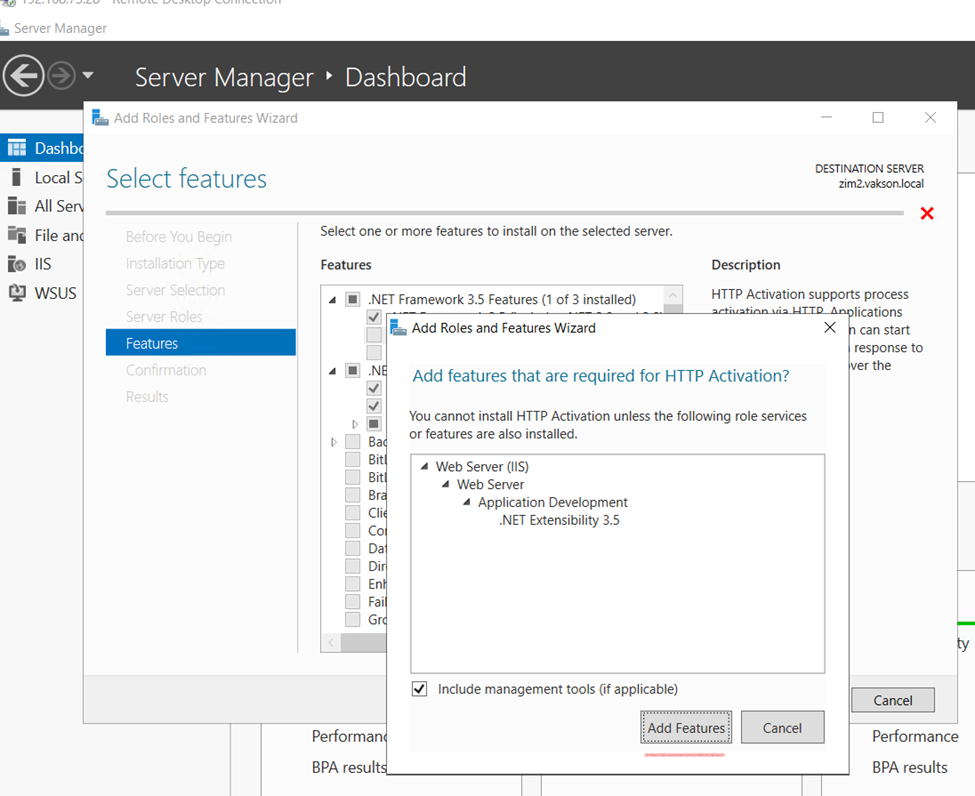
On the Server roles page, select the role Windows Server Update Services. You should see Add features that are required for Windows Server Update Services box. Click Add Features, and then click Next.
Next
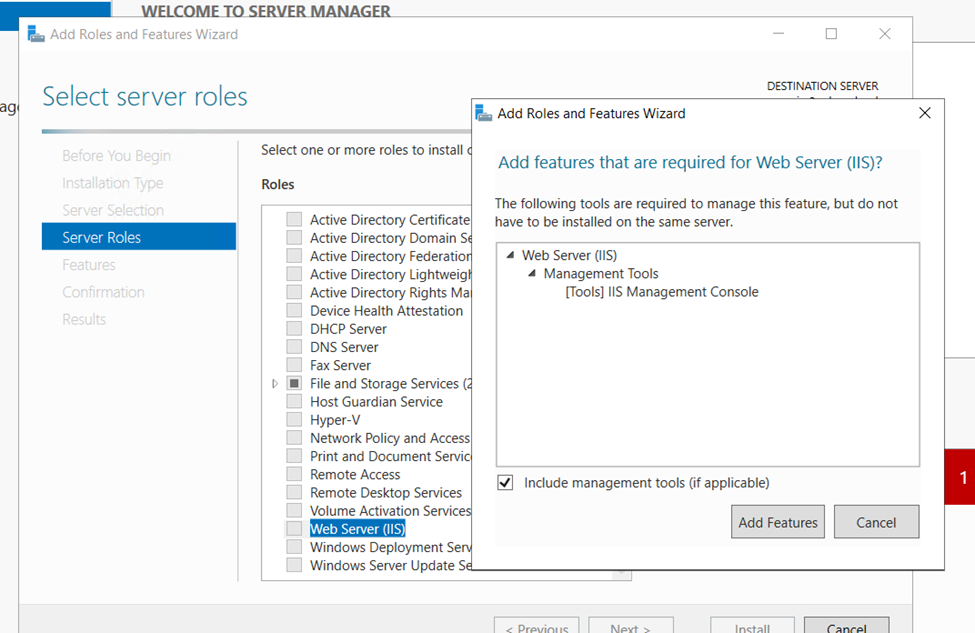
Or Including with IIS Server
Add features
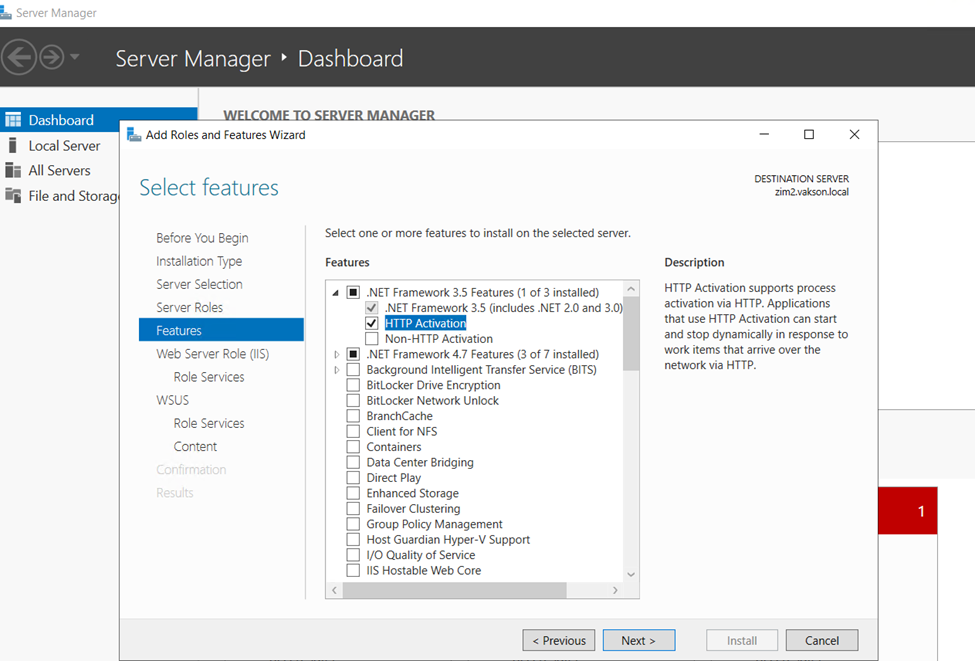
Also select HTTP Activation
Click and next
Next
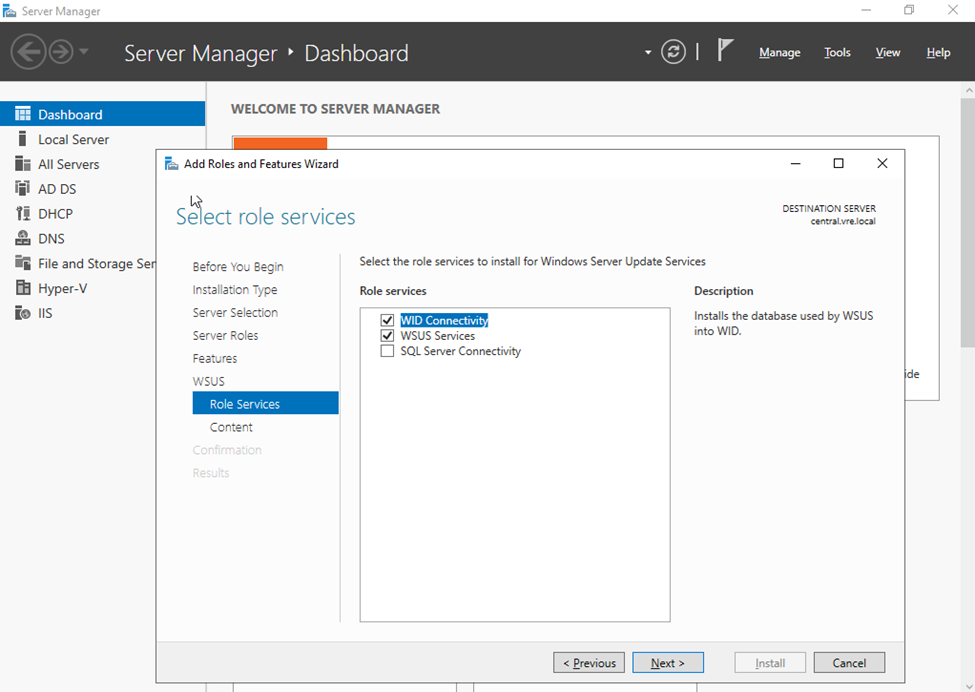
Select WID Connectivity and WSUS Services. Click Next.
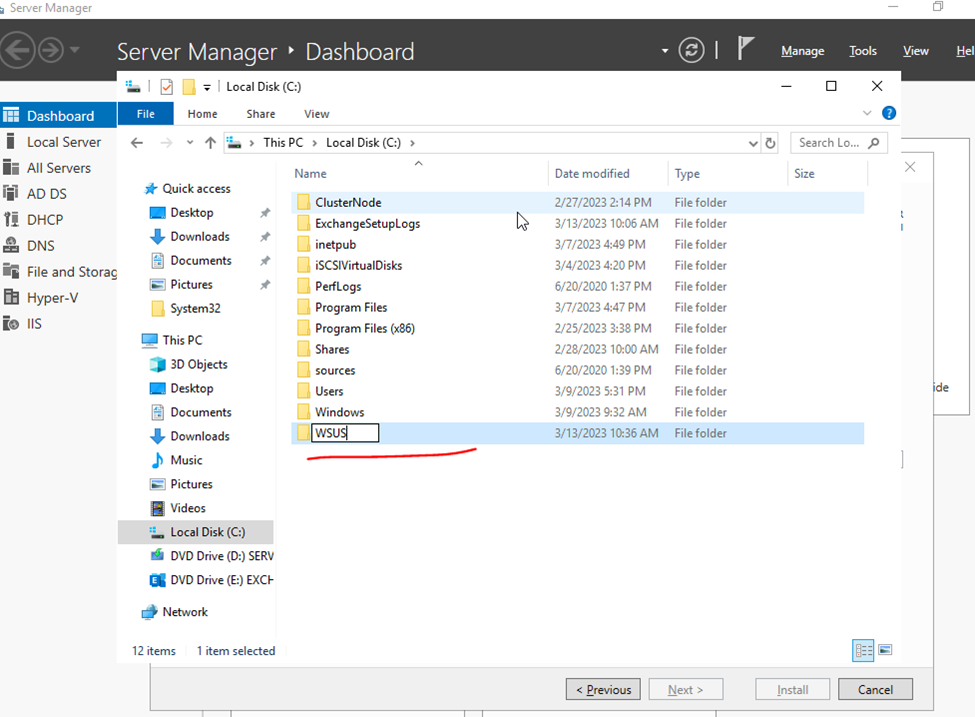
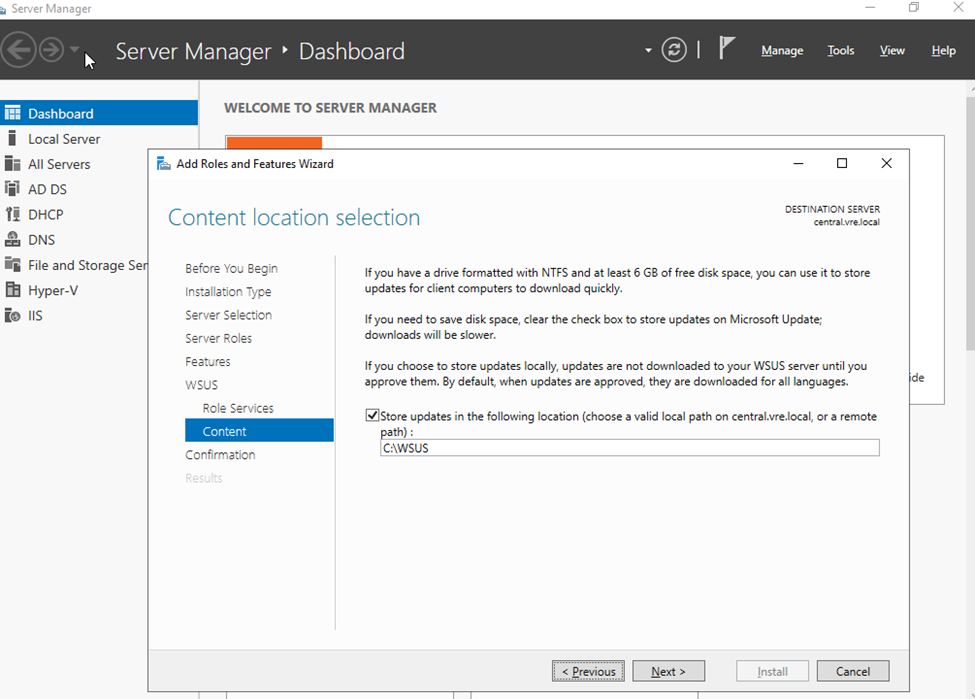
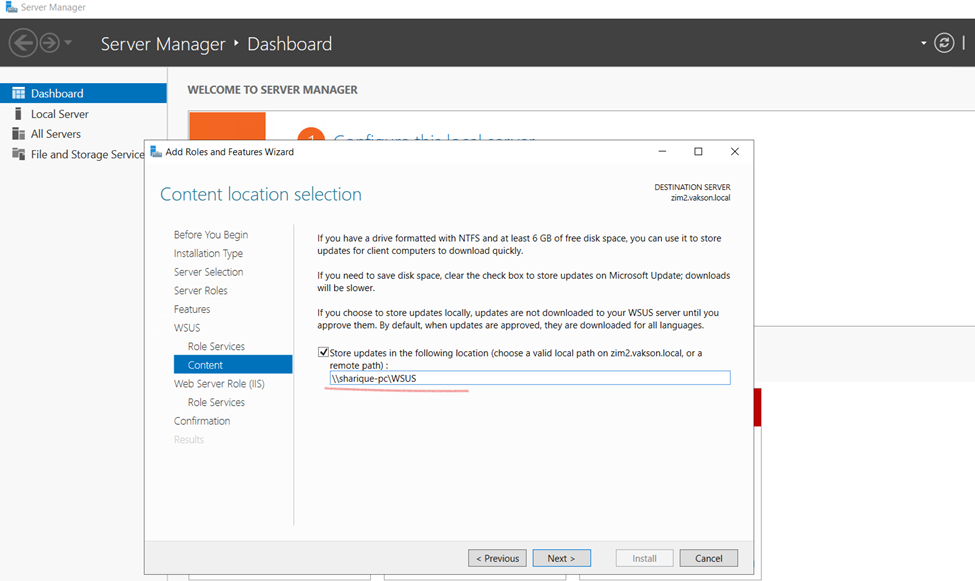
Create a patch folder
The size of this folder can grow eventually and you don’t want this folder to reside on C: drive. Hence choose either a separate drive or store the updates on remote server.
OR Network folder
Next
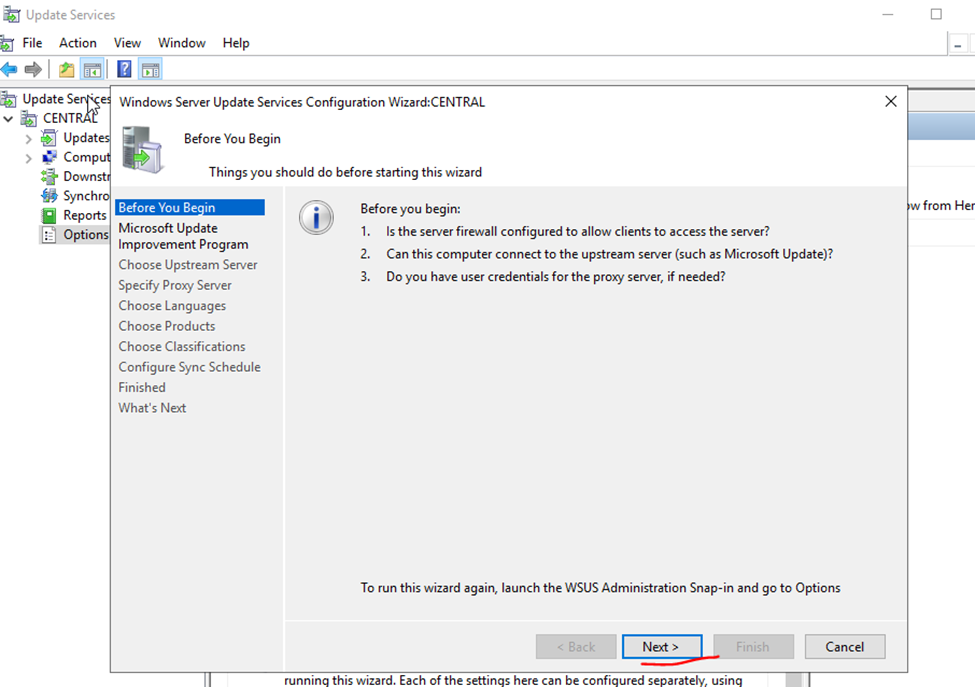
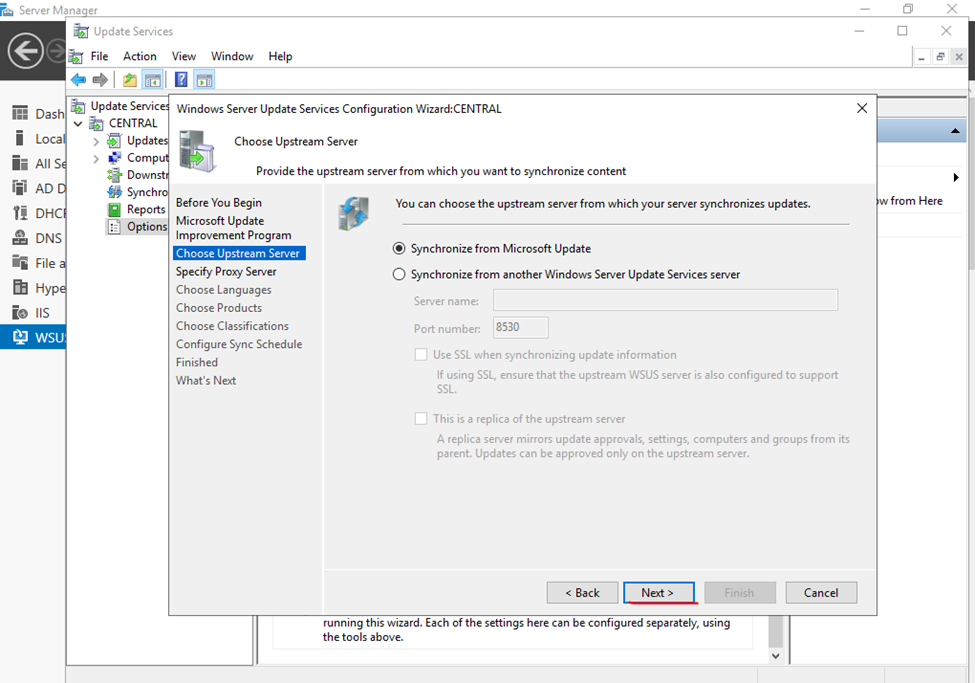
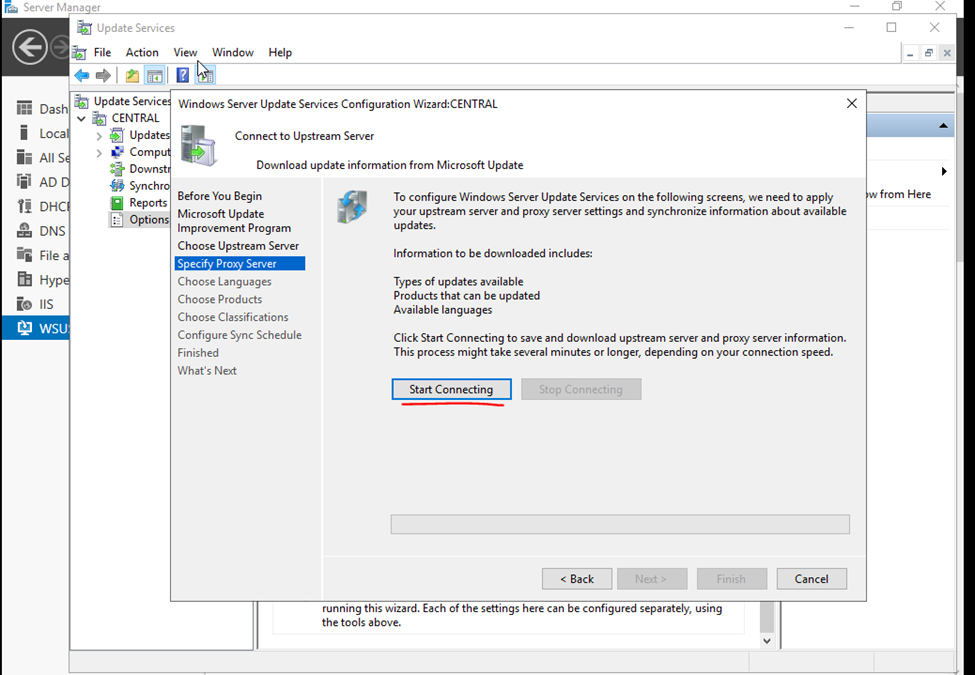
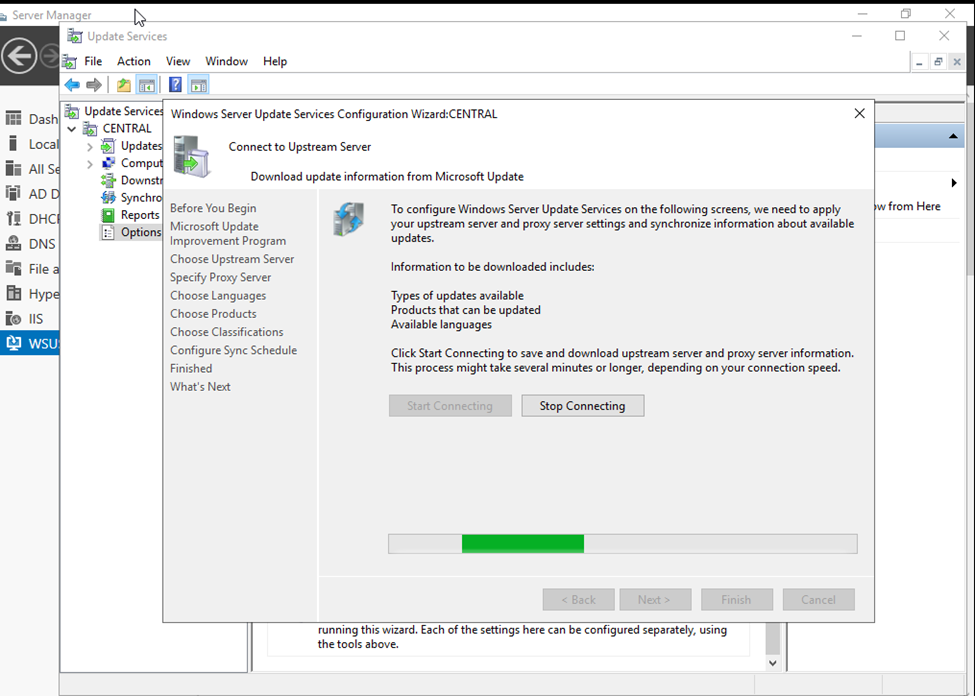
On the Connect to Upstream Server page, click Start Connecting button.
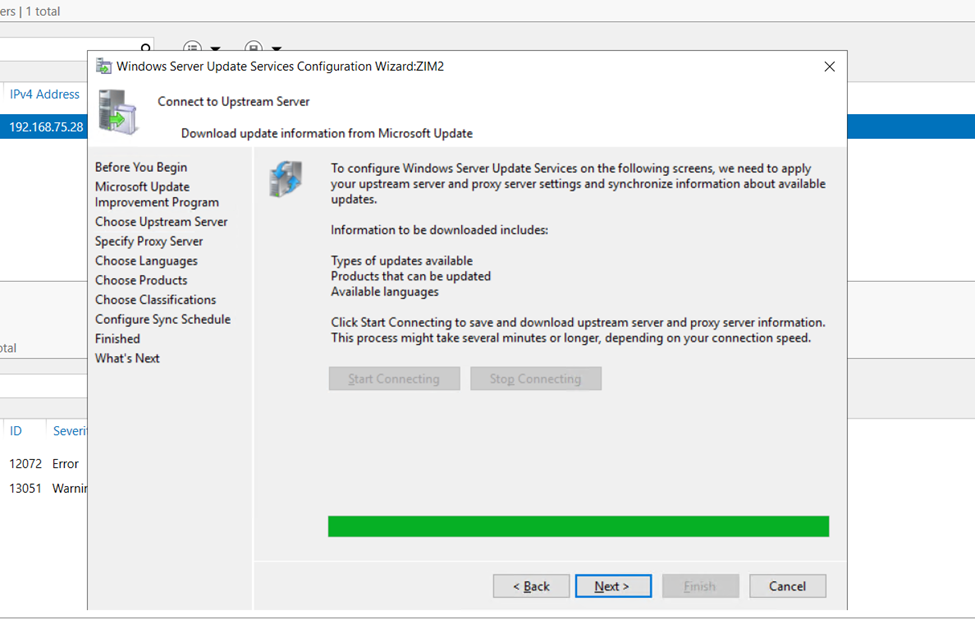
synchronization task is completed click Next
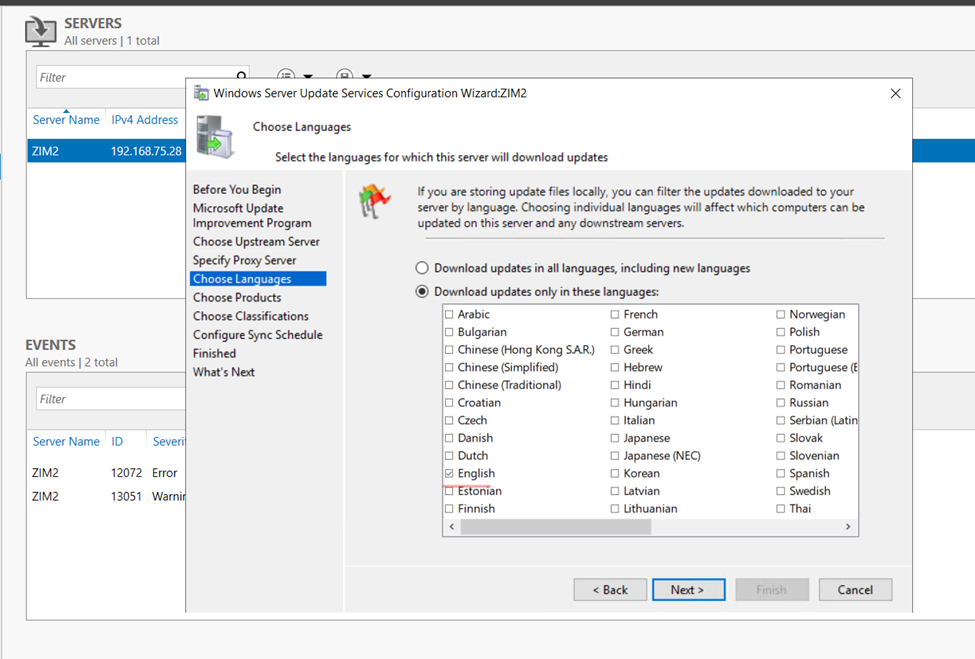
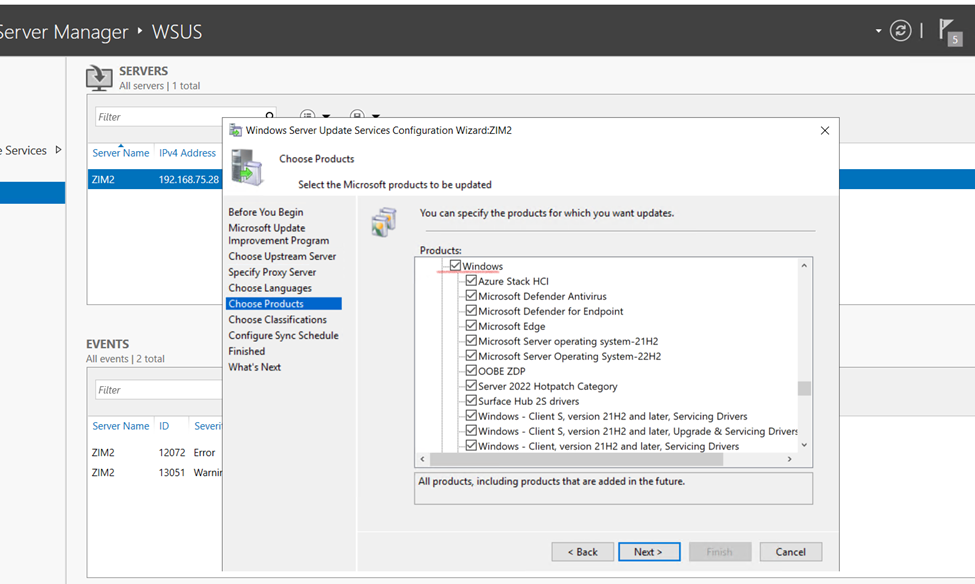
Choose Languages screen, click Download updates only in these languages. Check English and any other additional language you wish to download updates
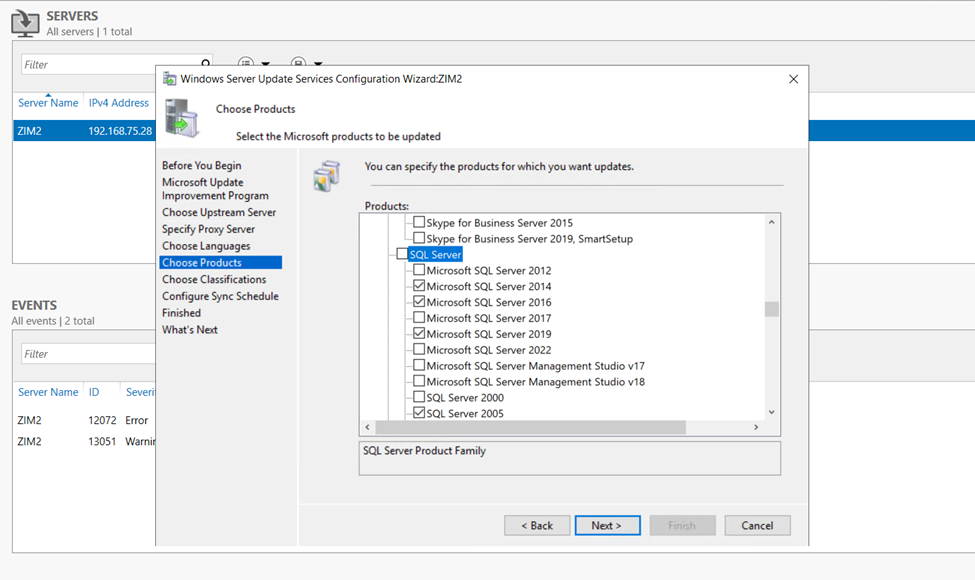
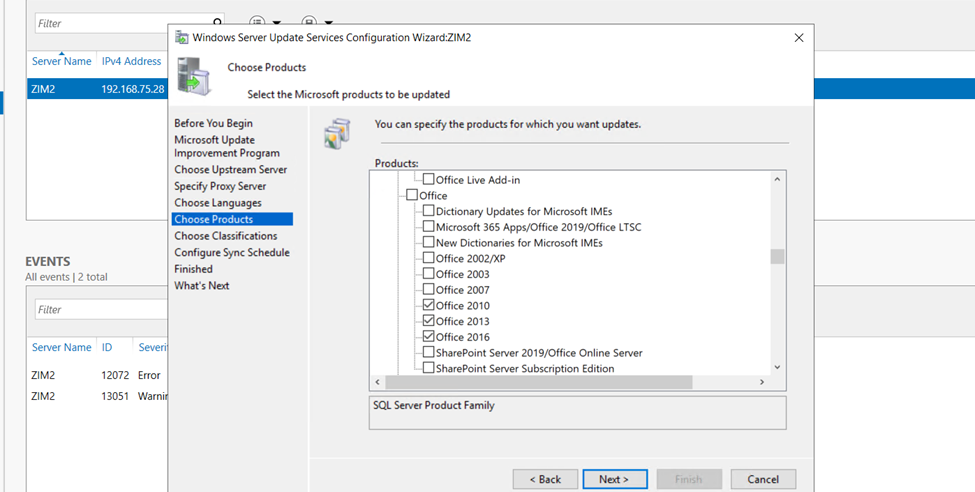
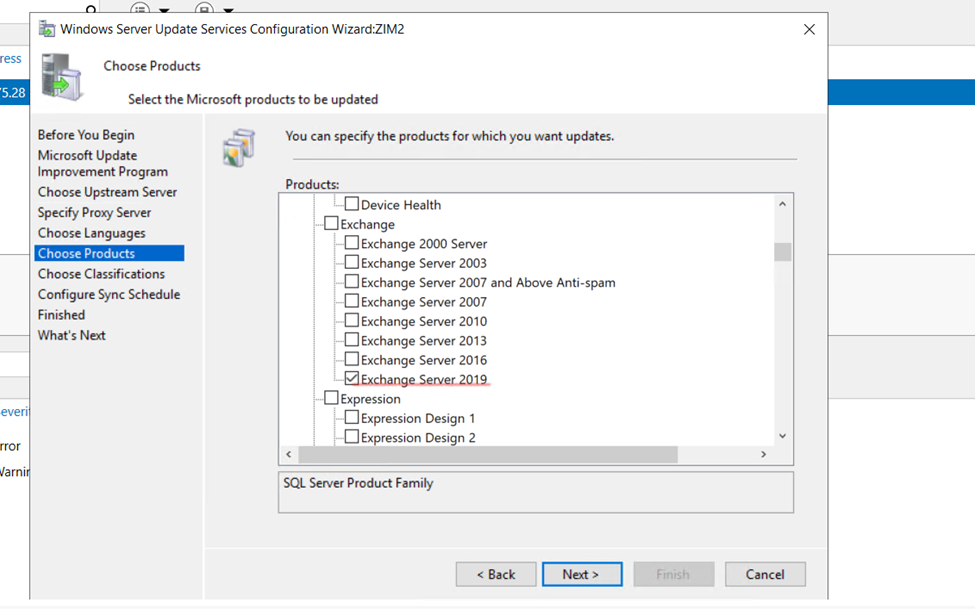
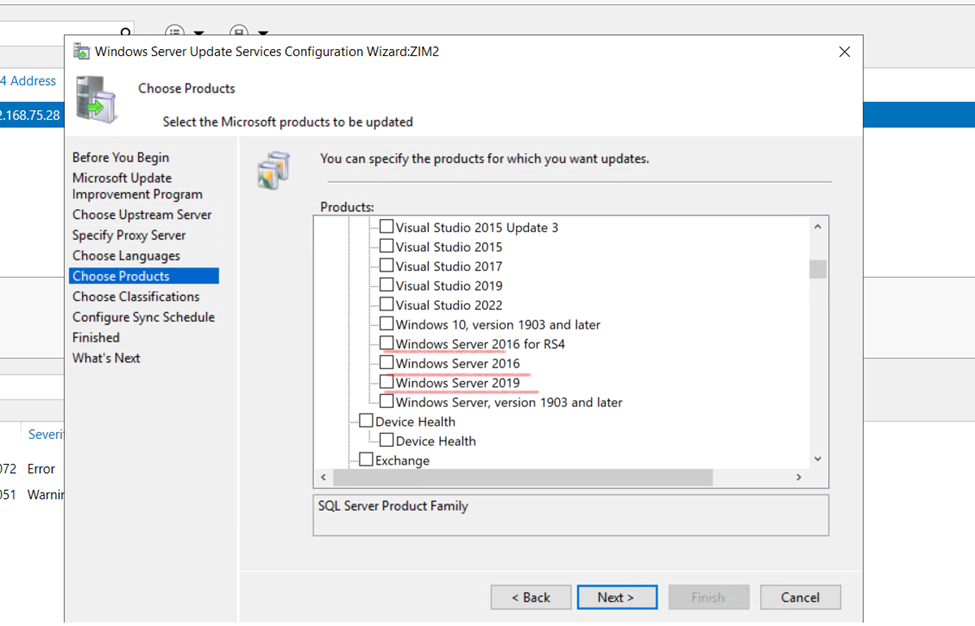
On the Choose products screen, check all products you wish to update. Scroll down to the Windows section and uncheck it. Then check only the Windows versions you have in your environment.
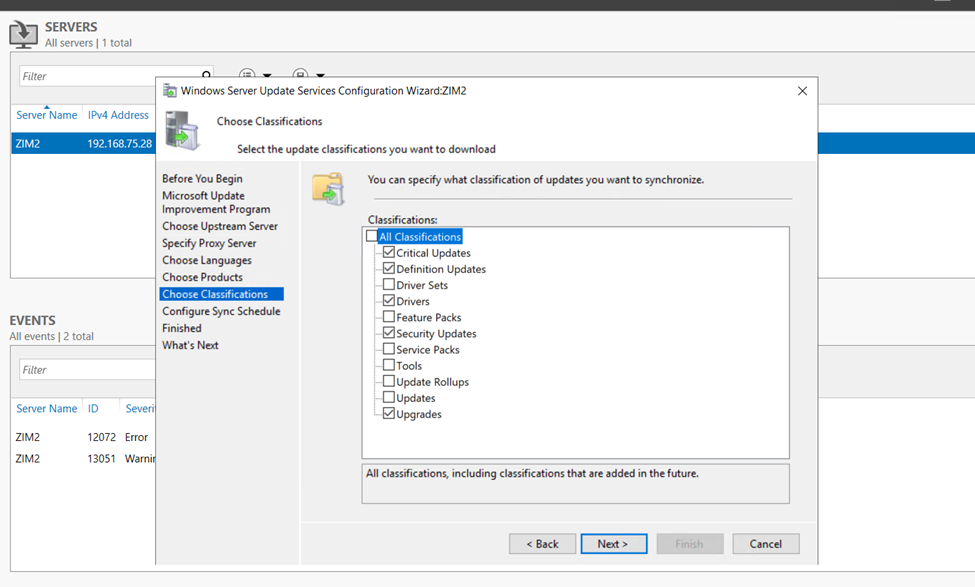
Choose Clarifications screen offers option to determine Windows update classifications you wish to download.
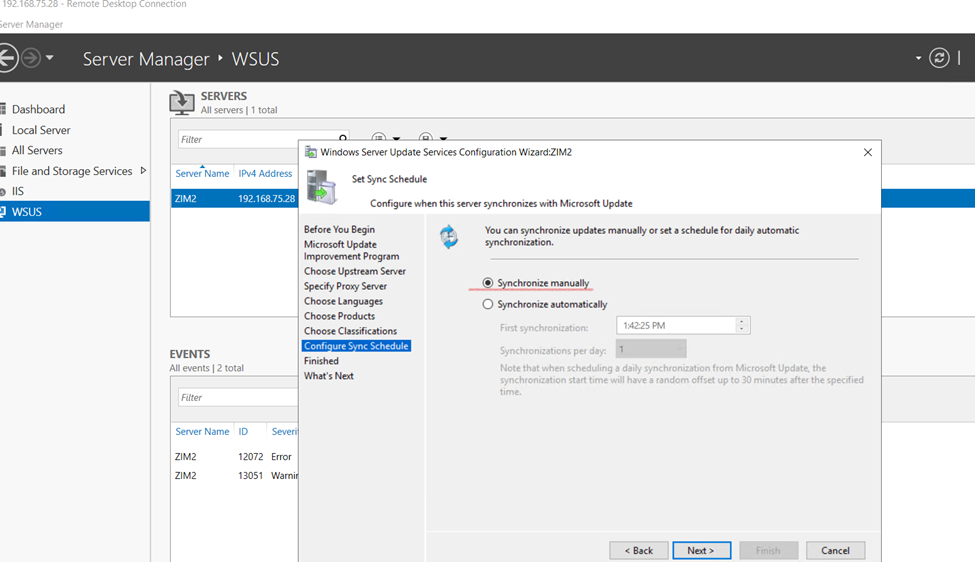
Set Sync Schedule screen configure to sync manually or automatically and Next.
If you choose Synchronize manually, you must manually start the synchronization process from the WSUS Administration Console. With this option selected, you have to manually perform the sync every time. Therefore do not select this option if you are setting up the WSUS in production.
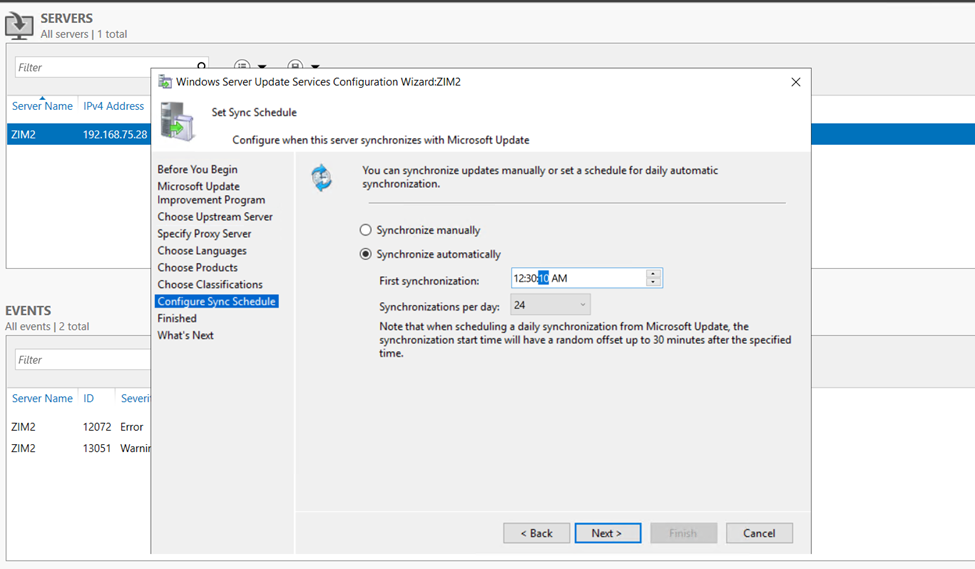
It is recommended to set the automatic sync between the primary WSUS and WSUS Replica as frequently as possible (24 syncs a day), because in scenarios where a remediation plan was activated on endpoints that communicate with WSUS Replica (Downstream WSUS) the “execute patch installation for single computer” task will only work after the Primary and Replica WSUS sync successfully.
If the sync has yet to occur, you will see either an exit code 341 or 342 for the “execute patch installation for single computer” task.
In order to change the sync schedule to be as frequently as possible, do the following on the WSUS replica.
Go to Options
Open Synchronization Schedule
Make sure Synchronize automatically is enabled and set to 24 synchronizations per day.
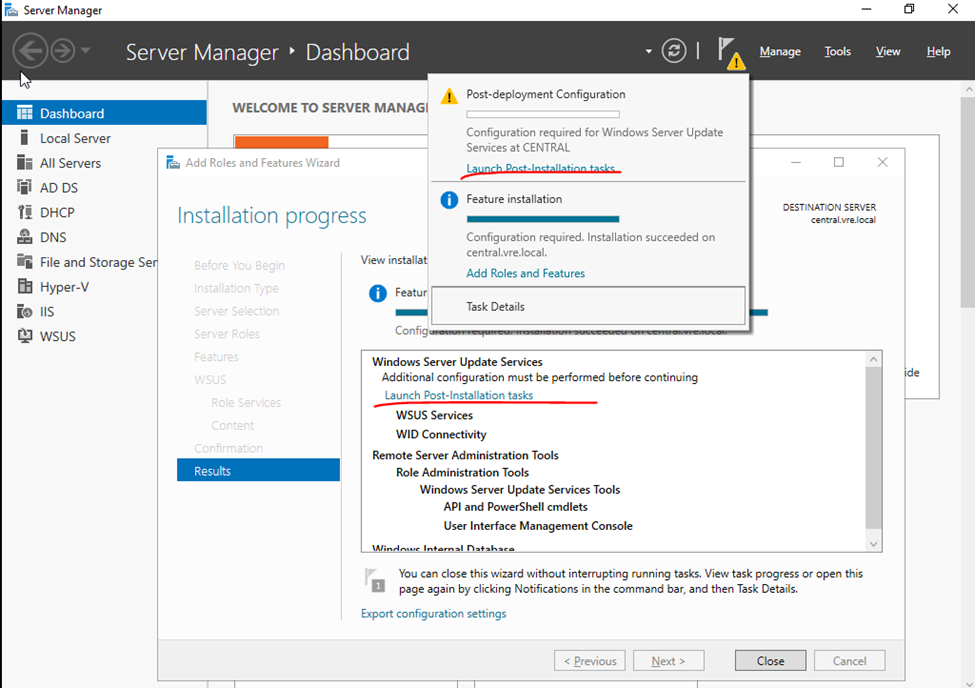
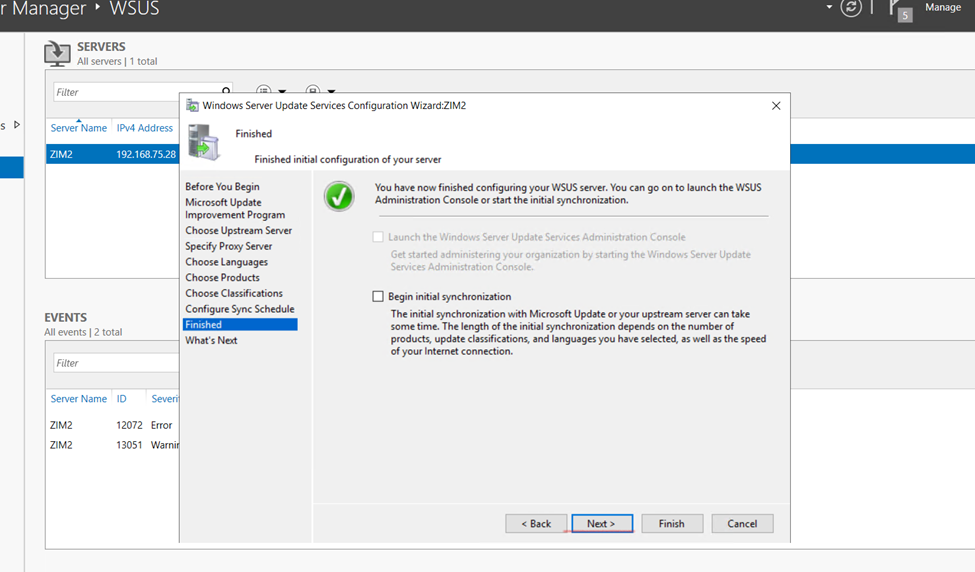
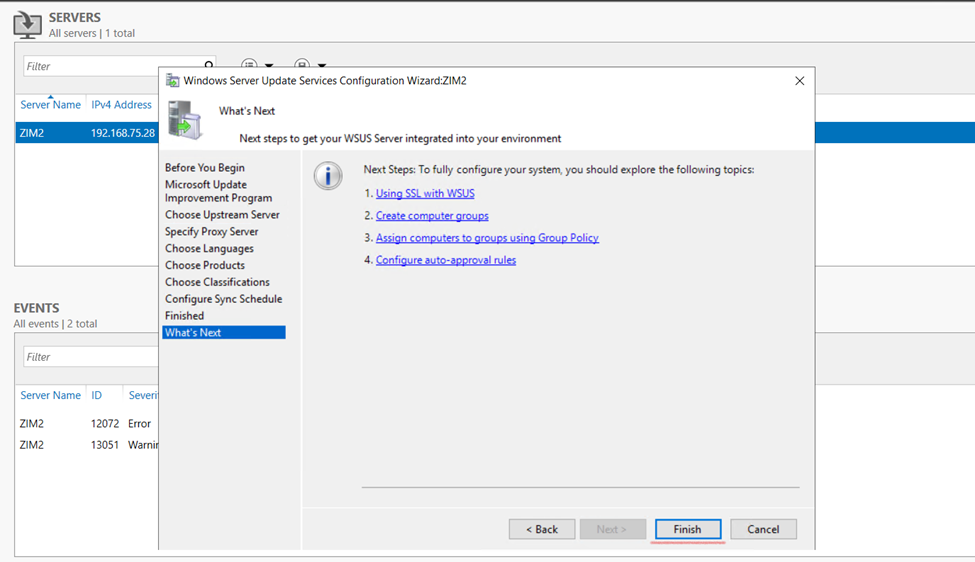
Next Begin WSUS Initial synchronization
Finally on the last page, click Finish. This completes the steps to configure WSUS
So now,
Need to configure GPO
If you wanted to connect to specific need to install IIS (Internet Information Services).
Configure Group Policy Settings for WSUS
After you install and configure WSUS, the next important task is to configure group policy settings for automatic updates.
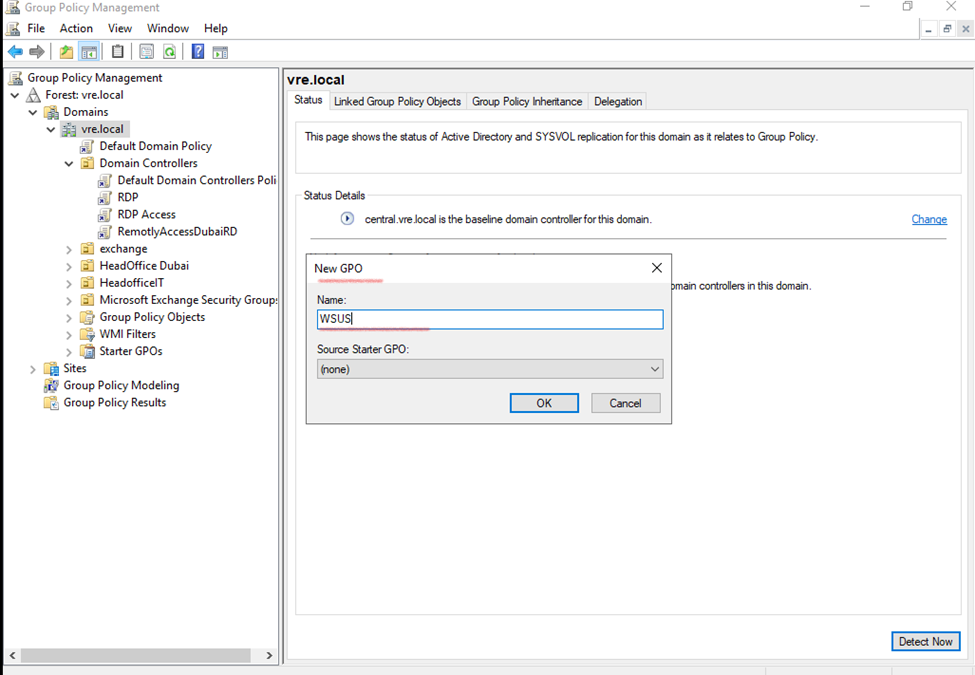
Open the Group Policy Management console, and open an existing GPO or create a new one.
WSUS – Create as per you, Group Policy
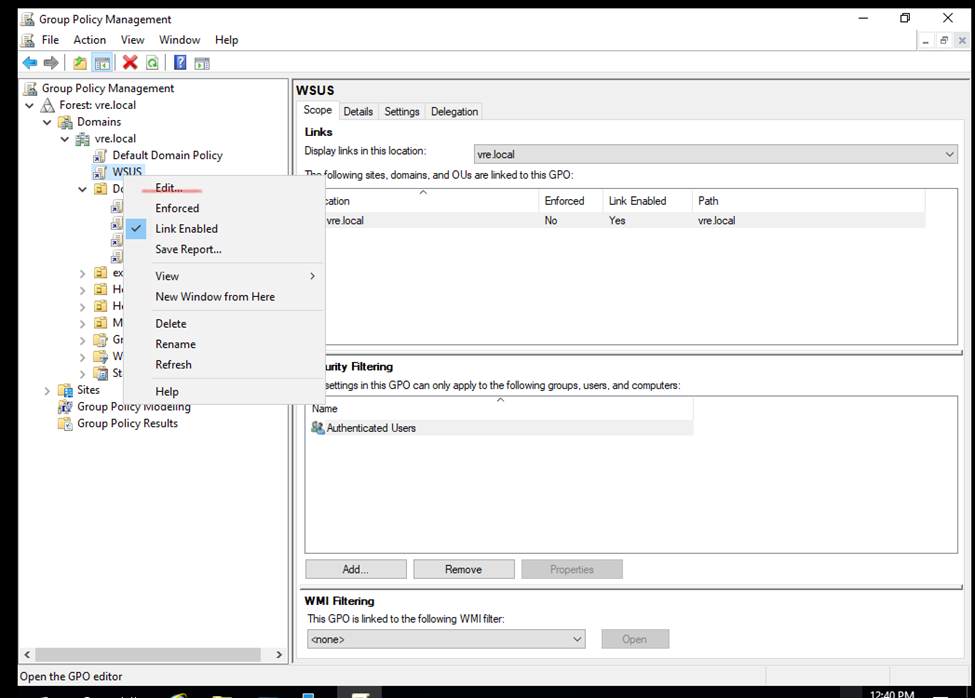
Once created Group policy click to edit once edited – you will redirect to GPO EDIT Windows
Edit GPO
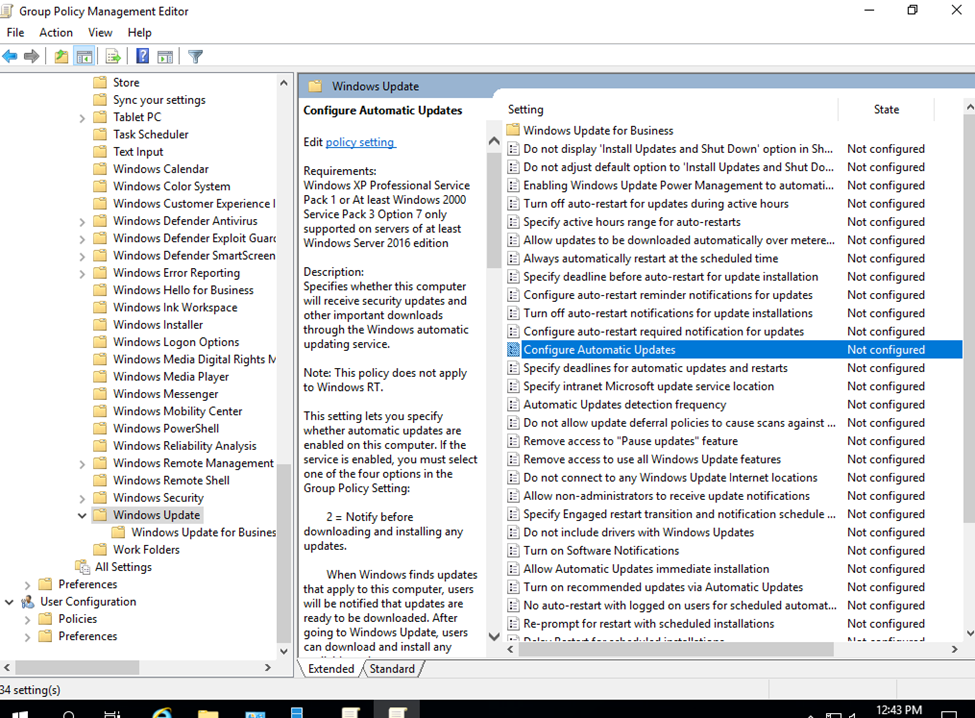
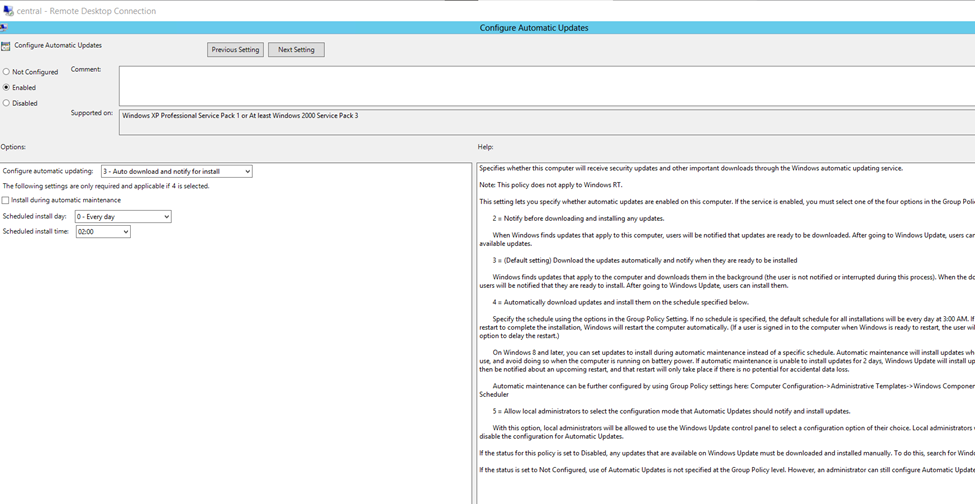
Configure WSUS Automatic Updates
Go to
Computer Configuration > Policies > Administrative Templates > Windows Components > Windows Update.
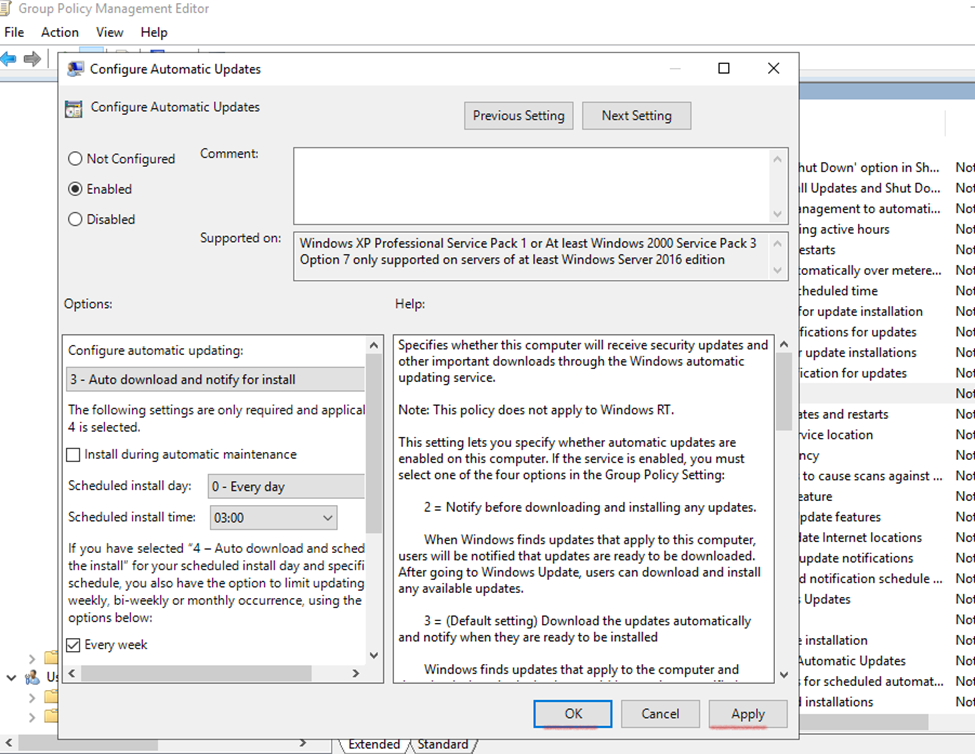
Double-click Configure Automatic Updates and set it to Enabled
Enable auto update
Intranet (Private Network).
You can design your private organization according to your need.
Locally connect to office devices environment, Like Computer, Server, Printer and etc. – office server which is only associated to only your office environment known as Intranet.
Mostly Intranet use for officially keep the data secure which is not connected to internet.
Specify Intranet Microsoft Update Service Location
The idea behind this is to ensure the client computers contact the specified intranet server instead of downloading updates from internet. Unless you configure this policy setting, the client computers
Computer Configuration > Policies > Administrative Templates > Windows Components > Windows Update.
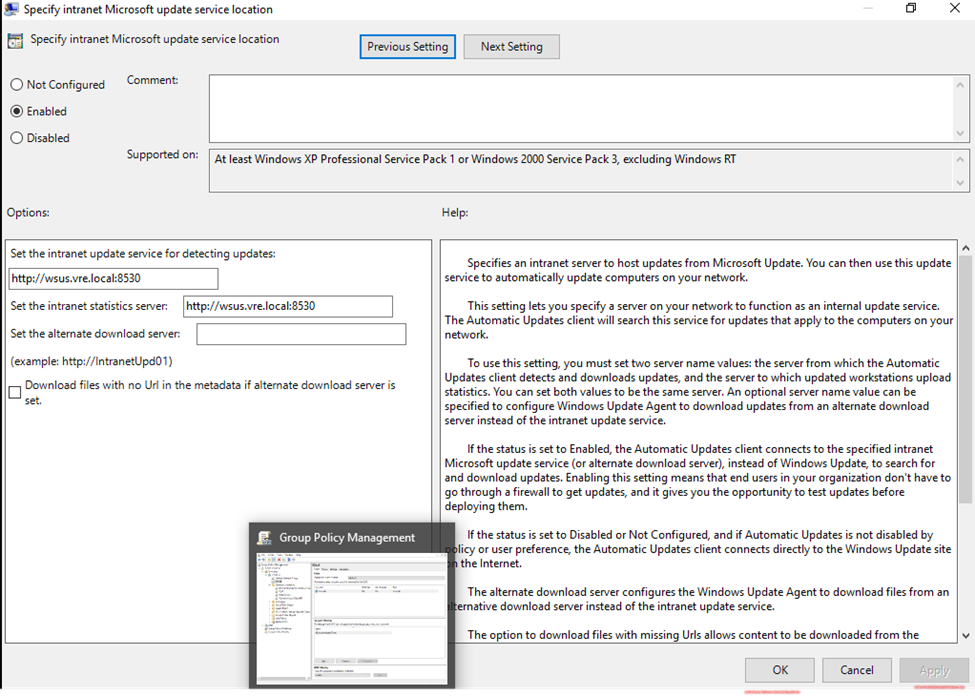
Double-click Specify Intranet Microsoft update service location and set it to Enabled
Specify intranet Microsoft Update service location
(in your Domain Controller your attached PC – Address will be appear here)
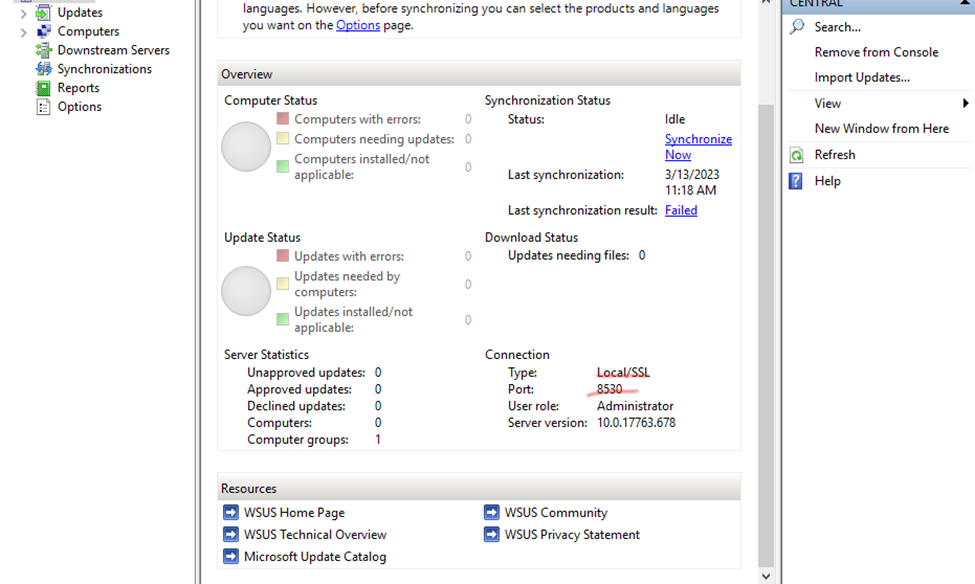
So my wsus pc url is : wsus.vre.local
Default port for wsus: 8530
Specify intranet Microsoft Update service location
On the client computer, check the resultant set of policy to confirm if the WSUS GPO is applied
To enable the policy, click Enabled. Specify the intranet update service and intranet statistics server. Click Apply and OK
How to Start, Stop and Restart Windows Server Update WSUS Services via PowerShell and CMD Start the WSUS service Start-Service wsusservice Stop the WSUS service Stop-Service wsusservice view the status of the WSUS service Get-Service wsusservice
The below commands are Command line syntax used to start, stop and restart WSUS service. net stop wsusservice net start wsusservice
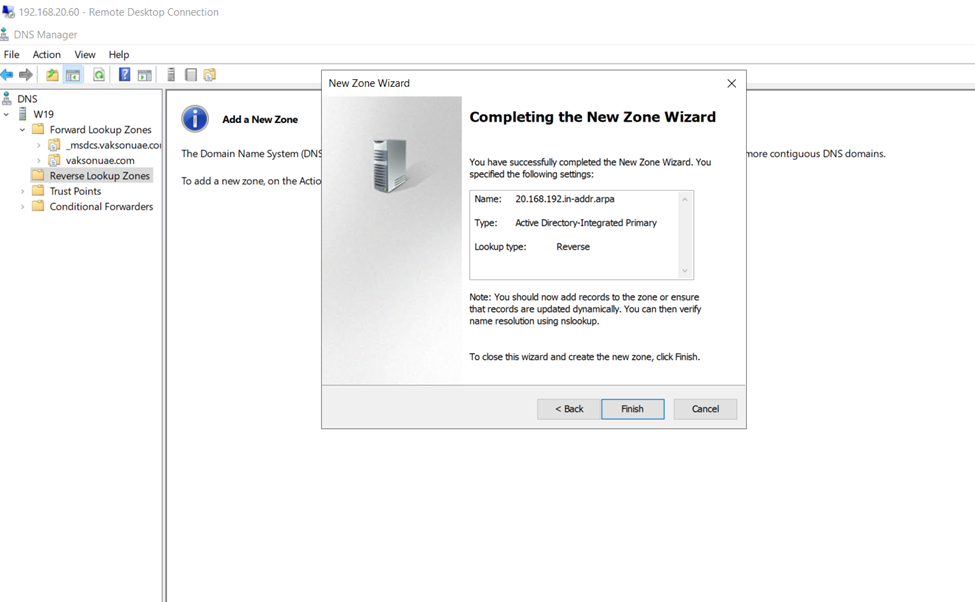
How to configure a DNS Reverse Lookup Zone in Windows Server 2019
How To add DNS Reverse Lookup Zone in Windows Server 2019
Reverse lookup zones are used to resolve IP addresses to a hostname. For reverse lookup zones to work they use a PTR record that provides the mapping of the IP address in the zone to the hostname.
Configuring DNS Reverse Lookup zone
Go to tools and open DNS
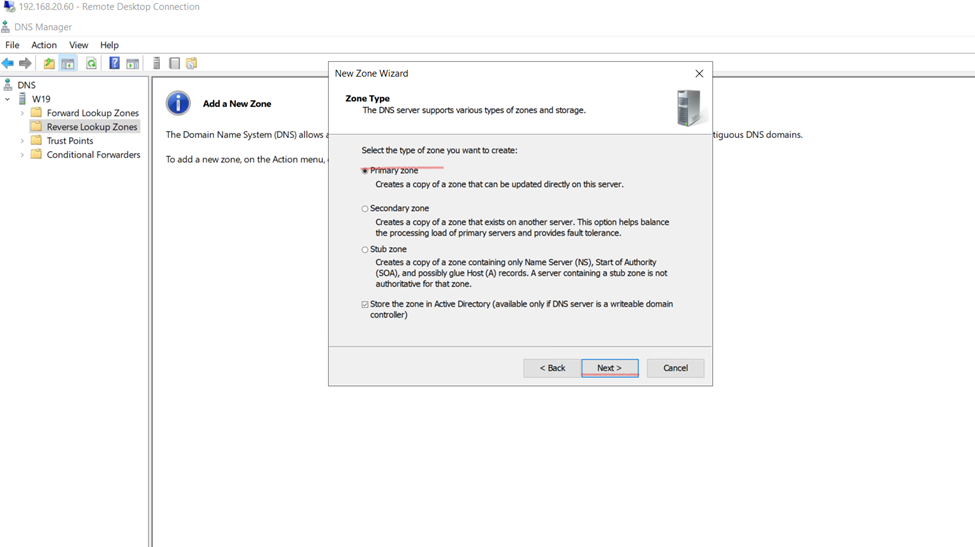
DNS Manager, under your server, right-click on Reverse Lookup zones, and click on New Zone
Click on Reverse zone and create
next
How to Create PTR Records
Let’s walk through manually creating a PTR record. This is only needed if a system is not configured to dynamically update. This may be the case for systems with static IP addresses like servers
Back in the DNS console PTR record listed.
You can see in the picture above the IP returned the hostname
You can see in the picture above the IP returned the hostname
The first task in the installation of any version of Exchange is to prepare the Active Directory environment where the Exchange Server will be placed. However, prior to the preparation, it should be checked against the above Domain Controller support prerequisites mentioned earlier. Once the above requirements are verified for consistency, proceed with the following preparation tasks on the server/computer which will be used to prepare the Active Directory.
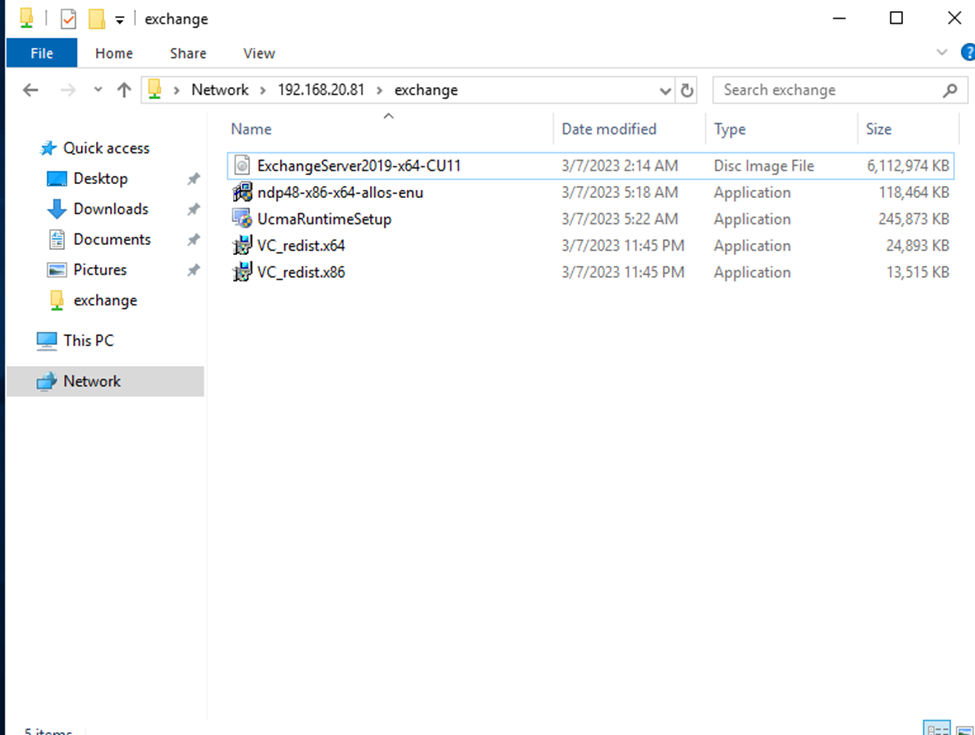
We will be using the Exchange Server itself to prepare the Active Directory.
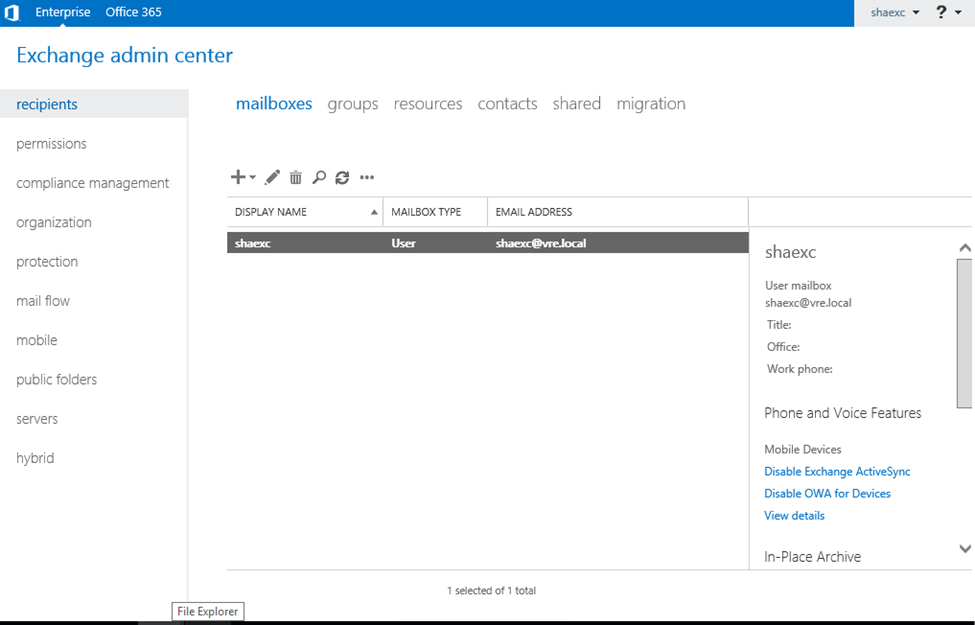
Office 365 Exchange Server
Exchange Server 2019
Exchange server pc should be connected to Domain Controller with Domain Controller user with required permission.
Before starting installation exchange server, we need to aware about the pre requisites.
.NET Framework 4.7 or later
Unified Communications Managed API 4.0
Visual C++ 2013 or 2012
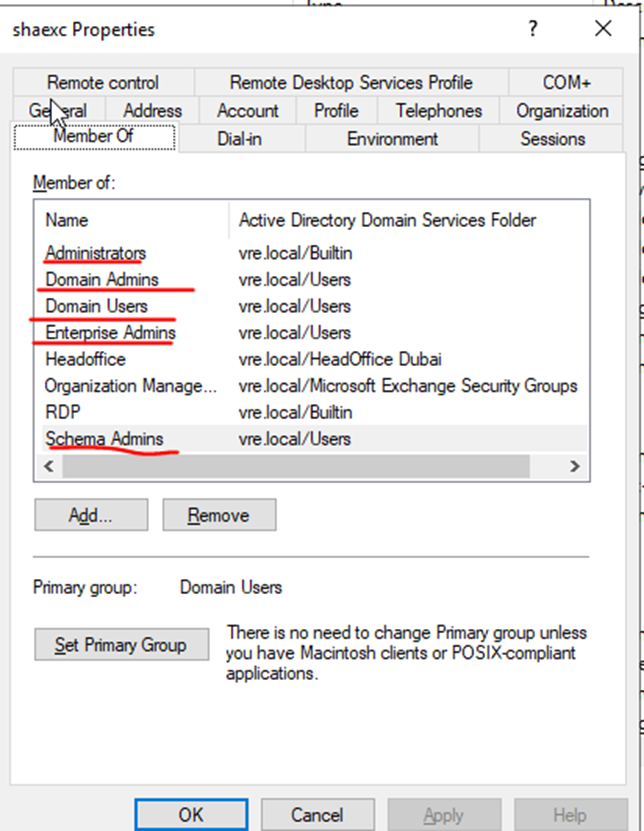
Required Permission right to Exchange Admin User:
Administrators
Domain Admins
Domain Users
Enterprise Admins
Schema Admins
pre requisitesSoftware
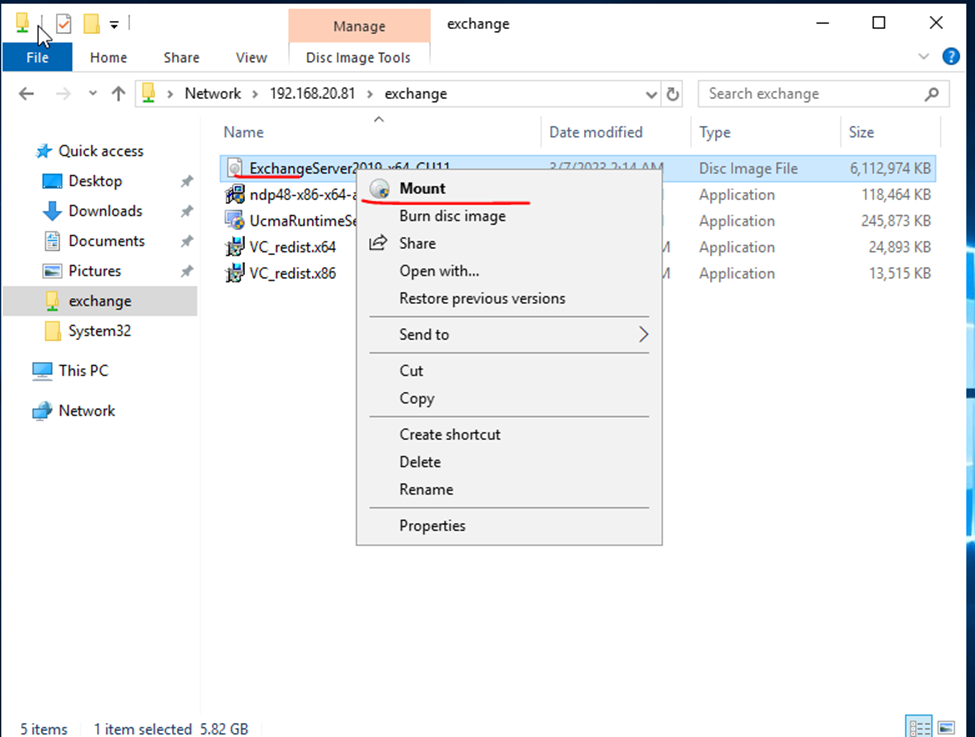
Mount the disk
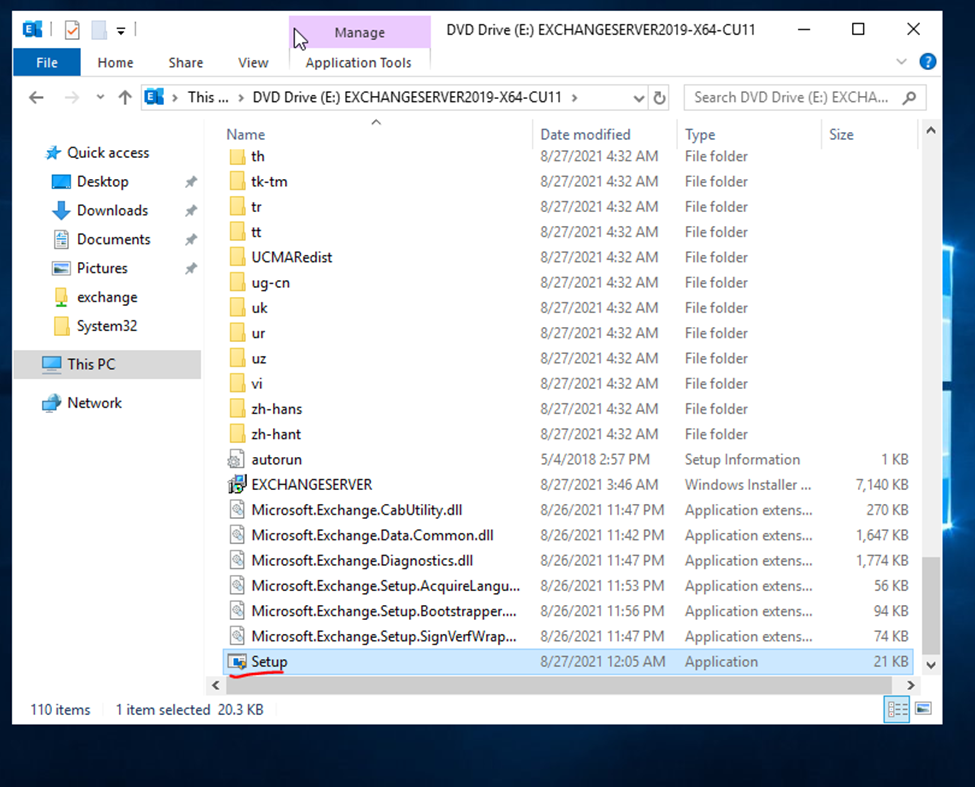
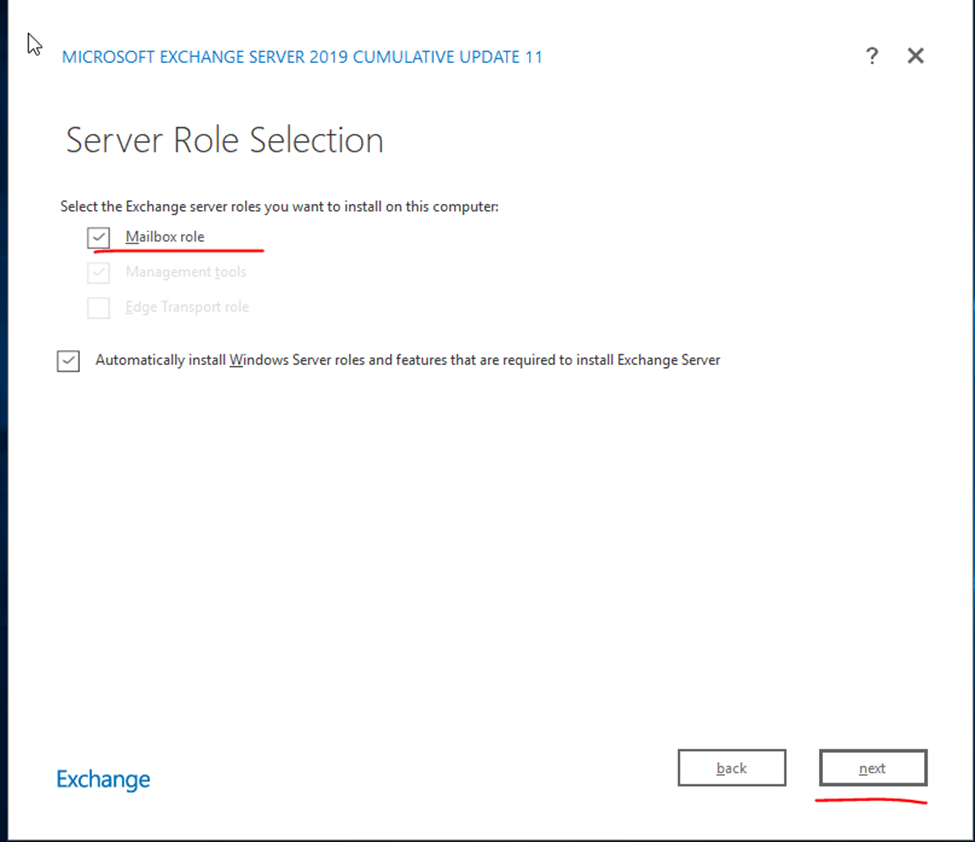
click to run setup file
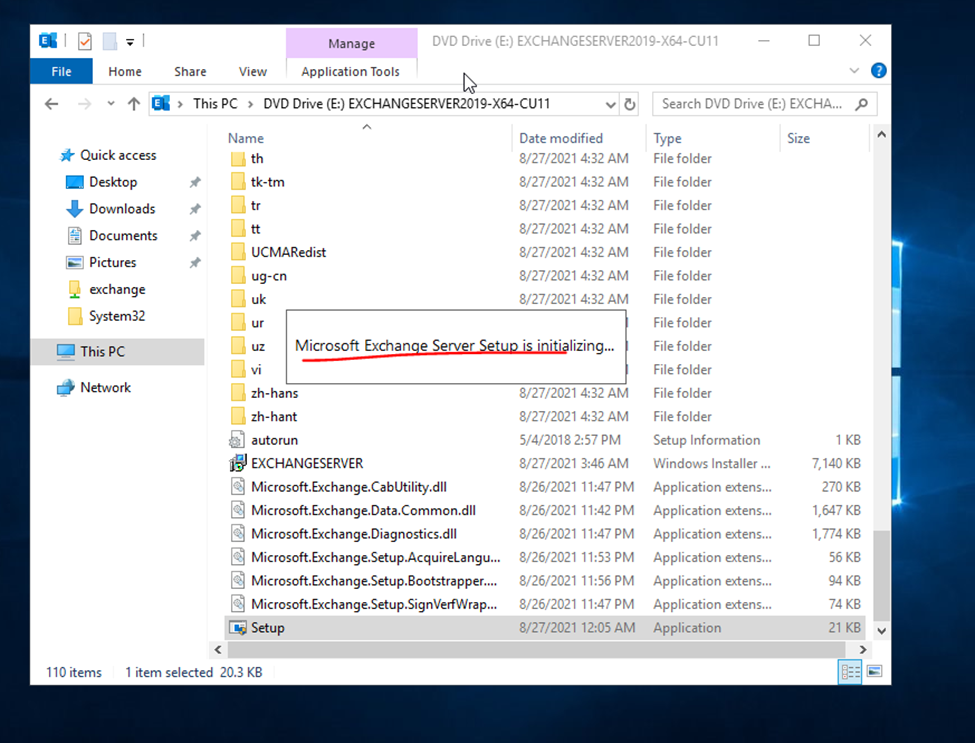
launching exchange installation
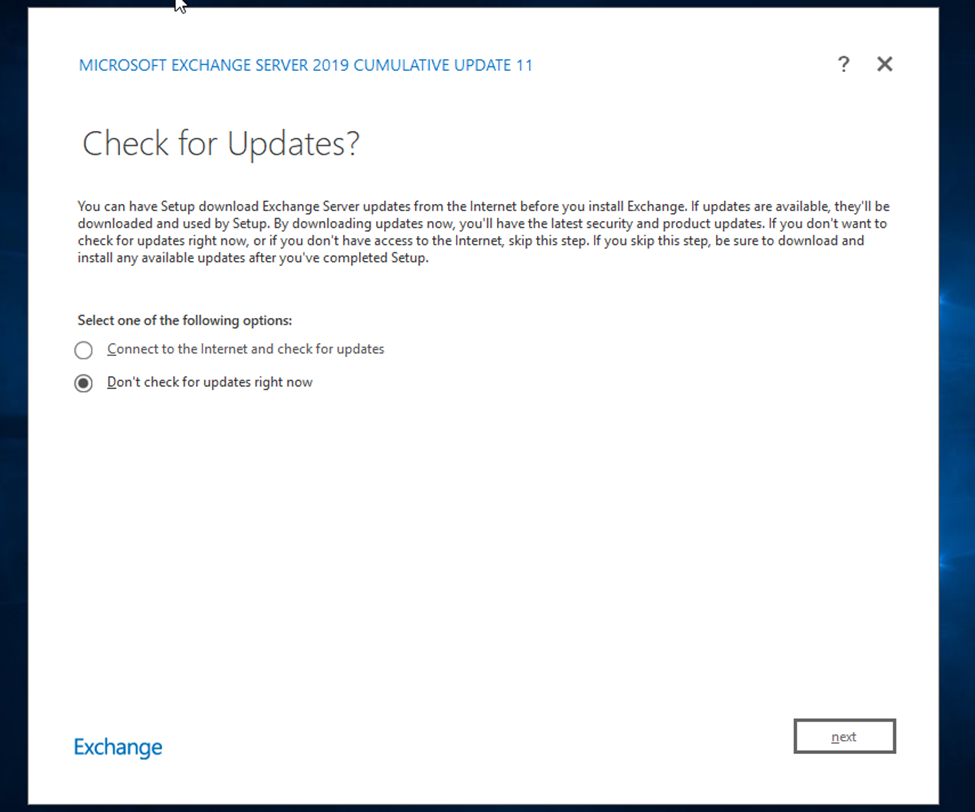
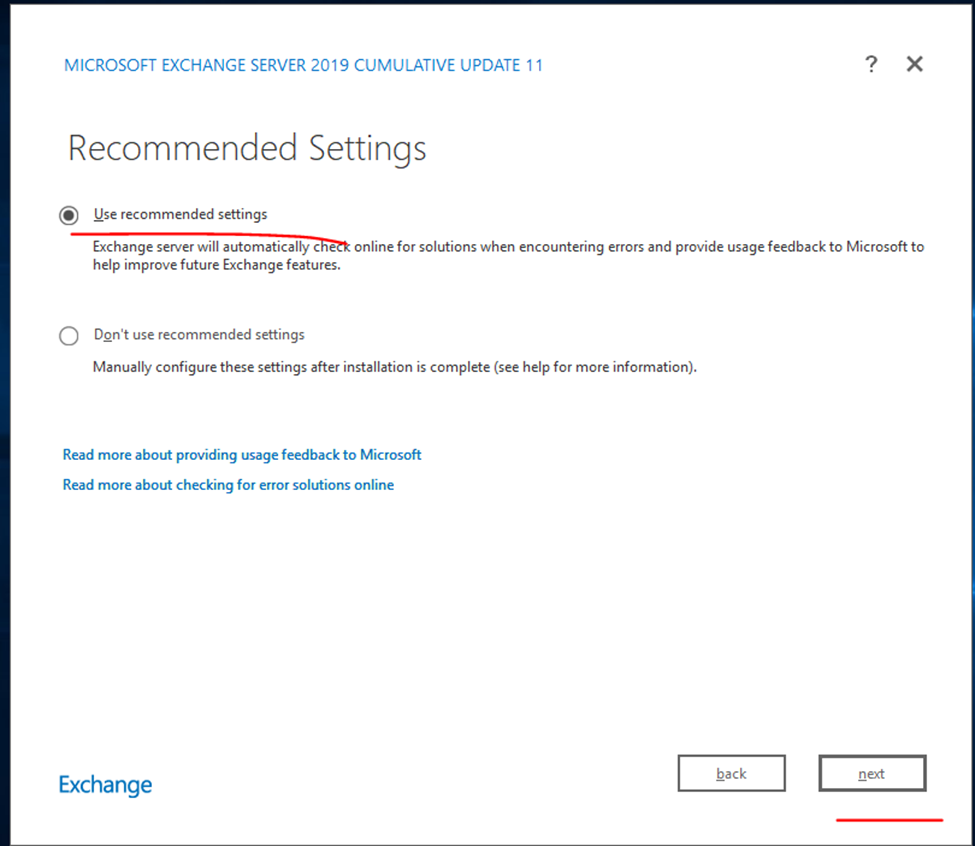
If you looking for latest update select update option otherwise next option
System state backup: Backs up operating system files, enabling you to recover when a machine starts but you’ve lost system files and registry. A system state backup includes: Domain member: Boot files, COM+ class registration database, registry
system state backup is, first of all, you need to know what a system state is. A system state contains some system settings and parameters files that are listed in the next part.
System state backup is a copy of system state data created by certain tools and stored in a safe location. Once the original system state files are damaged or missing, you can rely on the backup image to recover the previous working system.
Active Directory domain controllers (DCs) you have, you will certainly want to set up some sort of automated backup of your Active Directory. Although having two or more DCs provides redundancy and fail-over protection in the event one of them fails, you can’t really anticipate what can happen in the event of a natural disaster, a fire, or flooding of a data center
for Restore we need to Start Server in Repair Mode(Click – F8)
so, if we select bare metal recovery – we are taking complete server backup.
if we select System State taking backup only for Active directory.
Windows Server Backup.
Installation and Configuration windows server 2019 backup solution.
Click Tools
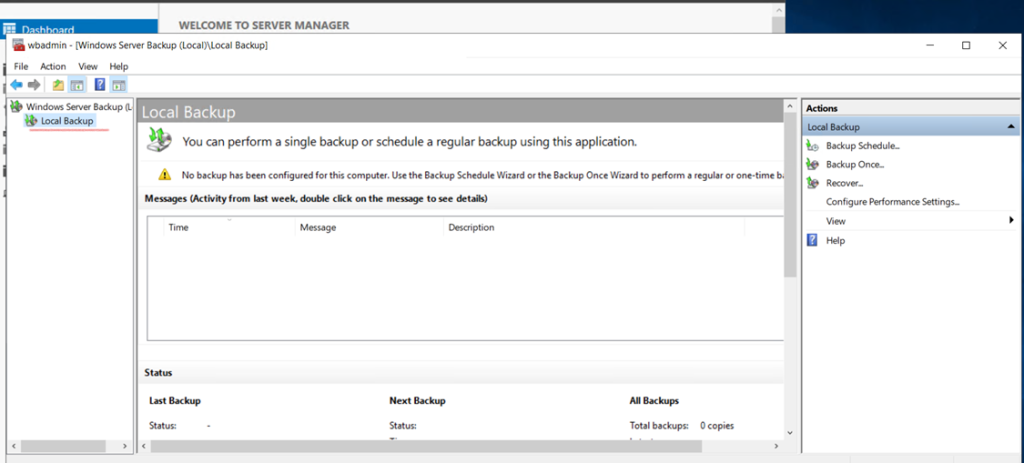
Here we are in Windows Server Backup
Daily Backup
Select window server backup
As you can see, it’s pretty bare-bones at the moment. Not a lot of action. Don’t worry, we’ll change that nice and quick. Click the ‘Local Backup‘ link on the left tree view.
here selecting the Backup schedule.
Backup schedule
only taking the C Drive Backup
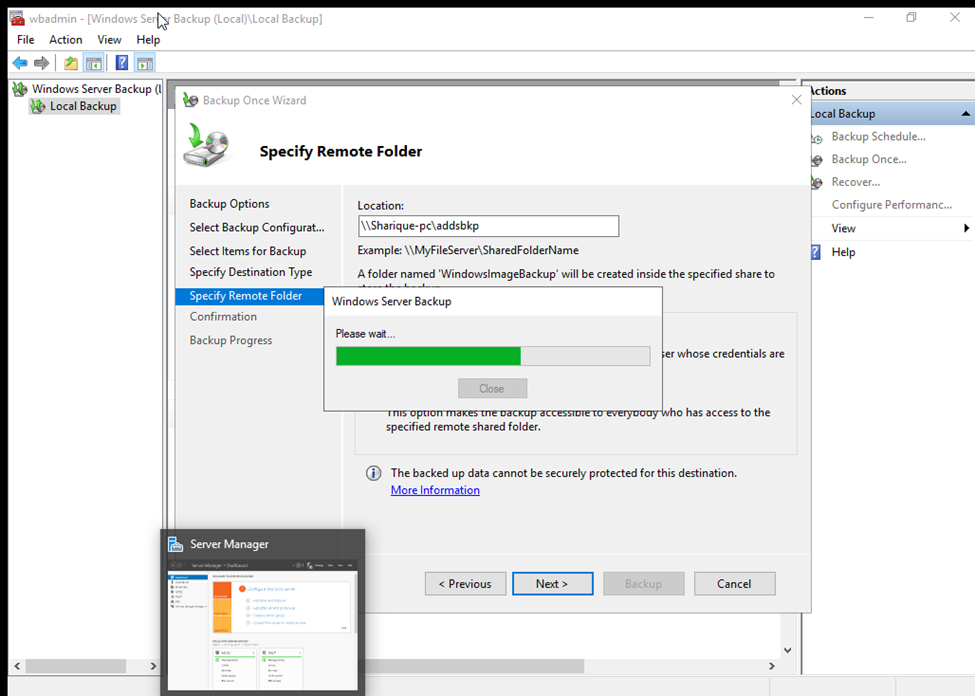
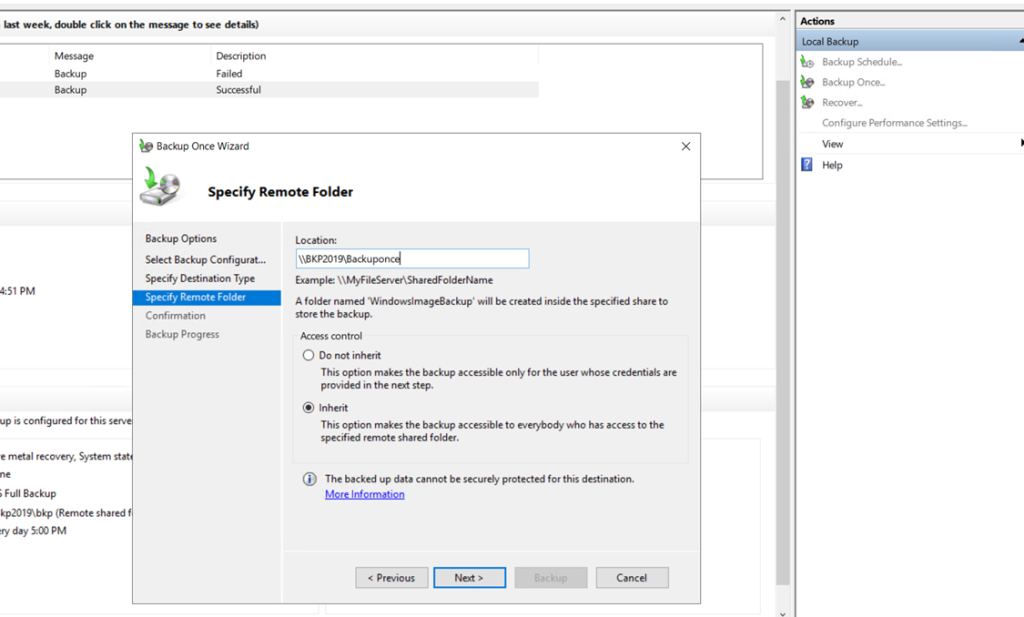
Taking the backup in network folder.
So, now type the username and password central server username and password
System State taking backup only for Active directory
here i m tacking specific ADDS Backup
Click on Advanced Setting select vss setting and click to vss full backup if you’re not running any backup.
Backup scheduled
Backup once.
First, let’s do a single backup. Then, I’ll show you how to create an automated task/schedule. Click the ‘Backup Once…‘ link under the Actions menu on the right-hand side.
The ‘Backup Once Wizard‘ opens. As we haven’t created a scheduled backup yet, you can just click Next.
The ‘Full server (recommended)‘ option is selected by default – that’s what we want. Click Next.
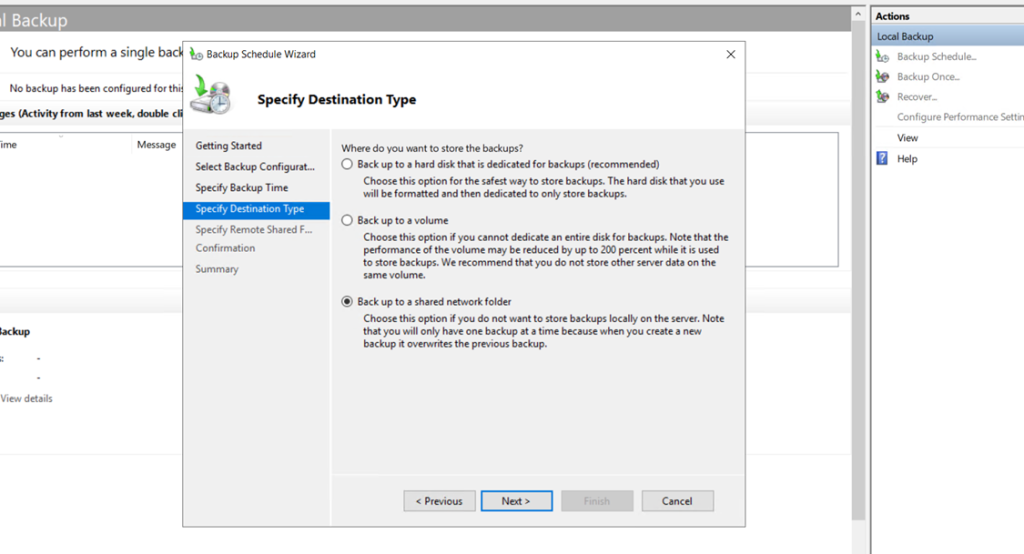
On the ‘Specify Destination Type‘ screen, typically, you would choose the ‘Remote shared folder‘ option to use another disk.
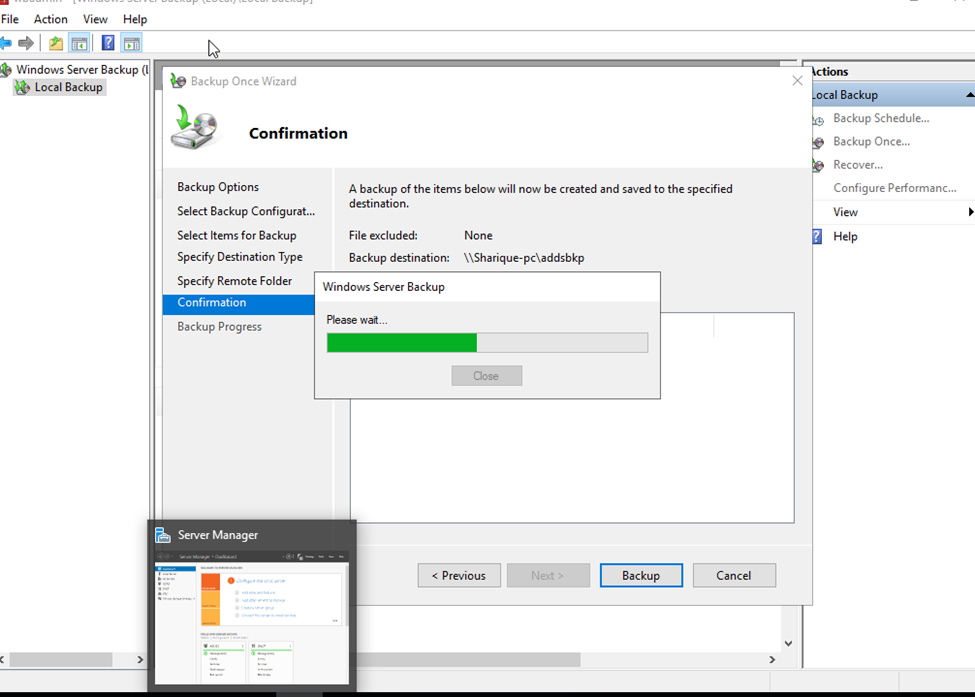
OK, we are at the Confirmation screen. Click Backup.
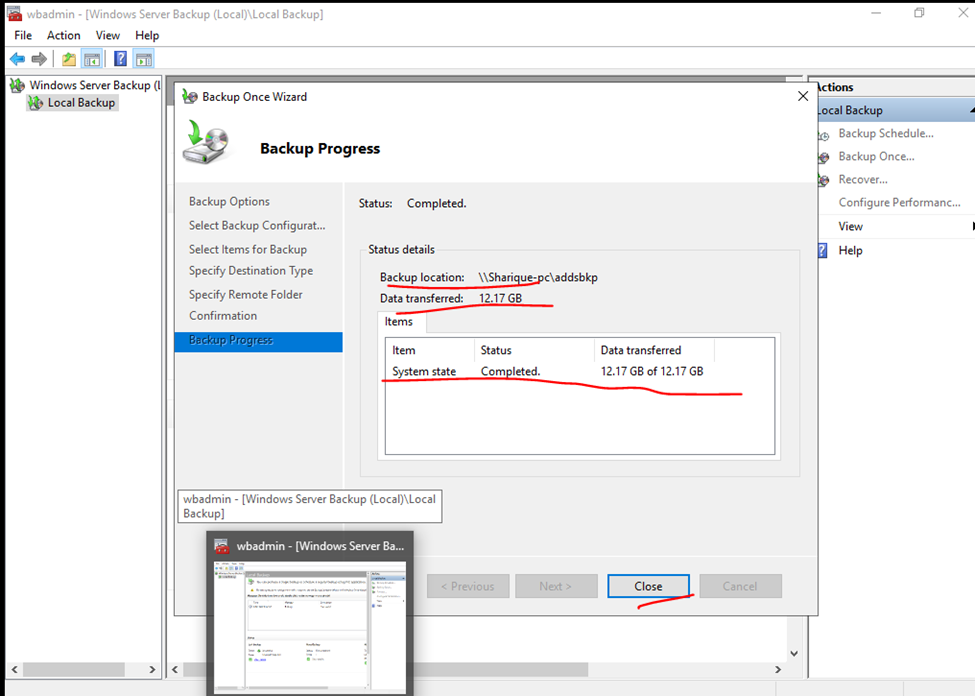
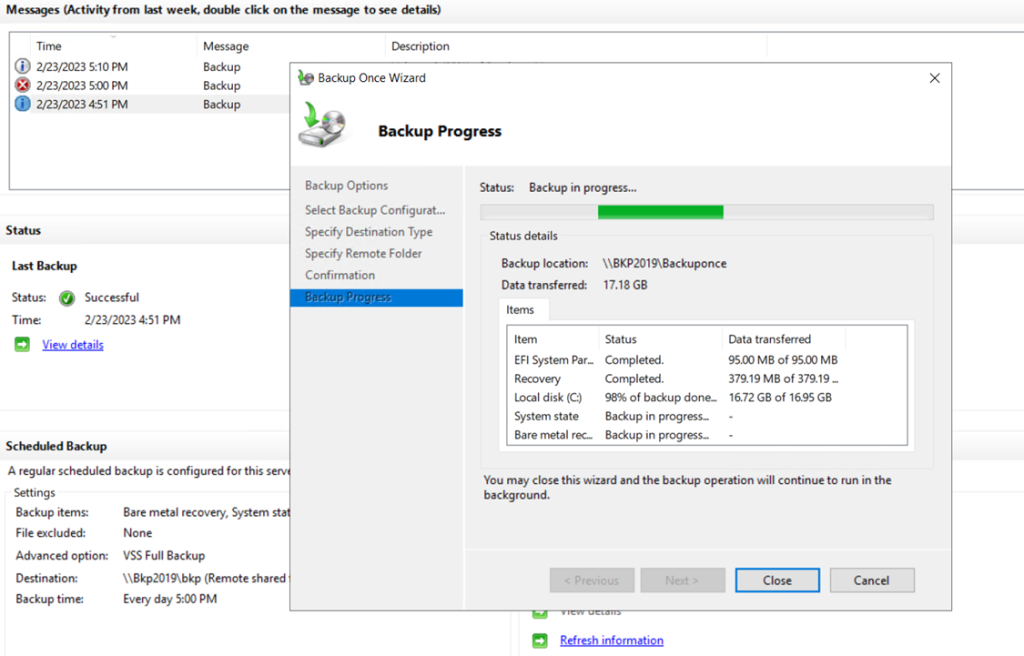
We can monitor the job’s progress in the dialog box or in the main interface window.
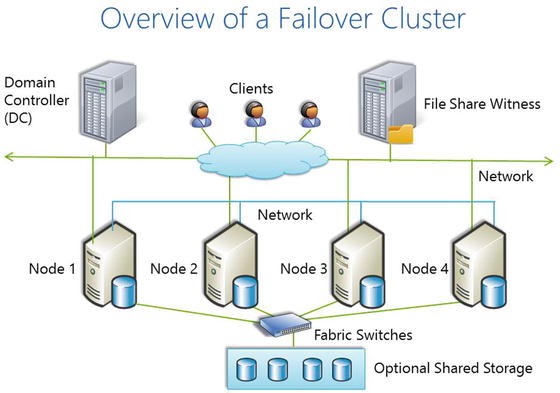
In order to increase high-availability for your business-critical data using Windows Server, you need Failover Clustering in Windows Server to achieve it.
Failover clustering will enable you to make you Windows Server services highly available. In this guide we will go just through simple setup of failover clustering on Windows Server 2019 without setting up any services.
Steps to Create HighAvailability Cluster Environment in Windows Server.
HighAvailability Server
Steps:
Windows Server.
Minimum Requirements:
Same windows server operating system.
Main Machine- example: win server 2019 DC- Domain Controller, – DC IP – 192.168.20.2
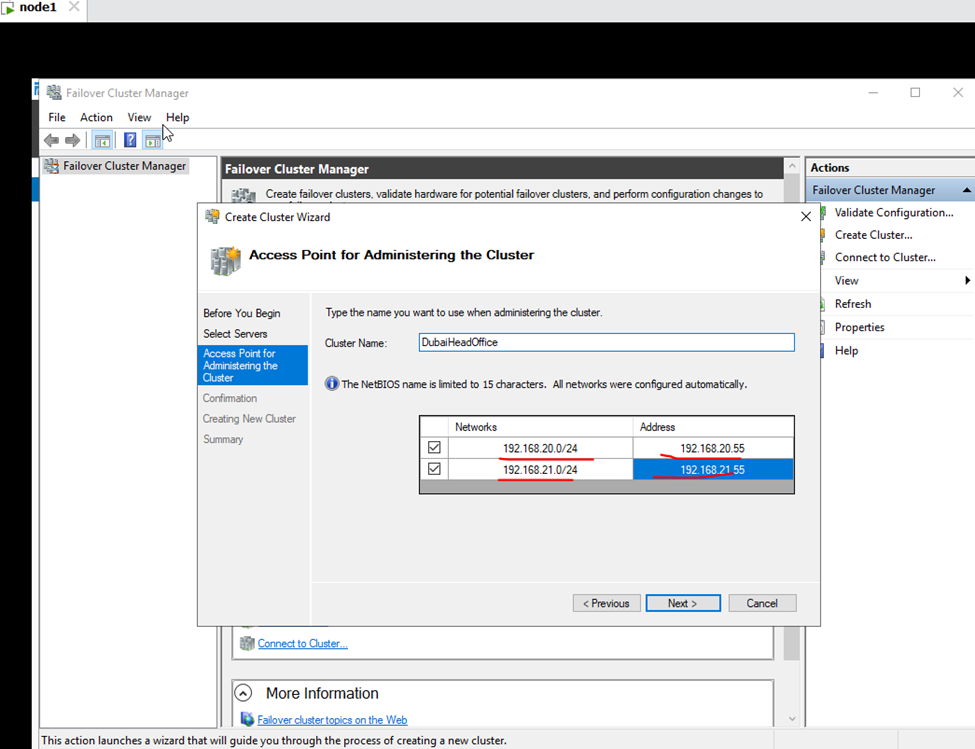
First Node 1 – win server 2019 (Active – Active) – Adaptor 1 – 192.168.20.51, Adaptor 2 – 192.168.21.51
Second Node 2 – Win Server 2019 (Active – Passive) Adaptor 2 – 192.168.20.52, Adaptor 2 – 192.168.21.52
if do you already working on DC Environment it’s okay otherwise need to install and Configure DC.
because Failover cluster will communicate with same network DC Environment.
– Suppose i am having DC Environment.
Need to install Node1 and Node 2. and join DC.
node pc name need to rename as per you. Nodes will join DC Environment
win+r = sysdm.cpl (shortcut key)
(win dc and nodes IP Will be Static)
once you will attached the NODE1 AND Multiple node pc to dc
you will login that pc from administrator account.
in Node 1,node 2 – nedeed to Network Adaptor.
IN DC
so now,
iscsi target and iscsi storage in DC.
install failover cluster.
IN DC
create storage drive using iscsi.
new isdcsi virtual disk as per need
minimum as per your requirment.
DataDisk
Log Drive
Quorumdisk
MSDT Disk
WHILE Creating Virtual Disk
Access Server- add-ENTER the node 1 and node 2 ip address.
IN All NODES
iscsi Initiator.(Default Installed)
run iscsi Initiator.
IP will be Server dc, so we created ISCSI File in DC.
find the created dc – attached machine node1 and node 2.
attached them with your node.
volume + autoconfigure.
so now available disk will be available in node 1 and node 2.
win+r – diskmgmt.msc
make the disk online and active disk.
So here,
I AM Already having DC Environment.
Now need to create NODES.
So, my Domain Controller is vre.local
And I already having nodes windows server.
Once join to the Domain Controller need to login from Same Admin User.
If you have already joined to DC your pc can login from DC Administrator.
So here,
And assign the static IP.
Implementing Failover Cluster in Windows Server 2019
So now,
GO to DC
Click add Features and roles.
Select server
Select
iSCSI Target and Storage Provider
And other make as default install it
Once install click on
File storage services
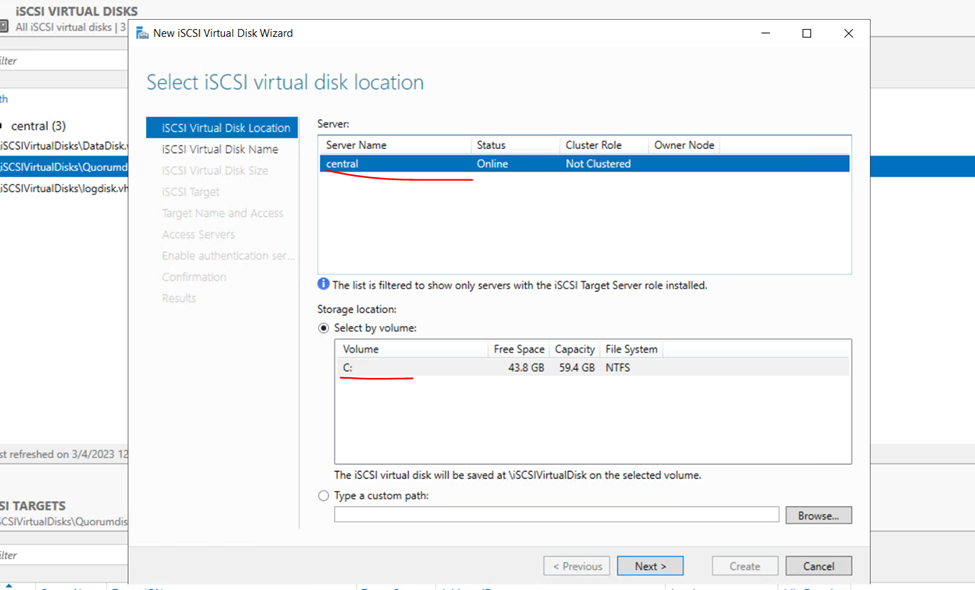
Click on Iscsi Virtual task and click on create
You can create on external drive also
So here I am creating as default.
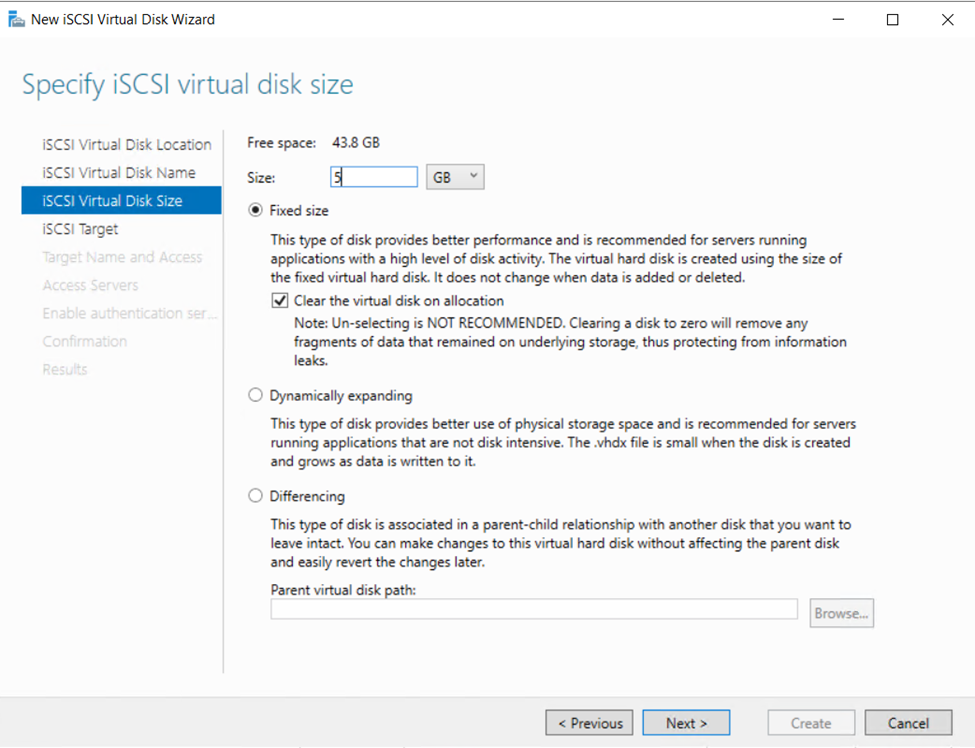
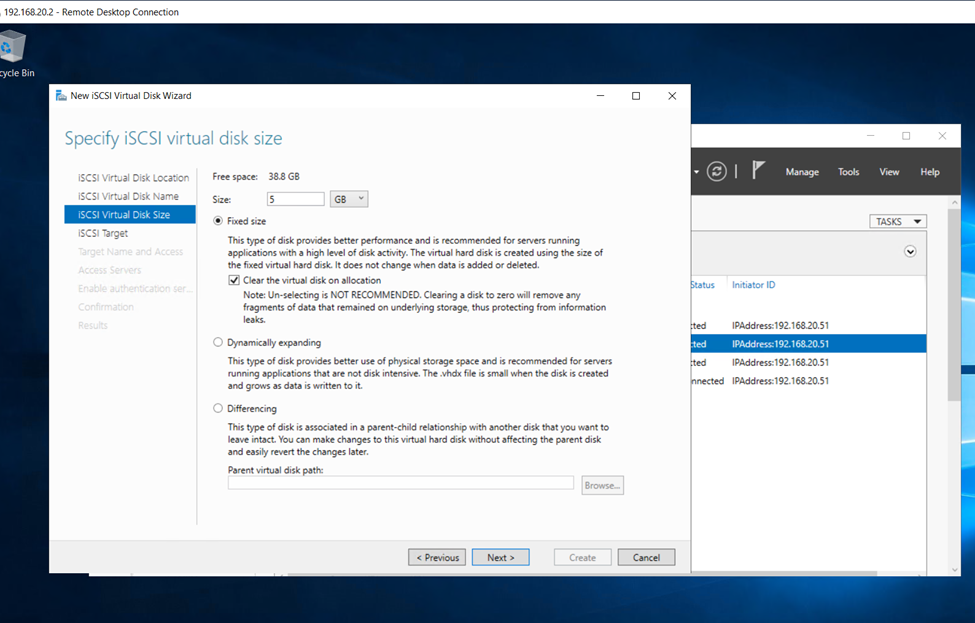
Assign the name as per your need
I am giving here 5GB
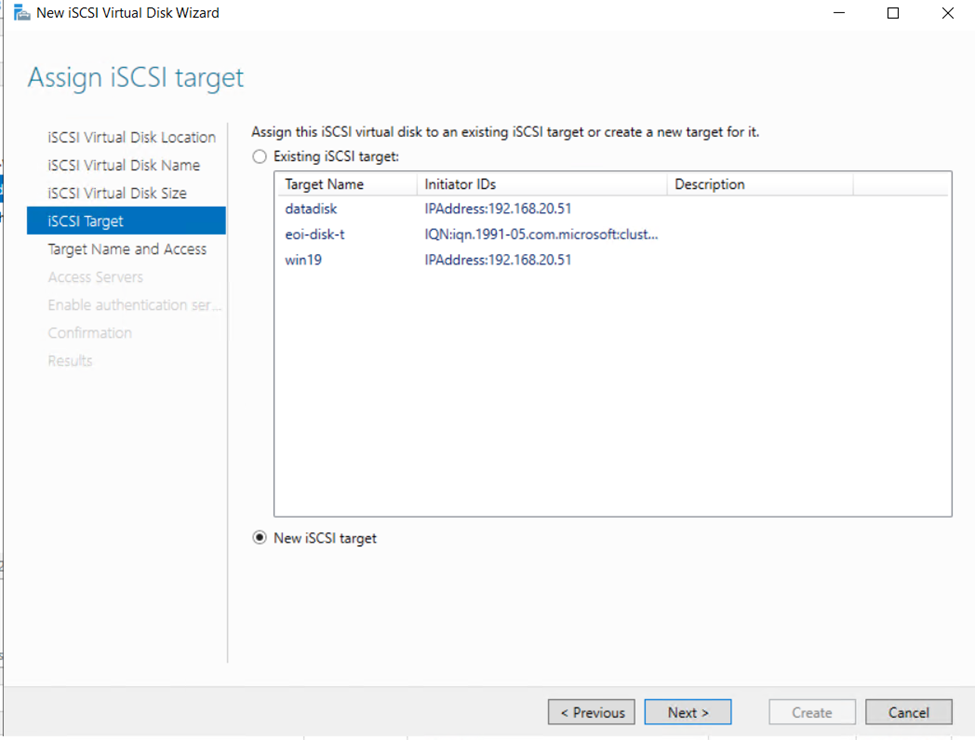
Click on new iSCSITarget
Allocate name
Check your name attached with Cluster
Or search from ip address
Click to Next
Leave as default
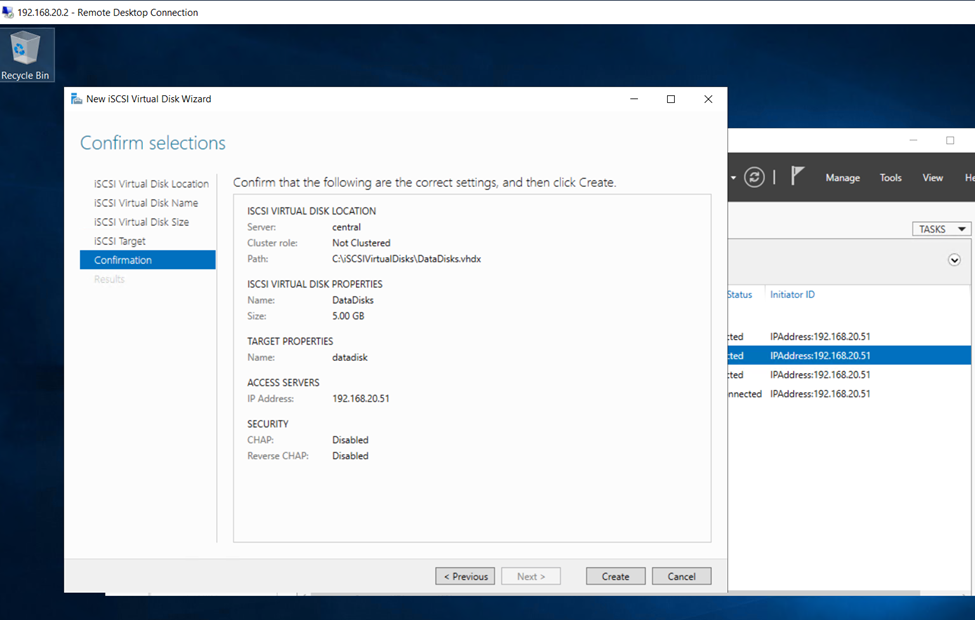
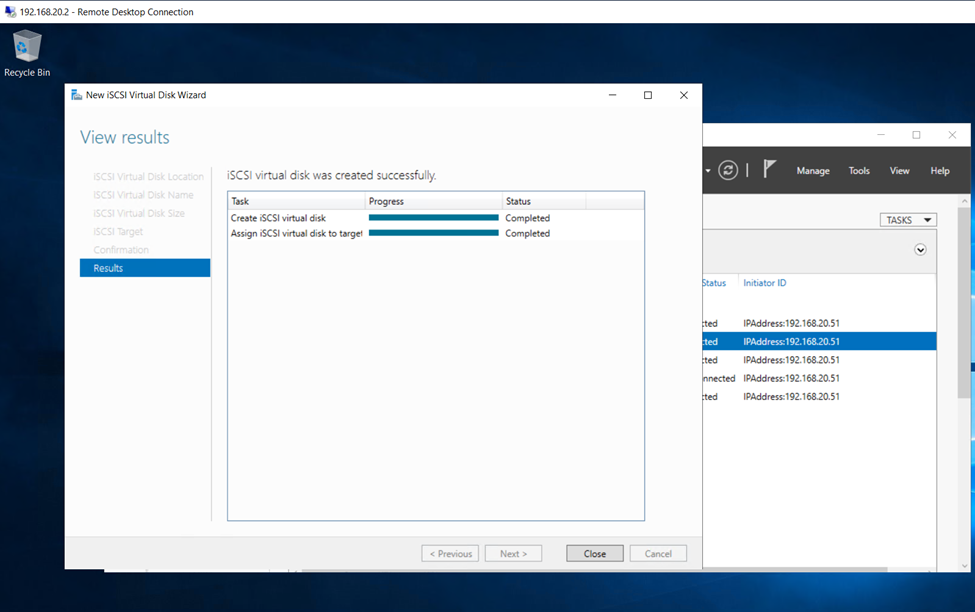
So, click on create and create first iSCSI Disk
Iscsi Disk Created
We ned to create minimum – Iscsi Disks
Quorumdisk
DataDisk
Log Drive
So, again I m creating disks.
Assign size
Click next
Click on create disk
Created disk and close
Now,
Login to Node1 and Node 2 for Iscsi initiator
Click to quick connect
Click to Done so bellow screen connection established
Click on volume and device and click auto configuration
Right click on both disk which is not current activated make it online
Click on initialize disk
Select as default
Now assign name
Once done
So after this check DC Iscsi EMVIROMENT NOW YOU ARE CONNECTED.
Now install the Cluster in both nodes.
So, in feature select and install.
Once cluster install need to install File Server also.
Click to start Failover Cluster. Node 1 and node 2
Click to validate and create cluster in node1 node 2.
Select both servers (in my case Failover1 and Failover2) and select Next
Next
Run all tests | Next
Next
All test were success | Finish
Confirm the next options, and we will reach the confirmation screen, where we can check the information to create the cluster before hitting Finish and really create our Cluster.
We can proceed to creating cluster
Create Failover Cluster
Once validation done in node 1 and node 2.
Now Create cluster in node 1 and node 2.
Next
Assign the Cluster IP
Next
Once the Cluster is created, we can move on to define what kind of role (resource) we’ll need to use.
Finish
So, cluster validate and created.
So, now adding Disks
Select the disks
Once disks attached the disks will be online
You can assign disk as per the need
Log Disk
Network Interface
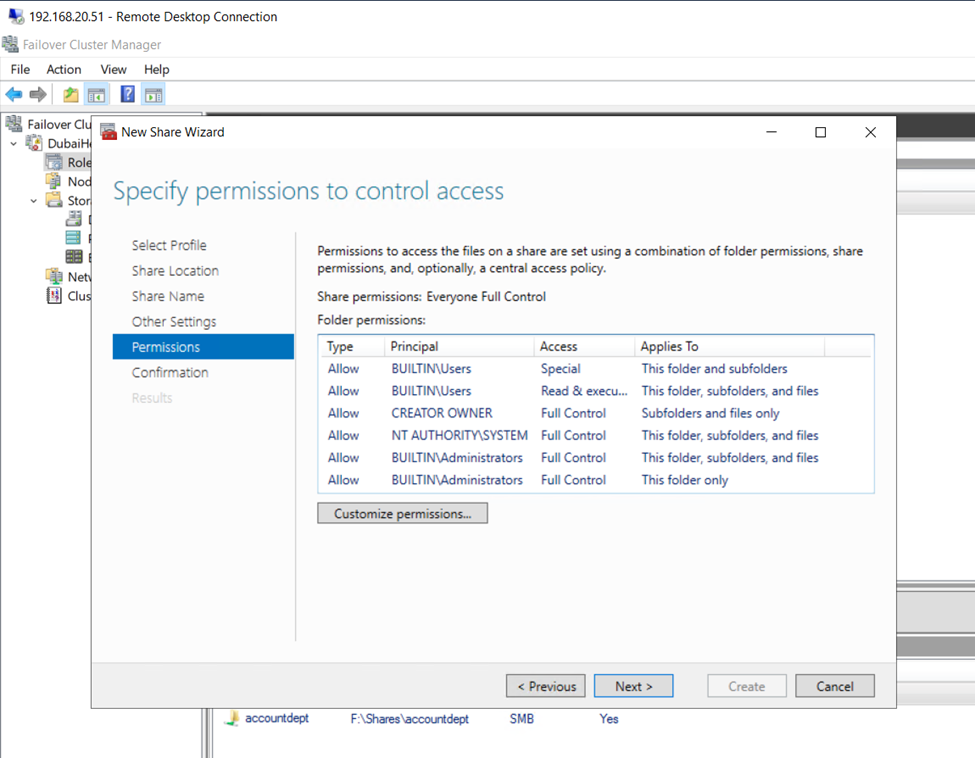
Creating file server in cluster environment
File Server and next
As you can see I have selected file server for general use
updates: pkg.adfinis.com
base | 3.6 kB 00:00
extras | 2.9 kB 00:00
updates | 2.9 kB 00:00
(1/4): base/7/x86_64/group_gz | 153 kB 00:01
(2/4): extras/7/x86_64/primary_db | 246 kB 00:01
(3/4): updates/7/x86_64/primary_db | 14 MB 00:02
(4/4): base/7/x86_64/primary_db | 6.1 MB 00:00:04
Resolving Dependencies
–> Running transaction check
—> Package NetworkManager.x86_64 1:1.18.8-1.el7 will be updated
—> Package NetworkManager.x86_64 1:1.18.8-2.el7_9 will be an update
—> Package NetworkManager-libnm.x86_64 1:1.18.8-1.el7 will be updated
—> Package NetworkManager-libnm.x86_64 1:1.18.8-2.el7_9 will be an update
—> Package NetworkManager-team.x86_64 1:1.18.8-1.el7 will be updated
—> Package NetworkManager-team.x86_64 1:1.18.8-2.el7_9 will be an update
—> Package NetworkManager-tui.x86_64 1:1.18.8-1.el7 will be updated
—> Package NetworkManager-tui.x86_64 1:1.18.8-2.el7_9 will be an update
—> Package bash.x86_64 0:4.2.46-34.el7 will be updated
—> Package bash.x86_64 0:4.2.46-35.el7_9 will be an update
—> Package bind-export-libs.x86_64 32:9.11.4-26.P2.el7 will be updated
—> Package bind-export-libs.x86_64 32:9.11.4-26.P2.el7_9.9 will be an update
—> Package bind-libs.x86_64 32:9.11.4-26.P2.el7 will be updated
—> Package bind-libs.x86_64 32:9.11.4-26.P2.el7_9.9 will be an update
—> Package bind-libs-lite.x86_64 32:9.11.4-26.P2.el7 will be updated
—> Package bind-libs-lite.x86_64 32:9.11.4-26.P2.el7_9.9 will be an update
—> Package bind-license.noarch 32:9.11.4-26.P2.el7 will be updated
—> Package bind-license.noarch 32:9.11.4-26.P2.el7_9.9 will be an update
—> Package bind-utils.x86_64 32:9.11.4-26.P2.el7 will be updated
—> Package bind-utils.x86_64 32:9.11.4-26.P2.el7_9.9 will be an update
—> Package binutils.x86_64 0:2.27-44.base.el7 will be updated
—> Package binutils.x86_64 0:2.27-44.base.el7_9.1 will be an update
—> Package bpftool.x86_64 0:3.10.0-1160.el7 will be updated
—> Package bpftool.x86_64 0:3.10.0-1160.59.1.el7 will be an update
—> Package ca-certificates.noarch 0:2020.2.41-70.0.el7_8 will be updated
—> Package ca-certificates.noarch 0:2021.2.50-72.el7_9 will be an update
—> Package centos-release.x86_64 0:7-9.2009.0.el7.centos will be updated
—> Package centos-release.x86_64 0:7-9.2009.1.el7.centos will be an update
—> Package coreutils.x86_64 0:8.22-24.el7 will be updated
—> Package coreutils.x86_64 0:8.22-24.el7_9.2 will be an update
—> Package cronie.x86_64 0:1.4.11-23.el7 will be updated
—> Package cronie.x86_64 0:1.4.11-24.el7_9 will be an update
—> Package cronie-anacron.x86_64 0:1.4.11-23.el7 will be updated
—> Package cronie-anacron.x86_64 0:1.4.11-24.el7_9 will be an update
—> Package curl.x86_64 0:7.29.0-59.el7 will be updated
—> Package curl.x86_64 0:7.29.0-59.el7_9.1 will be an update
—> Package cyrus-sasl-lib.x86_64 0:2.1.26-23.el7 will be updated
—> Package cyrus-sasl-lib.x86_64 0:2.1.26-24.el7_9 will be an update
—> Package cyrus-sasl-plain.x86_64 0:2.1.26-23.el7 will be updated
—> Package cyrus-sasl-plain.x86_64 0:2.1.26-24.el7_9 will be an update
—> Package device-mapper.x86_64 7:1.02.170-6.el7 will be updated
—> Package device-mapper.x86_64 7:1.02.170-6.el7_9.5 will be an update
—> Package device-mapper-event.x86_64 7:1.02.170-6.el7 will be updated
—> Package device-mapper-event.x86_64 7:1.02.170-6.el7_9.5 will be an update
—> Package device-mapper-event-libs.x86_64 7:1.02.170-6.el7 will be updated
—> Package device-mapper-event-libs.x86_64 7:1.02.170-6.el7_9.5 will be an update
—> Package device-mapper-libs.x86_64 7:1.02.170-6.el7 will be updated
—> Package device-mapper-libs.x86_64 7:1.02.170-6.el7_9.5 will be an update
—> Package device-mapper-persistent-data.x86_64 0:0.8.5-3.el7 will be updated
—> Package device-mapper-persistent-data.x86_64 0:0.8.5-3.el7_9.2 will be an update
—> Package dhclient.x86_64 12:4.2.5-82.el7.centos will be updated
—> Package dhclient.x86_64 12:4.2.5-83.el7.centos.1 will be an update
—> Package dhcp-common.x86_64 12:4.2.5-82.el7.centos will be updated
—> Package dhcp-common.x86_64 12:4.2.5-83.el7.centos.1 will be an update
—> Package dhcp-libs.x86_64 12:4.2.5-82.el7.centos will be updated
—> Package dhcp-libs.x86_64 12:4.2.5-83.el7.centos.1 will be an update
—> Package dmidecode.x86_64 1:3.2-5.el7 will be updated
—> Package dmidecode.x86_64 1:3.2-5.el7_9.1 will be an update
—> Package expat.x86_64 0:2.1.0-12.el7 will be updated
—> Package expat.x86_64 0:2.1.0-14.el7_9 will be an update
—> Package firewalld.noarch 0:0.6.3-11.el7 will be updated
—> Package firewalld.noarch 0:0.6.3-13.el7_9 will be an update
—> Package firewalld-filesystem.noarch 0:0.6.3-11.el7 will be updated
—> Package firewalld-filesystem.noarch 0:0.6.3-13.el7_9 will be an update
—> Package freetype.x86_64 0:2.8-14.el7 will be updated
—> Package freetype.x86_64 0:2.8-14.el7_9.1 will be an update
—> Package glib2.x86_64 0:2.56.1-7.el7 will be updated
—> Package glib2.x86_64 0:2.56.1-9.el7_9 will be an update
—> Package glibc.x86_64 0:2.17-317.el7 will be updated
—> Package glibc.x86_64 0:2.17-325.el7_9 will be an update
—> Package glibc-common.x86_64 0:2.17-317.el7 will be updated
—> Package glibc-common.x86_64 0:2.17-325.el7_9 will be an update
—> Package grub2.x86_64 1:2.02-0.86.el7.centos will be updated
—> Package grub2.x86_64 1:2.02-0.87.el7.centos.7 will be an update
—> Package grub2-common.noarch 1:2.02-0.86.el7.centos will be updated
—> Package grub2-common.noarch 1:2.02-0.87.el7.centos.7 will be an update
—> Package grub2-pc.x86_64 1:2.02-0.86.el7.centos will be updated
—> Package grub2-pc.x86_64 1:2.02-0.87.el7.centos.7 will be an update
—> Package grub2-pc-modules.noarch 1:2.02-0.86.el7.centos will be updated
—> Package grub2-pc-modules.noarch 1:2.02-0.87.el7.centos.7 will be an update
—> Package grub2-tools.x86_64 1:2.02-0.86.el7.centos will be updated
—> Package grub2-tools.x86_64 1:2.02-0.87.el7.centos.7 will be an update
—> Package grub2-tools-extra.x86_64 1:2.02-0.86.el7.centos will be updated
—> Package grub2-tools-extra.x86_64 1:2.02-0.87.el7.centos.7 will be an update
—> Package grub2-tools-minimal.x86_64 1:2.02-0.86.el7.centos will be updated
—> Package grub2-tools-minimal.x86_64 1:2.02-0.87.el7.centos.7 will be an update
—> Package httpd.x86_64 0:2.4.6-95.el7.centos will be updated
—> Package httpd.x86_64 0:2.4.6-97.el7.centos.5 will be an update
—> Package httpd-manual.noarch 0:2.4.6-95.el7.centos will be updated
—> Package httpd-manual.noarch 0:2.4.6-97.el7.centos.5 will be an update
—> Package httpd-tools.x86_64 0:2.4.6-95.el7.centos will be updated
—> Package httpd-tools.x86_64 0:2.4.6-97.el7.centos.5 will be an update
—> Package initscripts.x86_64 0:9.49.53-1.el7 will be updated
—> Package initscripts.x86_64 0:9.49.53-1.el7_9.1 will be an update
—> Package iprutils.x86_64 0:2.4.17.1-3.el7 will be updated
—> Package iprutils.x86_64 0:2.4.17.1-3.el7_7 will be an update
—> Package iwl100-firmware.noarch 0:39.31.5.1-79.el7 will be updated
—> Package iwl100-firmware.noarch 0:39.31.5.1-80.el7_9 will be an update
—> Package iwl1000-firmware.noarch 1:39.31.5.1-79.el7 will be updated
—> Package iwl1000-firmware.noarch 1:39.31.5.1-80.el7_9 will be an update
—> Package iwl105-firmware.noarch 0:18.168.6.1-79.el7 will be updated
—> Package iwl105-firmware.noarch 0:18.168.6.1-80.el7_9 will be an update
—> Package iwl135-firmware.noarch 0:18.168.6.1-79.el7 will be updated
—> Package iwl135-firmware.noarch 0:18.168.6.1-80.el7_9 will be an update
—> Package iwl2000-firmware.noarch 0:18.168.6.1-79.el7 will be updated
—> Package iwl2000-firmware.noarch 0:18.168.6.1-80.el7_9 will be an update
—> Package iwl2030-firmware.noarch 0:18.168.6.1-79.el7 will be updated
—> Package iwl2030-firmware.noarch 0:18.168.6.1-80.el7_9 will be an update
—> Package iwl3160-firmware.noarch 0:25.30.13.0-79.el7 will be updated
—> Package iwl3160-firmware.noarch 0:25.30.13.0-80.el7_9 will be an update
—> Package iwl3945-firmware.noarch 0:15.32.2.9-79.el7 will be updated
—> Package iwl3945-firmware.noarch 0:15.32.2.9-80.el7_9 will be an update
—> Package iwl4965-firmware.noarch 0:228.61.2.24-79.el7 will be updated
—> Package iwl4965-firmware.noarch 0:228.61.2.24-80.el7_9 will be an update
—> Package iwl5000-firmware.noarch 0:8.83.5.1_1-79.el7 will be updated
—> Package iwl5000-firmware.noarch 0:8.83.5.1_1-80.el7_9 will be an update
—> Package iwl5150-firmware.noarch 0:8.24.2.2-79.el7 will be updated
—> Package iwl5150-firmware.noarch 0:8.24.2.2-80.el7_9 will be an update
—> Package iwl6000-firmware.noarch 0:9.221.4.1-79.el7 will be updated
—> Package iwl6000-firmware.noarch 0:9.221.4.1-80.el7_9 will be an update
—> Package iwl6000g2a-firmware.noarch 0:18.168.6.1-79.el7 will be updated
—> Package iwl6000g2a-firmware.noarch 0:18.168.6.1-80.el7_9 will be an update
—> Package iwl6000g2b-firmware.noarch 0:18.168.6.1-79.el7 will be updated
—> Package iwl6000g2b-firmware.noarch 0:18.168.6.1-80.el7_9 will be an update
—> Package iwl6050-firmware.noarch 0:41.28.5.1-79.el7 will be updated
—> Package iwl6050-firmware.noarch 0:41.28.5.1-80.el7_9 will be an update
—> Package iwl7260-firmware.noarch 0:25.30.13.0-79.el7 will be updated
—> Package iwl7260-firmware.noarch 0:25.30.13.0-80.el7_9 will be an update
—> Package kbd.x86_64 0:1.15.5-15.el7 will be updated
—> Package kbd.x86_64 0:1.15.5-16.el7_9 will be an update
—> Package kbd-legacy.noarch 0:1.15.5-15.el7 will be updated
—> Package kbd-legacy.noarch 0:1.15.5-16.el7_9 will be an update
—> Package kbd-misc.noarch 0:1.15.5-15.el7 will be updated
—> Package kbd-misc.noarch 0:1.15.5-16.el7_9 will be an update
—> Package kernel.x86_64 0:3.10.0-1160.59.1.el7 will be installed
—> Package kernel-tools.x86_64 0:3.10.0-1160.el7 will be updated
—> Package kernel-tools.x86_64 0:3.10.0-1160.59.1.el7 will be an update
—> Package kernel-tools-libs.x86_64 0:3.10.0-1160.el7 will be updated
—> Package kernel-tools-libs.x86_64 0:3.10.0-1160.59.1.el7 will be an update
—> Package kexec-tools.x86_64 0:2.0.15-51.el7 will be updated
—> Package kexec-tools.x86_64 0:2.0.15-51.el7_9.3 will be an update
—> Package kpartx.x86_64 0:0.4.9-133.el7 will be updated
—> Package kpartx.x86_64 0:0.4.9-135.el7_9 will be an update
—> Package krb5-libs.x86_64 0:1.15.1-50.el7 will be updated
—> Package krb5-libs.x86_64 0:1.15.1-51.el7_9 will be an update
—> Package libblkid.x86_64 0:2.23.2-65.el7 will be updated
—> Package libblkid.x86_64 0:2.23.2-65.el7_9.1 will be an update
—> Package libcroco.x86_64 0:0.6.12-4.el7 will be updated
—> Package libcroco.x86_64 0:0.6.12-6.el7_9 will be an update
—> Package libcurl.x86_64 0:7.29.0-59.el7 will be updated
—> Package libcurl.x86_64 0:7.29.0-59.el7_9.1 will be an update
—> Package libmount.x86_64 0:2.23.2-65.el7 will be updated
—> Package libmount.x86_64 0:2.23.2-65.el7_9.1 will be an update
—> Package libsmartcols.x86_64 0:2.23.2-65.el7 will be updated
—> Package libsmartcols.x86_64 0:2.23.2-65.el7_9.1 will be an update
—> Package libsss_idmap.x86_64 0:1.16.5-10.el7 will be updated
—> Package libsss_idmap.x86_64 0:1.16.5-10.el7_9.12 will be an update
—> Package libsss_nss_idmap.x86_64 0:1.16.5-10.el7 will be updated
—> Package libsss_nss_idmap.x86_64 0:1.16.5-10.el7_9.12 will be an update
—> Package libstoragemgmt.x86_64 0:1.8.1-1.el7 will be updated
—> Package libstoragemgmt.x86_64 0:1.8.1-2.el7_9 will be an update
—> Package libstoragemgmt-python.noarch 0:1.8.1-1.el7 will be updated
—> Package libstoragemgmt-python.noarch 0:1.8.1-2.el7_9 will be an update
—> Package libstoragemgmt-python-clibs.x86_64 0:1.8.1-1.el7 will be updated
—> Package libstoragemgmt-python-clibs.x86_64 0:1.8.1-2.el7_9 will be an update
—> Package libuuid.x86_64 0:2.23.2-65.el7 will be updated
—> Package libuuid.x86_64 0:2.23.2-65.el7_9.1 will be an update
—> Package libxml2.x86_64 0:2.9.1-6.el7.5 will be updated
—> Package libxml2.x86_64 0:2.9.1-6.el7_9.6 will be an update
—> Package libxml2-python.x86_64 0:2.9.1-6.el7.5 will be updated
—> Package libxml2-python.x86_64 0:2.9.1-6.el7_9.6 will be an update
—> Package linux-firmware.noarch 0:20200421-79.git78c0348.el7 will be updated
—> Package linux-firmware.noarch 0:20200421-80.git78c0348.el7_9 will be an update
—> Package lvm2.x86_64 7:2.02.187-6.el7 will be updated
—> Package lvm2.x86_64 7:2.02.187-6.el7_9.5 will be an update
—> Package lvm2-libs.x86_64 7:2.02.187-6.el7 will be updated
—> Package lvm2-libs.x86_64 7:2.02.187-6.el7_9.5 will be an update
—> Package mdadm.x86_64 0:4.1-6.el7 will be updated
—> Package mdadm.x86_64 0:4.1-9.el7_9 will be an update
—> Package microcode_ctl.x86_64 2:2.1-73.el7 will be updated
—> Package microcode_ctl.x86_64 2:2.1-73.11.el7_9 will be an update
—> Package mod_ssl.x86_64 1:2.4.6-95.el7.centos will be updated
—> Package mod_ssl.x86_64 1:2.4.6-97.el7.centos.5 will be an update
—> Package nspr.x86_64 0:4.21.0-1.el7 will be updated
—> Package nspr.x86_64 0:4.32.0-1.el7_9 will be an update
—> Package nss.x86_64 0:3.44.0-7.el7_7 will be updated
—> Package nss.x86_64 0:3.67.0-4.el7_9 will be an update
—> Package nss-softokn.x86_64 0:3.44.0-8.el7_7 will be updated
—> Package nss-softokn.x86_64 0:3.67.0-3.el7_9 will be an update
—> Package nss-softokn-freebl.x86_64 0:3.44.0-8.el7_7 will be updated
—> Package nss-softokn-freebl.x86_64 0:3.67.0-3.el7_9 will be an update
—> Package nss-sysinit.x86_64 0:3.44.0-7.el7_7 will be updated
—> Package nss-sysinit.x86_64 0:3.67.0-4.el7_9 will be an update
—> Package nss-tools.x86_64 0:3.44.0-7.el7_7 will be updated
—> Package nss-tools.x86_64 0:3.67.0-4.el7_9 will be an update
—> Package nss-util.x86_64 0:3.44.0-4.el7_7 will be updated
—> Package nss-util.x86_64 0:3.67.0-1.el7_9 will be an update
—> Package open-vm-tools.x86_64 0:11.0.5-3.el7 will be updated
—> Package open-vm-tools.x86_64 0:11.0.5-3.el7_9.3 will be an update
—> Package openldap.x86_64 0:2.4.44-22.el7 will be updated
—> Package openldap.x86_64 0:2.4.44-25.el7_9 will be an update
—> Package openssh.x86_64 0:7.4p1-21.el7 will be updated
—> Package openssh.x86_64 0:7.4p1-22.el7_9 will be an update
—> Package openssh-clients.x86_64 0:7.4p1-21.el7 will be updated
—> Package openssh-clients.x86_64 0:7.4p1-22.el7_9 will be an update
—> Package openssh-server.x86_64 0:7.4p1-21.el7 will be updated
—> Package openssh-server.x86_64 0:7.4p1-22.el7_9 will be an update
—> Package openssl.x86_64 1:1.0.2k-19.el7 will be updated
—> Package openssl.x86_64 1:1.0.2k-25.el7_9 will be an update
—> Package openssl-libs.x86_64 1:1.0.2k-19.el7 will be updated
—> Package openssl-libs.x86_64 1:1.0.2k-25.el7_9 will be an update
—> Package perl.x86_64 4:5.16.3-297.el7 will be updated
—> Package perl.x86_64 4:5.16.3-299.el7_9 will be an update
—> Package perl-Pod-Escapes.noarch 1:1.04-297.el7 will be updated
—> Package perl-Pod-Escapes.noarch 1:1.04-299.el7_9 will be an update
—> Package perl-libs.x86_64 4:5.16.3-297.el7 will be updated
—> Package perl-libs.x86_64 4:5.16.3-299.el7_9 will be an update
—> Package perl-macros.x86_64 4:5.16.3-297.el7 will be updated
—> Package perl-macros.x86_64 4:5.16.3-299.el7_9 will be an update
—> Package polkit.x86_64 0:0.112-26.el7 will be updated
—> Package polkit.x86_64 0:0.112-26.el7_9.1 will be an update
—> Package python.x86_64 0:2.7.5-89.el7 will be updated
—> Package python.x86_64 0:2.7.5-90.el7 will be an update
—> Package python-firewall.noarch 0:0.6.3-11.el7 will be updated
—> Package python-firewall.noarch 0:0.6.3-13.el7_9 will be an update
—> Package python-libs.x86_64 0:2.7.5-89.el7 will be updated
—> Package python-libs.x86_64 0:2.7.5-90.el7 will be an update
—> Package python-perf.x86_64 0:3.10.0-1160.el7 will be updated
—> Package python-perf.x86_64 0:3.10.0-1160.59.1.el7 will be an update
—> Package rpm.x86_64 0:4.11.3-45.el7 will be updated
—> Package rpm.x86_64 0:4.11.3-48.el7_9 will be an update
—> Package rpm-build-libs.x86_64 0:4.11.3-45.el7 will be updated
—> Package rpm-build-libs.x86_64 0:4.11.3-48.el7_9 will be an update
—> Package rpm-libs.x86_64 0:4.11.3-45.el7 will be updated
—> Package rpm-libs.x86_64 0:4.11.3-48.el7_9 will be an update
—> Package rpm-python.x86_64 0:4.11.3-45.el7 will be updated
—> Package rpm-python.x86_64 0:4.11.3-48.el7_9 will be an update
—> Package rsyslog.x86_64 0:8.24.0-55.el7 will be updated
—> Package rsyslog.x86_64 0:8.24.0-57.el7_9.1 will be an update
—> Package selinux-policy.noarch 0:3.13.1-268.el7 will be updated
—> Package selinux-policy.noarch 0:3.13.1-268.el7_9.2 will be an update
—> Package selinux-policy-targeted.noarch 0:3.13.1-268.el7 will be updated
—> Package selinux-policy-targeted.noarch 0:3.13.1-268.el7_9.2 will be an update
—> Package sos.noarch 0:3.9-2.el7.centos will be updated
—> Package sos.noarch 0:3.9-5.el7.centos.10 will be an update
—> Package sssd-client.x86_64 0:1.16.5-10.el7 will be updated
—> Package sssd-client.x86_64 0:1.16.5-10.el7_9.12 will be an update
—> Package sudo.x86_64 0:1.8.23-10.el7 will be updated
—> Package sudo.x86_64 0:1.8.23-10.el7_9.2 will be an update
—> Package systemd.x86_64 0:219-78.el7 will be updated
—> Package systemd.x86_64 0:219-78.el7_9.5 will be an update
—> Package systemd-libs.x86_64 0:219-78.el7 will be updated
—> Package systemd-libs.x86_64 0:219-78.el7_9.5 will be an update
—> Package systemd-python.x86_64 0:219-78.el7 will be updated
—> Package systemd-python.x86_64 0:219-78.el7_9.5 will be an update
—> Package systemd-sysv.x86_64 0:219-78.el7 will be updated
—> Package systemd-sysv.x86_64 0:219-78.el7_9.5 will be an update
—> Package tcsh.x86_64 0:6.18.01-17.el7 will be updated
—> Package tcsh.x86_64 0:6.18.01-17.el7_9.1 will be an update
—> Package tuned.noarch 0:2.11.0-9.el7 will be updated
—> Package tuned.noarch 0:2.11.0-11.el7_9 will be an update
—> Package tzdata.noarch 0:2020a-1.el7 will be updated
—> Package tzdata.noarch 0:2022a-1.el7 will be an update
—> Package unzip.x86_64 0:6.0-21.el7 will be updated
—> Package unzip.x86_64 0:6.0-24.el7_9 will be an update
—> Package util-linux.x86_64 0:2.23.2-65.el7 will be updated
—> Package util-linux.x86_64 0:2.23.2-65.el7_9.1 will be an update
—> Package vim-common.x86_64 2:7.4.629-7.el7 will be updated
—> Package vim-common.x86_64 2:7.4.629-8.el7_9 will be an update
—> Package vim-enhanced.x86_64 2:7.4.629-7.el7 will be updated
—> Package vim-enhanced.x86_64 2:7.4.629-8.el7_9 will be an update
—> Package vim-filesystem.x86_64 2:7.4.629-7.el7 will be updated
—> Package vim-filesystem.x86_64 2:7.4.629-8.el7_9 will be an update
—> Package vim-minimal.x86_64 2:7.4.629-7.el7 will be updated
—> Package vim-minimal.x86_64 2:7.4.629-8.el7_9 will be an update
—> Package virt-what.x86_64 0:1.18-4.el7 will be updated
—> Package virt-what.x86_64 0:1.18-4.el7_9.1 will be an update
—> Package wpa_supplicant.x86_64 1:2.6-12.el7 will be updated
—> Package wpa_supplicant.x86_64 1:2.6-12.el7_9.2 will be an update
—> Package zlib.x86_64 0:1.2.7-18.el7 will be updated
—> Package zlib.x86_64 0:1.2.7-19.el7_9 will be an update
updates/7/x86_64/filelists_db | 7.8 MB 00:00:01
–> Finished Dependency Resolution
Installing:
php x86_64 7.4.28-1.el7.remi remi-php74 3.4 M
Installing for dependencies:
libsodium x86_64 1.0.18-1.el7 epel 147 k
php-cli x86_64 7.4.28-1.el7.remi remi-php74 5.2 M
php-common x86_64 7.4.28-1.el7.remi remi-php74 1.2 M
php-json x86_64 7.4.28-1.el7.remi remi-php74 74 k
php-sodium x86_64 7.4.28-1.el7.remi remi-php74 85 k
Transaction Summary
Install 1 Package (+5 Dependent packages)
Total download size: 10 M
Installed size: 42 M
Is this ok [y/d/N]: y
Downloading packages:
warning: /var/cache/yum/x86_64/7/epel/packages/libsodium-1.0.18-1.el7.x86_64.rpm: Header V3 RSA/SHA256 Signature, key ID 352c64e5: NOKEY 0.0 B/s | 93 kB –:–:– ETA
Public key for libsodium-1.0.18-1.el7.x86_64.rpm is not installed
(1/6): libsodium-1.0.18-1.el7.x86_64.rpm | 147 kB 00:00:00
warning: /var/cache/yum/x86_64/7/remi-php74/packages/php-7.4.28-1.el7.remi.x86_64.rpm: Header V4 DSA/SHA1 Signature, key ID 00f97f56: NOKEY MB/s | 4.3 MB 00:00:03 ETA
Public key for php-7.4.28-1.el7.remi.x86_64.rpm is not installed
(2/6): php-7.4.28-1.el7.remi.x86_64.rpm | 3.4 MB 00:00:01
(3/6): php-json-7.4.28-1.el7.remi.x86_64.rpm | 74 kB 00:00:01
(4/6): php-cli-7.4.28-1.el7.remi.x86_64.rpm | 5.2 MB 00:00:01
(5/6): php-sodium-7.4.28-1.el7.remi.x86_64.rpm | 85 kB 00:00:01
updates: pkg.adfinis.com
remi-php74 | 3.0 kB 00:00:00
Package php-7.4.28-1.el7.remi.x86_64 already installed and latest version
Package php-common-7.4.28-1.el7.remi.x86_64 already installed and latest version
Package php-mcrypt is obsoleted by php-pecl-mcrypt, trying to install php-pecl-mcrypt-1.0.4-1.el7.remi.7.4.x86_64 instead
Package php-cli-7.4.28-1.el7.remi.x86_64 already installed and latest version
Package php-common-7.4.28-1.el7.remi.x86_64 already installed and latest version
Package php-mysql is obsoleted by php-mysqlnd, trying to install php-mysqlnd-7.4.28-1.el7.remi.x86_64 instead
Resolving Dependencies
–> Running transaction check
—> Package php-gd.x86_64 0:7.4.28-1.el7.remi will be installed
–> Processing Dependency: libgd.so.103()(64bit) for package: php-gd-7.4.28-1.el7.remi.x86_64
—> Package php-mysqlnd.x86_64 0:7.4.28-1.el7.remi will be installed
–> Processing Dependency: php-pdo(x86-64) = 7.4.28-1.el7.remi for package: php-mysqlnd-7.4.28-1.el7.remi.x86_64
—> Package php-opcache.x86_64 0:7.4.28-1.el7.remi will be installed
—> Package php-pecl-mcrypt.x86_64 0:1.0.4-1.el7.remi.7.4 will be installed
–> Processing Dependency: libmcrypt.so.4()(64bit) for package: php-pecl-mcrypt-1.0.4-1.el7.remi.7.4.x86_64
–> Running transaction check
—> Package gd3php.x86_64 0:2.3.3-4.el7.remi will be installed
–> Processing Dependency: libjpeg.so.62(LIBJPEG_6.2)(64bit) for package: gd3php-2.3.3-4.el7.remi.x86_64
–> Processing Dependency: libtiff.so.5(LIBTIFF_4.0)(64bit) for package: gd3php-2.3.3-4.el7.remi.x86_64
–> Processing Dependency: libX11.so.6()(64bit) for package: gd3php-2.3.3-4.el7.remi.x86_64
–> Processing Dependency: libXpm.so.4()(64bit) for package: gd3php-2.3.3-4.el7.remi.x86_64
–> Processing Dependency: libfontconfig.so.1()(64bit) for package: gd3php-2.3.3-4.el7.remi.x86_64
–> Processing Dependency: libjpeg.so.62()(64bit) for package: gd3php-2.3.3-4.el7.remi.x86_64
–> Processing Dependency: libraqm.so.0()(64bit) for package: gd3php-2.3.3-4.el7.remi.x86_64
–> Processing Dependency: libtiff.so.5()(64bit) for package: gd3php-2.3.3-4.el7.remi.x86_64
–> Processing Dependency: libwebp.so.7()(64bit) for package: gd3php-2.3.3-4.el7.remi.x86_64
—> Package libmcrypt.x86_64 0:2.5.8-13.el7 will be installed
—> Package php-pdo.x86_64 0:7.4.28-1.el7.remi will be installed
–> Running transaction check
—> Package fontconfig.x86_64 0:2.13.0-4.3.el7 will be installed
–> Processing Dependency: fontpackages-filesystem for package: fontconfig-2.13.0-4.3.el7.x86_64
–> Processing Dependency: dejavu-sans-fonts for package: fontconfig-2.13.0-4.3.el7.x86_64
—> Package libX11.x86_64 0:1.6.7-4.el7_9 will be installed
–> Processing Dependency: libX11-common >= 1.6.7-4.el7_9 for package: libX11-1.6.7-4.el7_9.x86_64
–> Processing Dependency: libxcb.so.1()(64bit) for package: libX11-1.6.7-4.el7_9.x86_64
—> Package libXpm.x86_64 0:3.5.12-1.el7 will be installed
—> Package libjpeg-turbo.x86_64 0:1.2.90-8.el7 will be installed
—> Package libraqm.x86_64 0:0.7.0-4.el7 will be installed
–> Processing Dependency: libfribidi.so.0()(64bit) for package: libraqm-0.7.0-4.el7.x86_64
–> Processing Dependency: libharfbuzz.so.0()(64bit) for package: libraqm-0.7.0-4.el7.x86_64
—> Package libtiff.x86_64 0:4.0.3-35.el7 will be installed
–> Processing Dependency: libjbig.so.2.0()(64bit) for package: libtiff-4.0.3-35.el7.x86_64
—> Package libwebp7.x86_64 0:1.0.3-1.el7.remi will be installed
–> Running transaction check
—> Package dejavu-sans-fonts.noarch 0:2.33-6.el7 will be installed
–> Processing Dependency: dejavu-fonts-common = 2.33-6.el7 for package: dejavu-sans-fonts-2.33-6.el7.noarch
—> Package fontpackages-filesystem.noarch 0:1.44-8.el7 will be installed
—> Package fribidi.x86_64 0:1.0.2-1.el7_7.1 will be installed
—> Package harfbuzz.x86_64 0:1.7.5-2.el7 will be installed
–> Processing Dependency: libgraphite2.so.3()(64bit) for package: harfbuzz-1.7.5-2.el7.x86_64
—> Package jbigkit-libs.x86_64 0:2.0-11.el7 will be installed
—> Package libX11-common.noarch 0:1.6.7-4.el7_9 will be installed
—> Package libxcb.x86_64 0:1.13-1.el7 will be installed
–> Processing Dependency: libXau.so.6()(64bit) for package: libxcb-1.13-1.el7.x86_64
–> Running transaction check
—> Package dejavu-fonts-common.noarch 0:2.33-6.el7 will be installed
—> Package graphite2.x86_64 0:1.3.10-1.el7_3 will be installed
—> Package libXau.x86_64 0:1.0.8-2.1.el7 will be installed
–> Finished Dependency Resolution
Installing:
php-gd x86_64 7.4.28-1.el7.remi remi-php74 89 k
php-mysqlnd x86_64 7.4.28-1.el7.remi remi-php74 255 k
php-opcache x86_64 7.4.28-1.el7.remi remi-php74 332 k
php-pecl-mcrypt x86_64 1.0.4-1.el7.remi.7.4 remi-php74 30 k
Installing for dependencies:
dejavu-fonts-common noarch 2.33-6.el7 base 64 k
dejavu-sans-fonts noarch 2.33-6.el7 base 1.4 M
fontconfig x86_64 2.13.0-4.3.el7 base 254 k
fontpackages-filesystem noarch 1.44-8.el7 base 9.9 k
fribidi x86_64 1.0.2-1.el7_7.1 base 79 k
gd3php x86_64 2.3.3-4.el7.remi remi-safe 138 k
graphite2 x86_64 1.3.10-1.el7_3 base 115 k
harfbuzz x86_64 1.7.5-2.el7 base 267 k
jbigkit-libs x86_64 2.0-11.el7 base 46 k
libX11 x86_64 1.6.7-4.el7_9 updates 607 k
libX11-common noarch 1.6.7-4.el7_9 updates 164 k
libXau x86_64 1.0.8-2.1.el7 base 29 k
libXpm x86_64 3.5.12-1.el7 base 55 k
libjpeg-turbo x86_64 1.2.90-8.el7 base 135 k
libmcrypt x86_64 2.5.8-13.el7 epel 99 k
libraqm x86_64 0.7.0-4.el7 epel 15 k
libtiff x86_64 4.0.3-35.el7 base 172 k
libwebp7 x86_64 1.0.3-1.el7.remi remi-safe 266 k
libxcb x86_64 1.13-1.el7 base 214 k
php-pdo x86_64 7.4.28-1.el7.remi remi-php74 139 k
updates: pkg.adfinis.com
Package httpd-2.4.6-97.el7.centos.5.x86_64 already installed and latest version
Package httpd-tools-2.4.6-97.el7.centos.5.x86_64 already installed and latest version
Nothing to do
[root@nvc ~]
# sudo systemctl enable httpd
Created symlink from /etc/systemd/system/multi-user.target.wants/httpd.service to /usr/lib/systemd/system/httpd.service.
[root@nvc ~]
# sudo systemctl start httpd
[root@nvc ~]
# sudo systemctl status httpd
● httpd.service – The Apache HTTP Server
Loaded: loaded (/usr/lib/systemd/system/httpd.service; enabled; vendor preset: disabled)
Active: active (running) since Sat 2022-04-02 11:58:18 +04; 9s ago
Docs: man:httpd(8)
man:apachectl(8)
Main PID: 55987 (httpd)
Status: “Total requests: 0; Current requests/sec: 0; Current traffic: 0 B/sec”
CGroup: /system.slice/httpd.service
├─55987 /usr/sbin/httpd -DFOREGROUND
├─55988 /usr/sbin/httpd -DFOREGROUND
├─55989 /usr/sbin/httpd -DFOREGROUND
├─55990 /usr/sbin/httpd -DFOREGROUND
├─55991 /usr/sbin/httpd -DFOREGROUND
├─55992 /usr/sbin/httpd -DFOREGROUND
└─55993 /usr/sbin/httpd -DFOREGROUND
Apr 02 11:58:17 nvc systemd[1]: Starting The Apache HTTP Server…
Apr 02 11:58:18 nvc httpd[55987]: AH00558: httpd: Could not reliably determine the server’s fully qualified domain name, using fe80::c154:c121:5c98:c897. …his message
Apr 02 11:58:18 nvc systemd[1]: Started The Apache HTTP Server.
Hint: Some lines were ellipsized, use -l to show in full.
[root@nvc ~]
# setenforce 0
[root@nvc ~]
# cd /var/www/html/
[root@nvc html]
#
[root@nvc html]
# vi info.php
[root@nvc html]
# systemctl restart httpd.service
[root@nvc html]
# sudo systemctl status httpd
● httpd.service – The Apache HTTP Server
Loaded: loaded (/usr/lib/systemd/system/httpd.service; enabled; vendor preset: disabled)
Active: active (running) since Sat 2022-04-02 12:00:32 +04; 1min 1s ago
Docs: man:httpd(8)
man:apachectl(8)
Process: 56012 ExecStop=/bin/kill -WINCH ${MAINPID} (code=exited, status=0/SUCCESS)
Main PID: 56017 (httpd)
Status: “Total requests: 0; Current requests/sec: 0; Current traffic: 0 B/sec”
CGroup: /system.slice/httpd.service
├─56017 /usr/sbin/httpd -DFOREGROUND
├─56018 /usr/sbin/httpd -DFOREGROUND
├─56019 /usr/sbin/httpd -DFOREGROUND
├─56020 /usr/sbin/httpd -DFOREGROUND
├─56021 /usr/sbin/httpd -DFOREGROUND
├─56022 /usr/sbin/httpd -DFOREGROUND
└─56023 /usr/sbin/httpd -DFOREGROUND
Apr 02 12:00:07 nvc systemd[1]: Starting The Apache HTTP Server…
Apr 02 12:00:22 nvc httpd[56017]: AH00558: httpd: Could not reliably determine the server’s fully qualified domain name, using fe80::c154:c121:5c98:c897. …his message
Apr 02 12:00:32 nvc systemd[1]: Started The Apache HTTP Server.
Hint: Some lines were ellipsized, use -l to show in full.
[root@nvc html]
# cd
[root@nvc ~]
# vi /etc/hosts
[root@nvc ~]
# systemctl restart httpd
[root@nvc ~]
# sudo systemctl status httpd
● httpd.service – The Apache HTTP Server
Loaded: loaded (/usr/lib/systemd/system/httpd.service; enabled; vendor preset: disabled)
Active: active (running) since Sat 2022-04-02 12:02:51 +04; 3s ago
Docs: man:httpd(8)
man:apachectl(8)
Process: 56050 ExecStop=/bin/kill -WINCH ${MAINPID} (code=exited, status=0/SUCCESS)
Main PID: 56055 (httpd)
Status: “Processing requests…”
CGroup: /system.slice/httpd.service
├─56055 /usr/sbin/httpd -DFOREGROUND
├─56056 /usr/sbin/httpd -DFOREGROUND
├─56057 /usr/sbin/httpd -DFOREGROUND
├─56058 /usr/sbin/httpd -DFOREGROUND
├─56059 /usr/sbin/httpd -DFOREGROUND
├─56060 /usr/sbin/httpd -DFOREGROUND
└─56061 /usr/sbin/httpd -DFOREGROUND
Apr 02 12:02:51 nvc systemd[1]: Starting The Apache HTTP Server…
Apr 02 12:02:51 nvc systemd[1]: Started The Apache HTTP Server.
[root@nvc ~]
# cd /etc/httpd/conf.d/
[root@nvc conf.d]
# ls
autoindex.conf fcgid.conf manual.conf php.conf README ssl.conf userdir.conf welcome.conf
[root@nvc conf.d]
# cd
[root@nvc ~]
# sudo mysql_secure_installation
sudo: mysql_secure_installation: command not found
Installing:
mariadb x86_64 1:5.5.68-1.el7 base 8.8 M
mariadb-server x86_64 1:5.5.68-1.el7 base 11 M
Installing for dependencies:
perl-Compress-Raw-Bzip2 x86_64 2.061-3.el7 base 32 k
perl-Compress-Raw-Zlib x86_64 1:2.061-4.el7 base 57 k
perl-DBD-MySQL x86_64 4.023-6.el7 base 140 k
perl-DBI x86_64 1.627-4.el7 base 802 k
perl-Data-Dumper x86_64 2.145-3.el7 base 47 k
perl-IO-Compress noarch 2.061-2.el7 base 260 k
perl-Net-Daemon noarch 0.48-5.el7 base 51 k
perl-PlRPC noarch 0.2020-14.el7 base 36 k
# systemctl enable mariadb
Created symlink from /etc/systemd/system/multi-user.target.wants/mariadb.service to /usr/lib/systemd/system/mariadb.service.
[root@nvc ~]
# sudo mysql_secure_installation
NOTE: RUNNING ALL PARTS OF THIS SCRIPT IS RECOMMENDED FOR ALL MariaDB
SERVERS IN PRODUCTION USE! PLEASE READ EACH STEP CAREFULLY!
In order to log into MariaDB to secure it, we’ll need the current
password for the root user. If you’ve just installed MariaDB, and
you haven’t set the root password yet, the password will be blank,
so you should just press enter here.
Enter current password for root (enter for none):
OK, successfully used password, moving on…
Setting the root password ensures that nobody can log into the MariaDB
root user without the proper authorisation.
Set root password? [Y/n] Y
New password:
Re-enter new password:
Password updated successfully!
Reloading privilege tables..
… Success!
By default, a MariaDB installation has an anonymous user, allowing anyone
to log into MariaDB without having to have a user account created for
them. This is intended only for testing, and to make the installation
go a bit smoother. You should remove them before moving into a
production environment.
Remove anonymous users? [Y/n] Y
… Success!
Normally, root should only be allowed to connect from ‘localhost’. This
ensures that someone cannot guess at the root password from the network.
Disallow root login remotely? [Y/n] Y
… Success!
By default, MariaDB comes with a database named ‘test’ that anyone can
access. This is also intended only for testing, and should be removed
before moving into a production environment.
Remove test database and access to it? [Y/n] Y
Dropping test database…
… Success!
Removing privileges on test database…
… Success!
Reloading the privilege tables will ensure that all changes made so far
will take effect immediately.
Reload privilege tables now? [Y/n] Y
… Success!
Cleaning up…
All done! If you’ve completed all of the above steps, your MariaDB
installation should now be secure.
Thanks for using MariaDB!
[root@nvc ~]
# sudo systemctl status mysqld
Unit mysqld.service could not be found.
[root@nvc ~]
# sudo systemctl status mariadb.service
● mariadb.service – MariaDB database server
Loaded: loaded (/usr/lib/systemd/system/mariadb.service; enabled; vendor preset: disabled)
Active: active (running) since Sat 2022-04-02 12:07:44 +04; 2min 15s ago
Main PID: 56398 (mysqld_safe)
CGroup: /system.slice/mariadb.service
├─56398 /bin/sh /usr/bin/mysqld_safe –basedir=/usr
└─56563 /usr/libexec/mysqld –basedir=/usr –datadir=/var/lib/mysql –plugin-dir=/usr/lib64/mysql/plugin –log-error=/var/log/mariadb/mariadb.log –pid-fi…
Apr 02 12:07:42 nvc mariadb-prepare-db-dir[56315]: MySQL manual for more instructions.
Apr 02 12:07:42 nvc mariadb-prepare-db-dir[56315]: Please report any problems at http://mariadb.org/jira
Apr 02 12:07:42 nvc mariadb-prepare-db-dir[56315]: The latest information about MariaDB is available at http://mariadb.org/.
Apr 02 12:07:42 nvc mariadb-prepare-db-dir[56315]: You can find additional information about the MySQL part at:
Apr 02 12:07:42 nvc mariadb-prepare-db-dir[56315]: http://dev.mysql.com
Apr 02 12:07:42 nvc mariadb-prepare-db-dir[56315]: Consider joining MariaDB’s strong and vibrant community:
Apr 02 12:07:42 nvc mariadb-prepare-db-dir[56315]: https://mariadb.org/get-involved/
Apr 02 12:07:42 nvc mysqld_safe[56398]: 220402 12:07:42 mysqld_safe Logging to ‘/var/log/mariadb/mariadb.log’.
Apr 02 12:07:42 nvc mysqld_safe[56398]: 220402 12:07:42 mysqld_safe Starting mysqld daemon with databases from /var/lib/mysql
Apr 02 12:07:44 nvc systemd[1]: Started MariaDB database server.
updates: pkg.adfinis.com
Package wget-1.14-18.el7_6.1.x86_64 already installed and latest version
Nothing to do
[root@nvc ~]
# cd /opt/
[root@nvc opt]
# ls
rh
[root@nvc opt]
# wget https://files.phpmyadmin.net/phpMyAdmin/5.0.2/phpMyAdmin-5.0.2-all-languages.zip
–2022-04-02 12:11:48– https://files.phpmyadmin.net/phpMyAdmin/5.0.2/phpMyAdmin-5.0.2-all-languages.zip
Resolving files.phpmyadmin.net (files.phpmyadmin.net)… 138.199.14.3, 2a02:6ea0:dc00::12
Connecting to files.phpmyadmin.net (files.phpmyadmin.net)|138.199.14.3|:443… connected.
HTTP request sent, awaiting response… 200 OK
Length: 14199213 (14M) [application/zip]
Saving to: ‘phpMyAdmin-5.0.2-all-languages.zip’
100%[==============================================================================================================================>] 14,199,213 6.67MB/s in 2.0s
MariaDB [Query_Panel]> INSERT INTO q_emp_details (queryp_id,Q_NAME,Q_ADDRESS,Joining_date,Shift,F_NAME,P_ADDRESS,Status) VALUES (“001″,”QUERYPANEL”,”DELHI”,”12-14-1991″,”NIGHT”,”S”,”PAN”,”SINGLE”);
MariaDB [Query_Panel]> INSERT INTO q_emp_details VALUES (“002″,”QUERY PANEL”,”DELHI India”,”1-14-1991″,”Day”,”S”,”PANjab”,”Married”);
INSERT QUERY
MULTIPLE INSERT IN SINGLE QUERY
MariaDB [Query_Panel]> INSERT INTO q_emp_details VALUES (“003″,”PANEL”,”India”,”1-14-1997″,”Day”,”Sha”,”der”,”Single”),(“004″,”ANEL”,”LHI Indi”,”1-14-1891″,”Both”,”SD”,”PAN”,”Married”),(“005″,”NEL”,”DELHI Ind”,”1-14-1791″,”Day”,”SP”,”PANjab”,”SINGLE”),(“0022″,”QJJUERY OOPANEL”,”U U DELHI India”,”5-14-1997″,”Day”,”S”,”jab”,”Married”),(“006″,”Y PANEL”,”DEL In”,”1-5-1991″,”Day”,”SO”,”Njab”,”Married”),(“0082″,”NELP”,”PDELHI India”,”1-14-1891″,”NIGHT”,”SH”,”ab”,”Married”);
SELECT QUERY USING ASC / DESC
MariaDB [Query_Panel]> SELECT Q_NAME FROM q_emp_details ORDER BY Q_NAME ASC;
MariaDB [Query_Panel]> SELECT * FROM q_emp_details ORDER BY queryp_id DESC; MariaDB [Query_Panel]> SELECT queryp_id FROM q_emp_details ORDER BY Q_NAME DESC;
UPDATE QUERY / AND /OR
MariaDB [Query_Panel]> UPDATE q_emp_details SET queryp_id=”21″ WHERE Q_NAME=”NELP”;
MariaDB [Query_Panel]> UPDATE q_emp_details SET Q_ADDRESS=”LAX DEL” AND Joining_date=”12-6-2019″ WHERE queryp_id=”22″;
CHANGE COLUMN NAME
MariaDB [query_panel]> ALTER TABLE q_emp_details CHANGE COLUMN Shift SHIFT_TIMING VARCHAR(50);
<?php
require_once("../inc/config.php");// .. used for this folder is in root directory
include_once("all_function.php"); // here insert functions running
class InsertData {
private $id; private $db; function __construct() { $this->db = new Database(); $this->fun = new AllFunction(); }
public function insertTestUs(){
if(isset($_POST['atitle'])){
$atitle = $_POST['atitle'];
}else{
$atitle = "";
}
if(isset($_POST['aheading'])){
$aheading = $_POST['aheading'];
}else{ $aheading = ""; }
if(isset($_POST['id'])){
$about_id = $_POST['id'];
}
if(isset($about_id) && $about_id > 0){
if($atitle != "" && $aheading != ""){
//update query
$query = "UPDATE querypanel_about_us SET atitle='$atitle', aheading='$aheading' WHERE about_id ='$about_id'";
$this->db->execute($query);
echo 0;
}else{
echo 1;
}
}else{
if($atitle != "" && $aheading != ""){
// insert query
$query = "INSERT INTO querypanel_about_us(atitle, aheading) VALUES('$atitle','$aheading')";
$this->db->execute($query);
echo 0;
}else{ echo 1; } } }
}
?>
Here i also mention the all function what i have used to included
<?php
class AllFunction
{
private $data; public function escape($data){ $this->data = $data;
// mysqli_real_escape_string() function escapes special characters in a string
//rtrim - remove character from right side of string
$value = mysqli_real_escape_string(rtrim($data)); return $value; }
}
?>
Fetch_values.php i have create a fetching value page so here i have to include config.php for connection page must be in that folder so we can fetch data from database.
Suppose if we stored config.php file so we need to add config page for receiving data
require(“include/ config.php “); also can use require_once(“include/ config.php “);
(Difference between Include ,Include_once & require ,require_once)
include – include or include_once produce E- Warning and scripts will continue ,
require or require_once – Produce a fatal error E – Compile Error and stop the scripts
<?php
 require_once('include/config.php');
 class FetchValues
 {

private $id;
private $db;
private $setLimit;
private $pageLimit;
private $banner_id;

 function __construct() {

 $this->db = new Database(); }

public function getAboutUsById($id)
 {
 $this->id = $id;
$query = "SELECT * FROM testabout WHERE about_id = '$id' AND status=0 LIMIT 1";
 $exe_query = $this->db->execute($query);
$result = $this->db->getResult($exe_query);
 return $result;
}

public function getAboutUsData()
 {
 $query = "SELECT * FROM testabout";
$exe_query = $this->db->execute($query);
 $results = $this->db->getResults($exe_query);
 return $results;
}

public function getWhatsIncludes()
 {
$query = "SELECT * FROM includes WHERE status=0 ORDER BY include_id DESC";     $exe_query = $this->db->execute($query);
 $results = $this->db->getResults($exe_query);
 return $results;
  }
 }
 ?>
Object oriented programming language is the concept of oops programming language.
CLASS : – Class is a group of Values with a set of Operations we can also say class is a blue-print(Architecture) object . Class can be used to seprate the data from relative data . we can think of a class as a template for making many instances of the same kind of object . ( instances – Objects are also known as instance(background process also know as instance )
Example Class -: a programmer can create a car class which describe a car. This class can contain the properties of a car (color, model, year, etc.)
<?php
 class FetchDataTest {
     private $db;
     private $id;
 function __construct()
 db = new Database();(Object)     }
 public function FunctionnameTest(){
 $test = $this->db->execute("SELECT * from testabc(tablename)");
 $results = $this->db->getResults($test);
return $results;
  }
}
?>
Object: – Object is a Class types variable it is the components of oops , the new operator used to create an Object.
Example : $object = new database(); $this -> db = new Database();
Inheritance : Drive a new class from an old class called as Inheritance ,we can create a new class with the help of old class known as Inheritance (Extends keywords used to inherit the class) , Inheritance specially used for reduce the number of code.
 Example : - son can used Father Properties so same as in Inheritance .
 SYNTAX
 Class Father {
         member of class father
 }
 Class son extends Father{
 member of class son
 }
Polymorphism : One things has many Form knows as Polymrphism ,(many types , many form)
Example : - Just make a call to toll free number , During the call they give us a suggestion English for click 1 , Hindi for click 2 and so on
Overloading :- Two or more function having same but the argument will be different
Example : real time Example assign some extra tasks to someone known as Overloading , same name but differ in the type of input parameter .
functions that have similar signatures .   only overload methods using the magic method __call.
Class Test {
public FunctionTestA1(hi){
     echo "hi";
 }
}
 Class TestB1 {
public FunctionTestA1(Hello){
     echo "Hello";
 }
}
Overriding : – Overriding is to replace parent method in child class ,Two method with same name and same parameter known as Overriding.
public class Forestanimal { public function readytoSpeak() {echo "Cat Speaking"; } // This is overloading the method readytoSpeak . public function readytoSpeak($sound) {echo $sound; } }
Abstraction : Require things will be Display Other used to hide .
Example: we have a Complete Employees Database Table , Name ,Address ,Department ,and so on .i just only need to fetch employees name and department.
Sql> SELECT name, department FROM Employees. so here we have get only require things other things we don't need .
Constructor : constructor is the member function of class that automatically called when an object created to other class.
Example : __construct ( ) : –
suppose page1.php
class FetchData { private $db; private $id; function __construct() { $this->db = new Database(); } Page2.php
CREATE TABLE IF NOT EXITS QueryPanel_Employee (Emp_ID INT NOT NULL PRIMARY KEY AUTO_INCREMENT, FIRST_NAME CHAR(25),LAST_NAME CHAR(25),SALARY INT(20),JOINING_DATE DATETIME,
SELECT substring(FIRST_NAME,1,3) FROM worker; SELECT SUBSTRING(LAST_NAME,1,2) FROM worker; SELECT SUBSTRING(LAST_NAME,1,4) FROM worker; SELECT SUBSTRING(LAST_NAME,2,5) FROM worker;
(INSTR) SELECT INSTR(FIRST_NAME,BINARY’A’) FROM worker WHERE FIRST_NAME = ‘amitabh’;
(SELECT QUERY FETCH ALL DATA)
SELECT * FROM north_busess_driver_details;
(WHERE CLAUSE) SELECT * FROM north_busess_driver_details WHERE Driver_id =’1′;
SELECT * FROM north_busess_driver_details WHERE D_NAME=’ABC’;
(IT WILL FETCH THE DETAILS WHAT WE HAVE MENTION IN QUERY)
SELECT Driver_id,D_NAME,PHONE_NUMBER FROM north_busess_driver_details WHERE Shift=’Morning’;
(AND OPERATOR IN SELECCT QUERY)
SELECT * FROM north_busess_driver_details WHERE D_NAME=’OL’ AND PHONE_NUMBER=’099′;
(OR OPERATOR IN SELECT QUERY)
SELECT * FROM north_busess_driver_details WHERE Driver_id=”011″ OR ADDRESS=”DEL”;
SELECT F_NAME,PHONE_NUMBER FROM north_busess_driver_details WHERE ADDRESS=”DEL” AND D_NAME=”OP”;
SELECT F_NAME,PHONE_NUMBER FROM north_busess_driver_details WHERE ADDRESS=”DEL” OR D_NAME=”OP”;
(DISTINCT)
SELECT DISTINCT D_NAME FROM north_busess_driver_details;
(DISTINCT COUNT)
SELECT COUNT(DISTINCT Driver_id) FROM north_busess_driver_details;
(NOT)
SELECT * FROM north_busess_driver_details WHERE NOT ADDRESS=’DEL’;
SELECT * FROM north_busess_driver_details WHERE NOT ADDRESS=’DEL’ AND NOT ADDRESS=’BIH’;
(ORDER BY ASC / DESC)
SELECT * FROM north_busess_driver_details ORDER BY Driver_id ASC;
SELECT * FROM north_busess_driver_details ORDER BY Driver_id DESC;
SELECT * FROM north_busess_driver_details ORDER BY D_NAME DESC;
(ASC/DESC WHERE CLAUSE)
SELECT * FROM north_busess_driver_details WHERE Driver_id=”11″ ORDER BY D_NAME ASC;
(UPDATE COLUMN) UPDATE north_busess_driver_details SET D_NAME=’BA’ WHERE Driver_id=’11’; (UPDATE overall Table) UPDATE north_busess_driver_details SET D_NAME=’BA’; UPDATE north_busess_driver_details SET D_NAME=’AA’ AND ADDRESS=’DEL’ WHERE Driver_id=’002′;
DELETE FROM north_busess_driver_details WHERE Driver_id=’501′;
DELETE FROM north_busess_driver_details;
(LIMIT)
SELECT * FROM north_busess_driver_details LIMIT 25;
(LIMIT PERTICULAR) SELECT Driver_id FROM north_busess_driver_details LIMIT 30;
SELECT * FROM north_busess_driver_details WHERE Driver_id=’11’ AND D_NAME=’D’ ORDER BY Shift LIMIT 1;
SELECT * FROM north_busess_driver_details WHERE Driver_id=’11’ OR D_NAME=’D’ ORDER BY Shift LIMIT 1;
(COUNT)
SELECT COUNT(Driver_id) FROM north_busess_driver_details;
SELECT COUNT(D_NAME) FROM north_busess_driver_details;
(AVG)
SELECT AVG(D_NAME) FROM north_busess_driver_details;
(SUM)
SELECT SUM(STATUS) FROM north_busess_driver_details;
(LIKE)
SELECT * FROM employee WHERE last_name LIKE ‘%a’
SELECT * FROM employee WHERE last_name LIKE ‘%S’
SELECT * FROM employee WHERE last_name LIKE ‘S%’
SELECT * FROM employee WHERE last_name LIKE ‘W%S’
SELECT * FROM employee WHERE first_name LIKE ‘%’
SELECT * FROM employee WHERE job_title LIKE ‘S%S’;
Before starting
RAC installation we need to create two nodes or we can create clone
After clone or installation completed
Go to
this directory
[root@six ~]# cd
/etc/udev/rules.d
Copy it
somewhere now I have copied it in root directory
[root@six ~]# cp
70-persistent-net.rules /root/
[root@six ~]# rm 70-persistent-net.rules
[root@six ~]# reboot
We need
to change the MAC address only if you created machine via clone otherwise no need
to change MAC address here I have used clone so need to change MAC address
In Network
Adapter we have to change MAC address
Just here
I have added in MAC any sequence we can assign
Adapter 1
Adapter 2: here we have last number with C
Adapter
3:
Here we
have replace with last number 3
After this
we need to open clone machine
Step 2:
Need to
change hostname into the /etc/hosts directory
We can
edit
[root@six
~]# vi /etc/hosts
Just for moment we need to change the hosts name
After changing
the hostname we can check the hostname
[root@six ~]# hostname
First edit in /etc/hosts file with new hostname
and test ping.
Second: go to /etc/sysconfig/network/ file and
change host parameter.
And reboot it.
Once rebooted please check network is coming by
pinging hostname.
[root@six ~]# ping six
After it
we need to fixed static IP in both nodes (machines)
Go to
network Connection tab we will edit network connection and set here static IP
address
Node : Six Static IP Configuration
In IPv4 Setting go to with manual setting add here
static ip address
eth0 : 10.0.2.14 & 255.255.255.254
Here we can see we
have mention here
eth1 194.168.4.227 & Netmask 255.255.255.254
Node :
Five Static IP Configuration
eth0 : 10.0.2.15 & Netmask 255.255.255.254 static IP created
eth01 : 194.168.4.228 & Netmask 255.255.255.254
Overall add static ip
after that need to reboot your system
After that need to edit in /etc/hosts file
Here we need to add
static ip in both node(machine)
We did mention here
priv : private ip
Vip : virtual ip
before configure hosts we also need to configure network file we need to change it in both network according to network Static ip
If you have not used the “oracle-rdbms-server-11gR2-preinstall” package to perform all prerequisites, you will need to manually perform the following setup tasks.
2 . Physical Backup : physical files like datafiles, control
files, RedoLog Files, Archivelog files
RMAN
HOT/ONLINE – WHEN DATABASE IS RUNNING (DATABASE IS OPEN)
COLD/OFFLINE – WHEN DATABSE IS CLOSED
Logical Level Backup EXPDP/IMPDP
Oracle Import / Oracle Export Table Level Backup
Data Pump Export – learn step by step how to unload data (and meta-data) from the database.
The dump file set contains table data, database object metadata, and control information that are written in an Oracle-proprietary, binary format.
The Data Pump Export works on the server only, therefore, it typically deals with directory object that maps to physical directories on the database server. The Export Data Pump tool does not write to the local file system on your client computer.
Notice that Oracle introduced the Data Pump Export utility starting in Oracle 10g. The Data pump Export is a replacement of the old Export utility. According to Oracle, the new Data Pump Export can be up to 40 times faster.
You invoke the Data Pump Export program using the expdp command. The behaviors of the program are determined by the parameters specified either on the command line or in a parameter file.
Oracle Data Pump Import
The Data Pump Import program is a tool that allows you to load an export dump file set into a target Oracle database system. The Data Pump Import utility comes with the Oracle Installation by default.
The dump file set consists of one or more disk files that store table data, database object metadata, and control information. The dump file set is created by running the Data Pump Export .
Note that the Data Pump Import is a replacement of the legacy Import tool called imp starting from Oracle 10g. Oracle recommends the Data Pump Import tool because it is more flexible and can be 15 times faster than the legacy tool in terms of performance.
Steps:
Now I am going to
create a new user in queryp database
SQL> create user q07 identified by q07;
User created
Now here we have
given the permission to user
SQL> grant connect, resource to q07;
Show user currently
admin SYS
SYS Oracle user is
the master of admin.
SQL> show user
Here connected with
new created user
SQL> conn q07/q07;
So before inserting
data in table we need to create table
SQL> create table
q07_insert_1 (q07_id INT NOT NULL PRIMARY KEY, QUERYPANEL_NAME VARCHAR(20));
As I implemented now I
am going to create another one table
SQL> create table q07_insert_2 (q07_insert_2_id INT NOT NULL PRIMARY KEY, QUERYPANEL_NAME_insert_2 varchar(20));
Inserting data in
both table
Need to perform the
insert query
SQL> insert into
q07_insert_1 values (‘031′,’querypanel insert 1’);
SQL> insert into
q07_insert_2 values (‘022′,’querypanel insert 2’);
So here inserted data in two new created table.
Whenever we will used to insert data must have to perform commit operation for saving the data
After the insertion
we need to create a backup directory
A tablespace is a storage location where the actual data underlying database objects can be kept. It provides a layer of abstraction between physical and logical data, and serves to allocate storage for all DBMS managed segments.
A tablespace is a logical group of data files in a database. A database typically contains at least one tablespace, and usually two or more. Within the database, the tablespace plays a role similar to that of a folder on the hard drive of a computer.
Datafile : Describe all database files , Datafiles are physical files stored on your disk created by Oracle database and has .dbf extension.
CREATE DBA DATA FILES TABLESPACE
We have to find the file location in DBA DATA FILES
Now here describing dba data files
SQL> desc dba_data_files;
We can use one of them
SQL> describe dba_data_files;
Here Selection Specific columns
DBA DATA FILES Selecting the FILE_NAME
SQL> SELECT FILE_NAME FROM dba_data_files;
TABLESPACENAME describe including with Created files name users
If we will create new TABLESPACENAME it will also reflect in File Name.
SQL> SELECT FILE_NAME, TABLESPACE_NAME FROM dba_data_files;
Now I am going to change the Bytes into MB
Now you can see here I have converted BYTES in MB.
SQL> select FILE_NAME,TABLESPACE_NAME,BYTES/1024 as size_in_mb from dba_data_files;
Now converting BYTES size in GB
SQL> select FILE_NAME,TABLESPACE_NAME,BYTES/1024/1024/1024 as size_in_gb from dba_data_files;
Now started to create tablespace
We need to know in which directory tablespace file used to create
So here
SQL> Select FILE_NAME from dba_data_files;
So We found the tablespace directory .
Whenever we are creating tablespace we used to create tablespace in oracle default directory including with path in string format.
SQL> select
USERNAME,ACCOUNT_STATUS from dba_users;
Here you can see query1 user account is locked
Now need to unlock
user account
SQL> alter user query1 account unlock;
Now here user is
unblock
SQL> select USERNAME,ACCOUNT_STATUS from dba_users;
User password Expire
We could not login
via old password
SQL> alter user query1 password expire;
Whenever we will used
to expire password need to set a new password during the user login
User session
Note: When it is in read/write mode, the status will simply say “ONLINE”
Rename Tablespace
SQL> alter tablespace Q05 OFFLINE normal;
SQL> alter tablespace Q05 RENAME TO QP05;
Assign Tablespace while creation of new users
here i have mention specific tablespace to user
SQL> create user q3 identified by q3 default tablespace sept_q3;
we can check here default tablespace to user
Q3 User default tablespace is sept_q3 because i used to mention this particular user carry this tablespace
we can also tablespace while we create table
easy to assign tablespace also like this
SQL> create table q3_insert_1(q_id INT NOT NULL PRIMARY KEY,NAME VARCHAR(20)) tablespace sept_q3;
A temporary tablespace, as its name implied, stores the temporary data that only exists during the database session.
Oracle uses temporary tablespaces to improve the concurrency of multiple sort operations which do not fit in memory. On top of this, Oracle stores temporary tables, temporary indexes, temporary B-trees, and temporary LOBs in temporary tablespaces.
By defeault, Oracle creates a single temporary tablespace named TEMP for each new Oracle Database installation. This TEMP tablespace can be shared by multiple users.
Now here we are going to create temporary tablespace
SQL*Plus is an interactive and batch query tool that is installed with every Oracle Database Server or Client installation. It has a command-line user interface
SQL*Plus has its own commands and environment, and it provides access to the Oracle Database.
First Step to start sqlplus in oracle database
Need to login with root directory
[root@3sept ~]# vi /etc/hosts
Edit host parameter and insert into host configuration
file
For installing Oracle 11gR2 Enterprise Edition on Linux 6 (RHEL 6, CentOS 6, OEL 6), first, you have to download the Oracle database software from the Oracle Database Software Downloads. The database software is Operating System (OS) specific and OS architecture (32-bit or 64-bit) specific. In my case I will use a 64-bit Linux Operating System, so I will download the following files: linux.x64_11gR2_database_1of2.zip and linux.x64_11gR2_database_2of2.zip files. Download and unzip them into a stage directory.
In this Steps, you will learn how to install Oracle 11g on your Linux 64-bit PC. This article will guide you through the installation steps especially when you are a fresher.
It will take some times we have to wait until
pre-installer completed.
Types y to yes to next step
After completed
We will used to create a new password
cmd> passwd oracle
We need to install rpm packages
If you have not used the “oracle-rdbms-server-11gR2-preinstall” package to perform all prerequisites, you will need to manually perform the following setup tasks.