
Oracle 12c Release 2 Installing Instructions and steps
Need to disable the Firewall Operating System Linux or Ubuntu
First disable the firewall
(System > Administration > Firewall).
Edit the hosts file
[root@qp01 ~]# Vi /etc/hosts
Change the hostname according your hostname
127.0.0.1 localhost localhost.localdomain localhost4 localhost4.localdomain4 qp01
::1 localhost localhost.localdomain localhost6 localhost6.localdoman6
qp01 is my hostname
Check the config file and
[root@qp01 ~]# vi /etc/selinux/config
SELINUX=permissive
Once the change is complete, restart the server
After that need to install the preinstall repository
[root@qp01 ~]# yum install oracle-database-server-12cR2-preinstall –y
once it will be completed we will move to yum updating repository
[root@qp01 ~]# yum update –y ( -y used for yes without ask any physical permission )
After that need to install RPM mandatory Packages according to the release versions
[root@qp01 ~]# yum install binutils -y
yum install compat-libcap1 -y
yum install compat-libstdc++-33 -y
yum install compat-libstdc++-33.i686 -y
yum install glibc -y
yum install glibc.i686 -y
yum install glibc-devel -y
yum install glibc-devel.i686 -y
yum install ksh -y
yum install libaio -y
yum install libaio.i686 -y
yum install libaio-devel -y
yum install libaio-devel.i686 -y
yum install libX11 -y
yum install libX11.i686 -y
yum install libXau -y
yum install libXau.i686 -y
yum install libXi -y
yum install libXi.i686 -y
yum install libXtst -y
yum install libXtst.i686 -y
yum install libgcc -y
yum install libgcc.i686 -y
yum install libstdc++ -y
yum install libstdc++.i686 -y
yum install libstdc++-devel -y
yum install libstdc++-devel.i686 -y
yum install libxcb -y
yum install libxcb.i686 -y
yum install make -y
yum install nfs-utils -y
yum install net-tools -y
yum install smartmontools -y
yum install sysstat -y
yum install unixODBC -y
yum install unixODBC-devel -y
Once RPM Packages completed
Need to create the oracle user
[root@qp01 ~]# Passwd oracle
Conform the password
After that
Make the directory
[root@qp01 ~]# mkdir -p /u01/app/oracle/product/12.2.0.1/db_1
[root@qp01 ~]# chown -R oracle:oinstall /u01
[root@qp01 ~]# chmod -R 775 /u01
and upload the database with the help of any software now I m uploading via winScp in oracle directory
Once database is uploaded we need to assign the access permission
File uploaded linuxx64_12201_database.zip
[oracle@qp01 ~]$ Chmod 775 linuxx64_12201_database.zip
Check the directory and unzip it
[oracle@qp01 ~]$ unzip the linuxx64_12201_database.zip
After unzip we will get database folder
Go to database directory and run the runInstaller
[oracle@qp01 ~]$ ./runInstaller
If we will face any error X11 or Localhost10 or 11 error we need to export display in root directory
Same as it is as per your username root directory
root@qp01 ~]# export DISPLAY=:0
./runInstaller

Here I have selected create and configure database

Server class

Single database instance
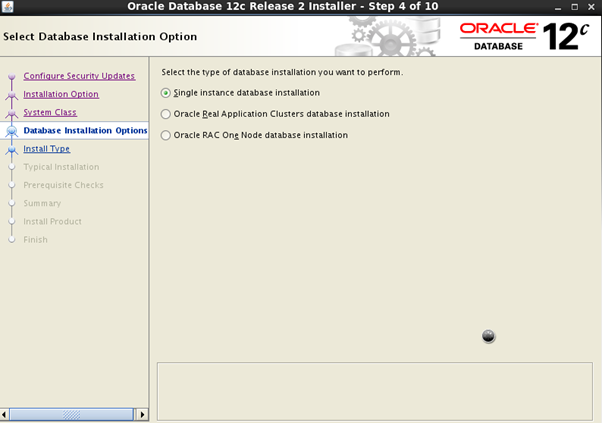
Advanced install ( in advance we will get extra features )

Enterprise Edition

We have already assign the directory so we will follow the assigned directory


We will select oninstall

General Purpose

We have to assign the global database name and pluggable database name different

I have just check the box to enable Automatic memory management
So it will manage according to memory management

Here File System Structure

So here I don’t register it

Unclick the auto recovery
Select the Database Group

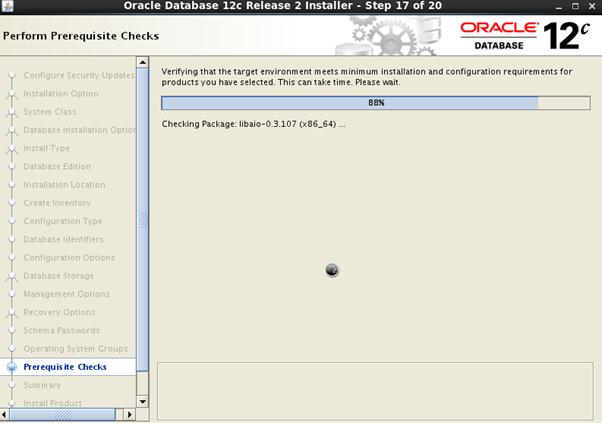
After that it will check the packages
If we need to save the response file we can just save it

It will take the time to finalize the database configuration

cd /u01/app/oraInventory

just run the ./orainstRoot.sh


We need to execute the both file in same directory
[root@qp01 ~]# cd /u01/app/oracle/product/12.2.0/db_1
./root.sh


Now database successfully installed

After the complete database installation we can check the database
[oracle@qp01 ~]$ cat /etc/oratab
We have created the database (name querypanel01)

Need to select the database
. oraenv

And start the sqlplus
Sqlplus / as sysdba

I dugg some of you post as I cogitated they were handy extremely helpful