
Youtube: https://www.youtube.com/@csbabaa
Microsoft Windows Server : DHCP/DNS Server Installation & Configuration
First, let’s install DHCP role on the serer. From Server Manager, Add Roles and Features and then click Next button on the next screen


I have assign the DC-CLOUD Name


I Have already selected DHCP and DNS

on the select features screen, just click next because we have no extra features to install at the moment

on the DHCP Server screen, click next to proceed

on the Confirm installation selections, click Install

wait until installation successful and click close button


Now you will need to provide an account that has required permission in AD to authorize DHCP servers. You can use logged in account (in my case domain admin) or provide alternate account that has required permissions. I would advise against skipping AD authorization as you can’t manage your DHCP servers until they are authorized in AD


That’s it. Let it complete required steps and complete the wizard

Next, open Server Manager and click Tools, you will see DHCP stated in the list, click the DHCP to open the console

Once your DHCP console open, verify your server name, in my case is DC-CLOUD.Shariq.local, double click IPv4, and you will notice there is no scope available. No scope mean no IP address will distribute to our clients

Next, you need to create the scope so that later our Windows 10 client will get IP from this server. What you need to do, just right click IPv4, Click New Scope

Click next

On the Scope Name, enter any name you prefer just to help you identify the scope information. For this demo, I use Branch Office as my scope name then click next

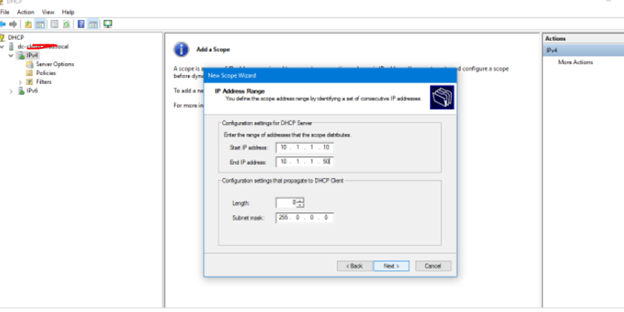
On the IP Address Range screen, this is where you need to enter the range of IP for your clients, the IP you enter will distribute to client later.. for this demo I’m using 10.1.1.10 to 10.1.1.50 for my start IP until 10.1.1.50 for my last IP
next, on the Lease Duration, I set 7 day, this is where you specify how long your clients can use an IP address from this scope
after ip will be renew

Next, On the Configure DHCP Options screen, click “Yes, I want to configure these options now

On the Router (Default Gateway) screen, you need to let the DHCP Server know what’s your Default Gateway IP

Next on the Domain Name and DNS Servers screen, verify that Parent Domain automatically detect my domain name which is querypanel.local and the IP itself.

On the WINS Servers, just click next because I do not have any WINS Server running in my Infra

Next, on the Activate Scope screen, Verify that you choose Yes, I want to activate this scope now and click next.. then on the next screen, click
Finish


On the DHCP Console, you will see your new scope now running and ready to distribute IP to clients
open command prompt, and type ipconfig /all to verify that your machine is getting ip from DHCP Server that you just created

I enjoy your writing style truly enjoying this internet site.