
Database Backup:
- Logical Backup
- Physical Backup
1 . Logical Backup : Tables
- Import ( impdp)
- Export ( expdp)
2 . Physical Backup : physical files like datafiles, control files, RedoLog Files, Archivelog files
- RMAN
HOT/ONLINE – WHEN DATABASE IS RUNNING (DATABASE IS OPEN)
COLD/OFFLINE – WHEN DATABSE IS CLOSED
Logical Level Backup EXPDP/IMPDP
Oracle Import / Oracle Export Table Level Backup
Data Pump Export – learn step by step how to unload data (and meta-data) from the database.
The dump file set contains table data, database object metadata, and control information that are written in an Oracle-proprietary, binary format.
The Data Pump Export works on the server only, therefore, it typically deals with directory object that maps to physical directories on the database server. The Export Data Pump tool does not write to the local file system on your client computer.
Notice that Oracle introduced the Data Pump Export utility starting in Oracle 10g. The Data pump Export is a replacement of the old Export utility. According to Oracle, the new Data Pump Export can be up to 40 times faster.
You invoke the Data Pump Export program using the expdp command. The behaviors of the program are determined by the parameters specified either on the command line or in a parameter file.
Oracle Data Pump Import
The Data Pump Import program is a tool that allows you to load an export dump file set into a target Oracle database system. The Data Pump Import utility comes with the Oracle Installation by default.
The dump file set consists of one or more disk files that store table data, database object metadata, and control information. The dump file set is created by running the Data Pump Export .
Note that the Data Pump Import is a replacement of the legacy Import tool called imp starting from Oracle 10g. Oracle recommends the Data Pump Import tool because it is more flexible and can be 15 times faster than the legacy tool in terms of performance.
Steps:
Now I am going to create a new user in queryp database
SQL> create user q07 identified by q07;

User created
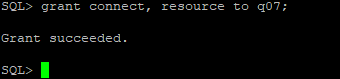
Now here we have given the permission to user
SQL> grant connect, resource to q07;
Show user currently admin SYS
SYS Oracle user is the master of admin.
SQL> show user

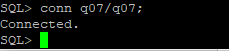
Here connected with new created user
SQL> conn q07/q07;
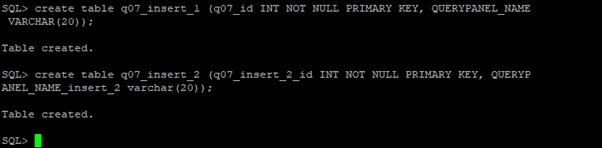
So before inserting data in table we need to create table
SQL> create table q07_insert_1 (q07_id INT NOT NULL PRIMARY KEY, QUERYPANEL_NAME VARCHAR(20));
As I implemented now I am going to create another one table
SQL> create table q07_insert_2 (q07_insert_2_id INT NOT NULL PRIMARY KEY, QUERYPANEL_NAME_insert_2 varchar(20));
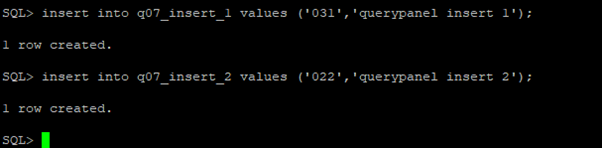
Inserting data in both table
Need to perform the insert query
SQL> insert into q07_insert_1 values (‘031′,’querypanel insert 1’);
SQL> insert into q07_insert_2 values (‘022′,’querypanel insert 2’);
So here inserted data in two new created table.
Whenever we will used to insert data must have to perform commit operation for saving the data

After the insertion we need to create a backup directory
Now we need to exit

So here I have created a backup directory
mkdir used for create directory
[oracle@querypanel app]$ mkdir querypbackup1october


We can see here new directory created
As we now we need to again connect with sqlplus here connected with sqlplus
So we need to create datapump directory in sqlplus and mention the backup directory location which we have created in /u01/aap/ directory
Here we have created directory in sqlplus
SQL> create directory newdatapump as ‘/u01/app/querypbackup1october’;

create directory ndatapump as ‘/u01/app/querypbackup1october’;
After creation of backupdirectory we need to perform following queries
SQL> desc dba_directories;

SQL> select OWNER,DIRECTORY_NAME,DIRECTORY_PATH from dba_directories;

So you can see in directory name and directory path new created path are available.
Table Level Backup
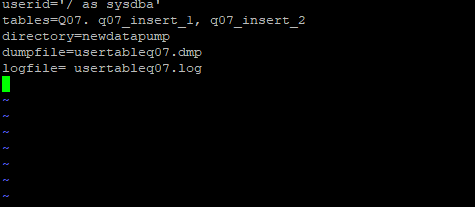
We need to perform vi editor
userid= ‘/ as sysdba’
tables=q08.q08_insert_1,q08.q08_insert_2
directory= newdatapump
dumpfile=usertq08.dmp
logfile=usertq08.log
another example .par
Table Lavel Backup
userid=’/ as sysdba’
tables=q06.a_q06
directory=odatapump
dumpfile=usertq06.dmp
logfile=usertq06.log
here I have inserted par file
vi usertableq07.par
I – used for insert
Esc – used for escape
:wq – used for save file
[oracle@querypanel ~]$ vi usertableq07.par
[oracle@querypanel ~]$ cat usertableq07.par
Cat cmd used for create a new file

Export data using expdp parfile
Expdp parfile = backupfilename
[oracle@querypanel ~]$ expdp parfile=usertableq07.par

Here table level backup has been exported
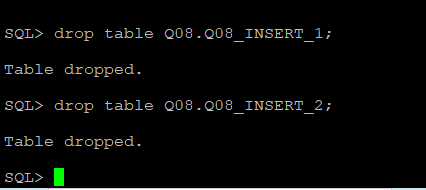
Now here we need to drop table because we already took the backup
SQL> drop table Q08.Q08_INSERT_1;
Import database table level Restore data
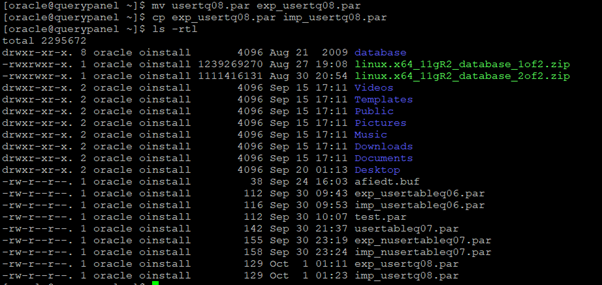
Need to make move directory
(mv) – move or rename
[oracle@querypanel ~]$ mv usertq08.par exp_usertq08.par
(cp) – copy the file1 content to file 2
[oracle@querypanel ~]$ cp exp_usertq08.par imp_usertq08.par
Impdp – used for importing
[oracle@querypanel ~]$ impdp parfile=imp_usertq08.par
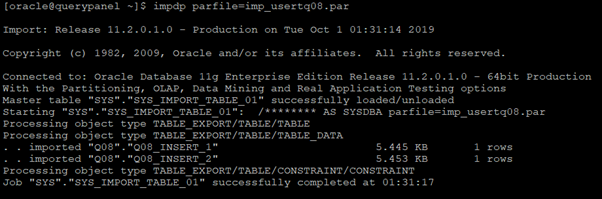
You can see after importing table data
SQL> select * from q08.q08_insert_1;
SQL> select * from q08.q08_insert_2;

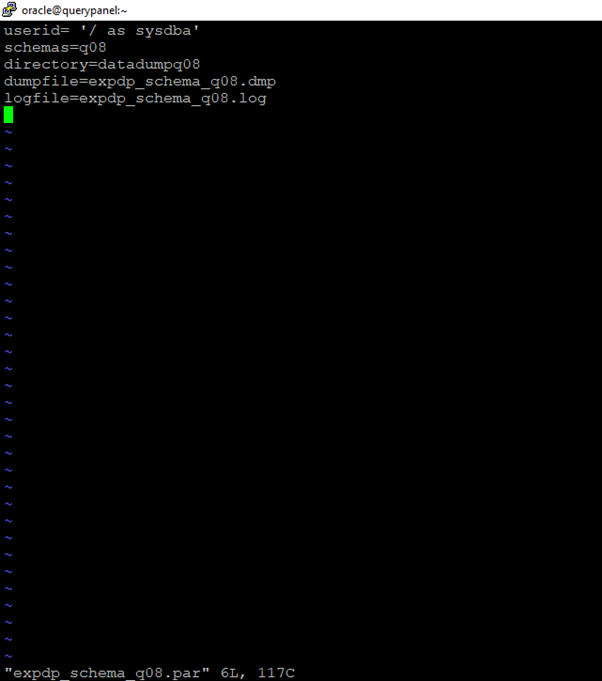
Schema Level Backup
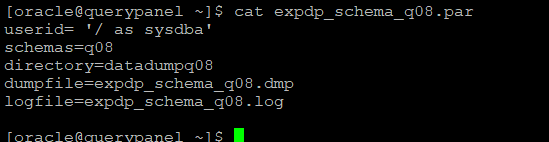
vi expdp_schema_q08.par
userid= ‘/ as sysdba’
schemas=q08
directory=datadumpq08
dumpfile=expdp_schema_q08.dmp
logfile=expdp_schema_q08.log
After edit we need to run cat command
Here we can check updated file
[oracle@querypanel ~]$ vi expdp_schema_q08.par
Now here run the expdp command for schema level backup
Now you can see schema level bacupup is successfully completed
[oracle@querypanel ~]$ expdp parfile=expdp_schema_q08.par

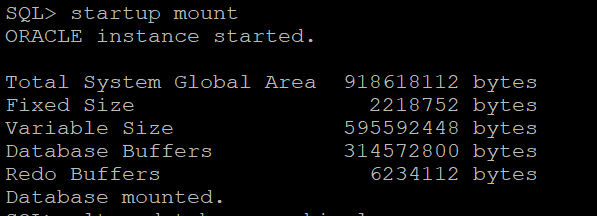
Physical Level Backup RMAN
SQL> startup mount
So now we need to set database in archivelog
We will perform alter command
SQL> alter database archivelog;

Now you can see we used to set database in archivelog
So here need to open database
SQL> alter database open;

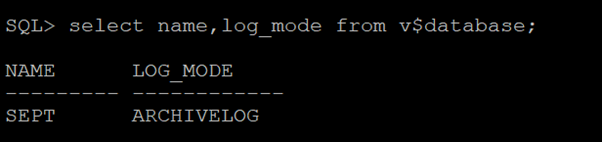
We can check here Archivelog mode
SQL> select name,log_mode from v$database;
HERE:
We need to create an archive backup directory
[oracle@3sept app]$ mkdir arc


Switch into logfile
SQL> alter system switch logfile;

Start the RMAN using : rman target /
[oracle@querypanel ~]$ rman target /

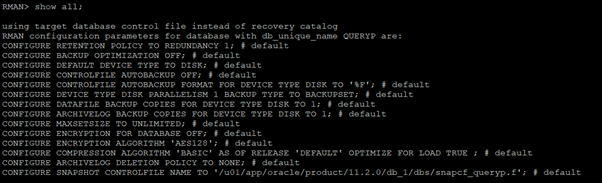
Here RMAN level is now connected
In RMAN : Show all used for recovery
RMAN> show all;
Exit command
RMAN> exit

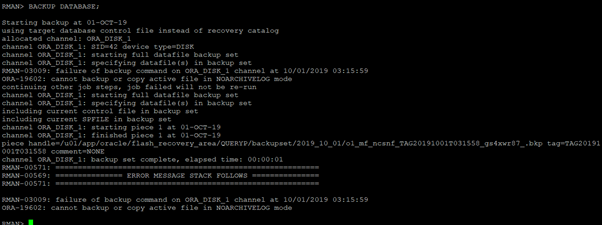
Making Whole Database Backups with RMAN
perform a full database backup
RMAN> BACKUP DATABASE;
After backup completed we can check the backup directory
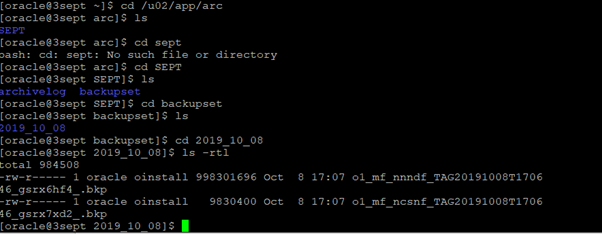
new backup directory created inside the archivelog created directory
hello qp can we directly make backup without archivelog?
yes you can for export expdp and import impdp
Thanks, the post helped a lot.
It is with this article that I begin to read this blog. Plus one subscriber 🙂